
The iPhone 15 Pro is a precision-engineered device, designed with tight tolerances and premium materials. When adding a protective case, the process must be equally precise. A poorly installed case can scratch the finish, misalign buttons, or even compromise structural integrity. More than just snapping on a cover, proper installation ensures full functionality, optimal protection, and long-term durability. This guide walks through each stage of the process with attention to detail that matches Apple’s own standards.
Why Proper Case Installation Matters
A high-quality case enhances drop protection, improves grip, and shields against everyday wear. However, if not installed correctly, it can do more harm than good. Misalignment may block speaker grilles, interfere with wireless charging, or create pressure points that lead to micro-cracks over time. The titanium frame and contoured edges of the iPhone 15 Pro demand cases that fit like a second skin—not forced into place, but guided smoothly onto the device.
“Even minor misalignment during case installation can accelerate wear on camera modules and side buttons.” — David Lin, Senior Mobile Device Technician at iFixHub
Given the phone’s $999 starting price, protecting your investment starts with how you put on its first layer of defense: the case.
Pre-Installation Checklist
Before touching your iPhone, gather everything you need. Rushing this step increases the risk of dust contamination or accidental drops. Use the checklist below to prepare:
- Clean, lint-free microfiber cloth
- Isopropyl alcohol (70%) and cotton swabs (optional for deep cleaning)
- Your iPhone 15 Pro case (ensure it's model-specific)
- A flat, well-lit surface
- Wash and dry hands thoroughly (or wear nitrile gloves)
- Power off the device (recommended for sensitive installations)
Never install a case immediately after handling food, lotions, or other sticky substances. Residue transfers easily to seams and ports, attracting dust and making future removal messy.
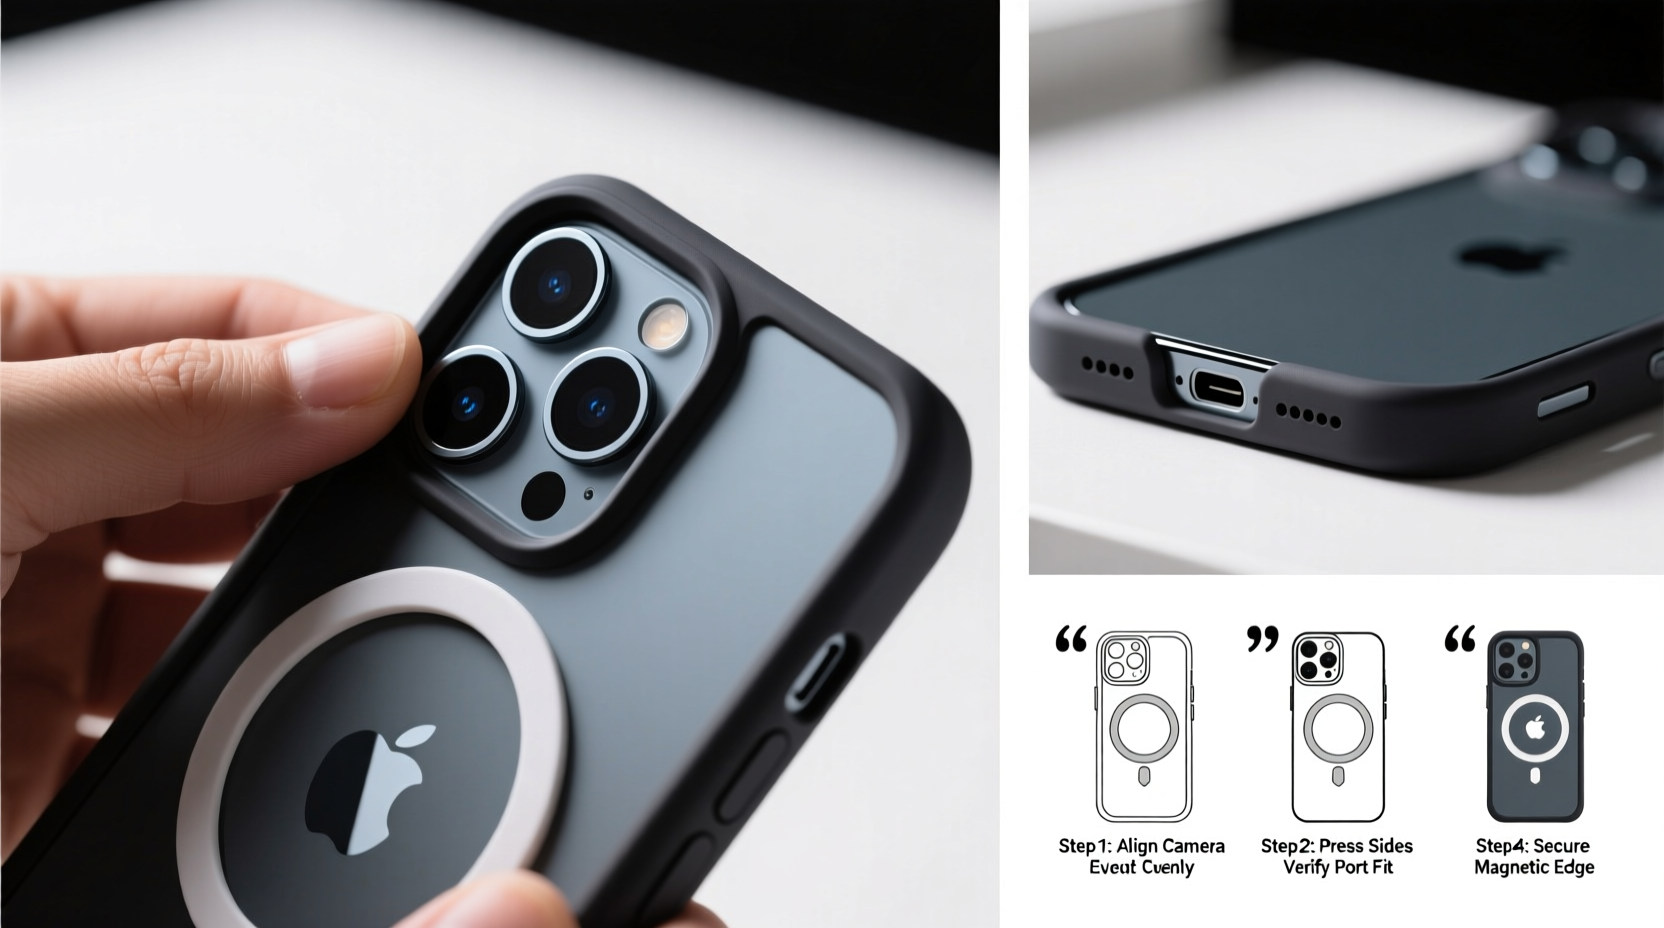
Step-by-Step Installation Process
Follow these six steps carefully to install your iPhone 15 Pro case without damaging the phone or compromising fit.
- Power Down the Device
While not mandatory, turning off your iPhone eliminates the risk of accidental input during installation. Press and hold the side button and either volume key until the power slider appears, then swipe to shut down. - Clean the Phone Thoroughly
Wipe the entire surface of the iPhone with a dry microfiber cloth. Pay special attention to the edges, camera bump, and charging port. If needed, lightly dampen a corner of the cloth with isopropyl alcohol to remove fingerprints or oils. Let the device air-dry completely before proceeding. - Inspect the Case Interior
Hold the case up to light and examine the inner lining. Look for debris, manufacturing residue, or sharp edges. Some third-party cases come with plastic film still attached inside—remove it if present. Run a finger along the interior to feel for imperfections that could scratch the phone. - Align the Bottom First
Place the iPhone so the charging port faces the same direction as the case’s opening. Gently press the bottom edge of the phone into the corresponding slot in the case. Ensure both lightning port cutouts are perfectly aligned. Do not force; if resistance occurs, recheck alignment. - Guide the Sides Evenly
Once the base is seated, slowly work the sides of the phone into the case. Apply gentle, even pressure from left to right. Avoid twisting motions. The curved titanium frame should slide smoothly into the case’s grooves. If using a rigid polycarbonate case, slight flexing is normal—but never use tools or excessive strength. - Verify Full Seating and Functionality
After the phone is fully enclosed, inspect all openings:- Camera ring: Should sit flush with no gaps
- Volume and action buttons: Must click freely without obstruction
- Speaker and microphone grilles: Fully exposed and unblocked
- Charging port: Open and accessible for cable insertion
Common Mistakes and How to Avoid Them
Even experienced users make errors when rushing case installation. Below is a comparison table outlining typical pitfalls and their solutions.
| Don’t | Do Instead |
|---|---|
| Use fingernails or tools to pry the case open | Warm the case gently in your palms to increase elasticity |
| Install the case over dirt or dust | Clean both phone and case before assembly |
| Force misaligned components | Double-check orientation and port alignment |
| Leave screen protector residue near edges | Replace damaged screen protectors before casing |
| Assume all “iPhone 15” cases fit the Pro model | Confirm case is labeled specifically for iPhone 15 Pro |
The iPhone 15 Pro has a slightly different camera module layout and frame curvature compared to the standard 15 or 15 Plus. Using a non-specific case often leads to poor camera coverage or interference with the new Capture Button on the left side.
Real-World Example: A Close Call with a Third-Party Case
Sarah, a freelance photographer in Portland, purchased a budget-friendly silicone case online for her new iPhone 15 Pro. Excited to use it on a shoot, she quickly snapped it on without inspecting the interior. By day’s end, she noticed muffled audio during video recording. Upon removal, she found small rubber ridges inside the case were partially covering the bottom speaker grille. Though the phone wasn’t damaged, sound quality suffered until she switched to a certified-fit brand. Her mistake? Skipping pre-installation inspection. Now, she checks every case under bright light before use—and always cleans her phone first.
Frequently Asked Questions
Can I install a case on my iPhone 15 Pro without removing it frequently?
Yes, many users keep the same case for months or years. However, it’s wise to remove and clean both the phone and case every 4–6 weeks to prevent dust buildup and inspect for wear. Long-term use without inspection can trap moisture or debris near ports.
Are MagSafe-compatible cases safe to install the same way?
Absolutely, but extra caution is advised. MagSafe cases contain embedded magnets that align automatically—but only if the phone is correctly positioned. Always center the iPhone before pressing down to avoid magnet misalignment, which can reduce charging efficiency.
What should I do if the case won’t snap into place?
Stop forcing it. Check that you have the correct model, verify there’s no debris, and warm the case slightly with your hands. If resistance persists, contact the manufacturer—some rigid cases require specific installation techniques or may be defective.
Final Tips for Long-Term Protection
Once installed, your case should feel secure but not strained. Over time, monitor for signs of wear: yellowing, warping, or loosening edges. High heat, UV exposure, and frequent removal can degrade materials faster. For best results, pair your case with a tempered glass screen protector and avoid stacking the phone with keys or coins in pockets.
Conclusion: Protect Your Investment with Precision
Installing an iPhone 15 Pro case isn’t just about convenience—it’s a ritual of care. Every press of the button, every charge through the port, depends on how well your case supports the device’s design. Taking five minutes to install it properly prevents months of frustration and potential damage. Whether you’re using a sleek minimalist sleeve or a rugged military-grade shell, treat the process with the seriousness it deserves. Your iPhone was built to last. With the right case, installed the right way, it will.


 浙公网安备
33010002000092号
浙公网安备
33010002000092号 浙B2-20120091-4
Comments
No comments yet. Why don't you start the discussion?