
A well-fitted Apple Watch band enhances both comfort and style. Among the most popular options is the metal band—sleek, durable, and ideal for professional or formal settings. However, improper installation or sizing can lead to discomfort, slippage, or even damage to the watch mechanism. Achieving a perfect fit requires precision and attention to detail. This guide walks you through every stage of installing and fine-tuning a metal iWatch band, ensuring it feels secure, looks polished, and lasts longer.
Understanding Metal iWatch Band Types
Before beginning, it’s important to identify which type of metal band you’re working with. Apple offers two primary styles: the Milanese Loop and the Link Bracelet. While both are metallic in appearance, their adjustment mechanisms differ significantly.
- Milanese Loop: A magnetic stainless steel mesh that wraps around the wrist and secures via an invisible magnetic clasp. Adjustment is continuous and tool-free.
- Link Bracelet: Composed of interlocking metal links, typically made of stainless steel or aluminum. Requires physical removal or addition of links for proper sizing.
This guide focuses on the Link Bracelet model, as it demands more technical handling during installation and adjustment. The Milanese Loop, while simpler, benefits from general care practices covered later in this article.
Tools You’ll Need for Installation
Proper tools ensure clean adjustments without scratching your device or damaging the band. Using makeshift items like paperclips or knives risks harming the delicate pins or links.
“Using the right tools isn’t just about precision—it prevents long-term wear caused by misaligned links.” — Jordan Lee, Wearable Tech Technician
Essential tools include:
- Spring bar removal tool (or precision pin pusher)
- Fine-tip tweezers
- Small container (to hold removed pins and links)
- Soft cloth (to protect the watch face during work)
- Optional: Magnifying glass for better visibility
Step-by-Step Guide to Installing and Adjusting the Band
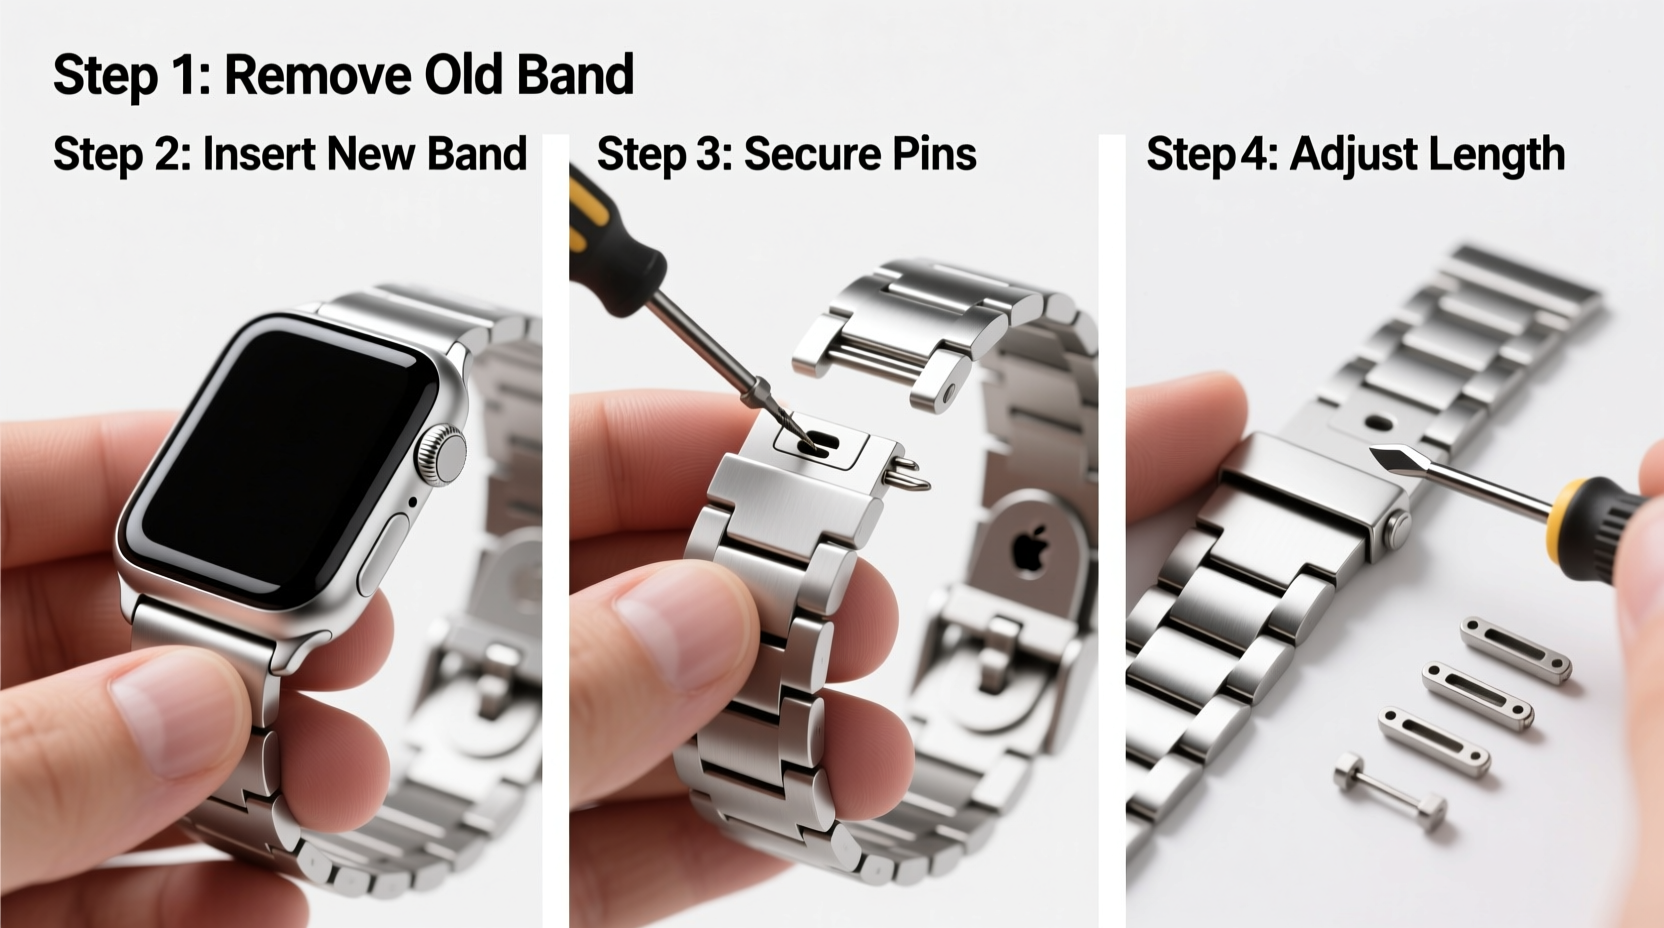
Follow this sequence carefully to install and resize your metal iWatch band correctly.
- Power off your Apple Watch. This prevents accidental screen activation or settings changes during handling.
- Lay the watch face-down on a soft cloth. This protects the display from scratches.
- Remove the existing band (if applicable). Insert the spring bar tool into the narrow slot where the band meets the watch body. Gently press to release the pin and slide the band off. Repeat for the other side.
- Inspect the new metal band. Check for any manufacturing defects, loose links, or damaged pins before attaching.
- Determine your correct size. Wrap the band loosely around your wrist. Note how many links need to be removed so the band fits snugly but allows room for airflow and movement. The ideal fit should allow one finger between the band and your skin.
- Disassemble excess links. On the inside of the band, locate the arrows indicating pin direction. Use the spring bar tool to gently push out the pins in the direction shown. Remove equal numbers of links from both sides for symmetry.
- Reinsert remaining pins securely. After removing unnecessary links, reattach the shortened sections. Ensure pins click fully into place and do not protrude.
- Attach the band to the watch. Align the end piece with the connector on the watch. Insert the pin at a slight angle and press firmly until it clicks. Test stability by gently tugging the band.
- Test the fit on your wrist. Fasten the clasp and assess comfort. It should stay in place during motion but not restrict circulation.
- Make micro-adjustments if needed. Some metal bands feature secondary adjustment holes for half-link precision. Utilize these for final tuning.
Real Example: First-Time Fit Challenge
Sarah, a graphic designer, purchased a stainless steel Link Bracelet online. Upon arrival, she found it too large, slipping constantly during client meetings. Without proper tools, she attempted to remove links with a needle, bending one of the pins. Frustrated, she visited an Apple Store, where a technician realigned the link and resized it correctly using a pin pusher. Sarah now keeps her tool kit handy for seasonal adjustments—her watch stays secure and professional-looking all day.
Do’s and Don’ts When Handling Metal Bands
| Do’s | Don’ts |
|---|---|
| Use proper spring bar tools for pin removal | Use sharp objects like knives or needles |
| Count and store removed links and pins safely | Discard extra links—you may need them later |
| Clean the band monthly with a microfiber cloth | Soak the band in water or cleaning solutions |
| Check pin tightness every few weeks | Wear the band while swimming or showering regularly |
| Adjust for seasonal changes (tighter in winter, looser in summer) | Force the clasp shut if alignment feels off |
Maintenance Tips for Longevity
A metal iWatch band is an investment. With regular care, it can remain lustrous and functional for years.
Weekly, inspect each link for looseness. If a pin appears partially ejected, use tweezers to gently press it back in. Avoid exposing the band to chlorine, saltwater, or perfumes, as these accelerate corrosion. For deeper cleaning, dampen a soft cloth with mild soapy water, wipe the surface, then dry immediately. Never submerge the band.
During workouts or humid conditions, consider switching to a sport band. Metal retains moisture against the skin, increasing irritation risk and oxidation potential.
Frequently Asked Questions
Can I resize the metal band myself without tools?
No. Unlike silicone or nylon bands, metal link bracelets require precise pin manipulation. Attempting removal without proper tools often results in bent pins or scratched components. Invest in an affordable tool kit designed for smartwatches.
How many times can I adjust the band before it wears out?
The pins and links are built for repeated adjustments, but excessive resizing shortens lifespan. Each insertion and removal causes microscopic wear. Aim to finalize your size and avoid daily changes. Most users only need 1–3 adjustments over the band’s life.
Is it safe to take my iWatch with a metal band through airport security?
Yes. The metal content is minimal and non-magnetic in most models. It will not trigger alarms or interfere with scanners. However, frequent exposure to high-security wands may scratch the finish over time.
Final Checklist Before Wearing Your Band
- ✅ Watch is powered off during installation
- ✅ Correct number of links removed based on wrist measurement
- ✅ Pins inserted in correct direction (follow internal arrows)
- ✅ Both sides of the band are symmetrical in length
- ✅ Band clicks securely into the watch connectors
- ✅ Clasp fastens smoothly and holds under gentle pull
- ✅ No sharp edges or protruding pins
- ✅ Final fit allows one finger beneath the band
Conclusion: Confidence Starts with Comfort
A perfectly fitted metal iWatch band does more than elevate your look—it ensures all-day comfort and confidence in your wearable tech. Whether you're closing business deals or tracking your morning run, a secure, well-maintained band supports your lifestyle seamlessly. Now that you’ve mastered installation and adjustment, take a moment to inspect your current setup. Make those small tweaks, store your tools wisely, and enjoy a flawless fit that lasts.


 浙公网安备
33010002000092号
浙公网安备
33010002000092号 浙B2-20120091-4
Comments
No comments yet. Why don't you start the discussion?