
Installing door trim may seem like a finishing touch, but it plays a crucial role in defining the character of a room. Well-installed trim adds polish, conceals gaps between walls and door frames, and elevates the overall craftsmanship of your space. Yet, many DIYers struggle with uneven joints, misaligned cuts, or loose sections that detract from an otherwise professional look. The difference between amateur and expert results lies not in expensive tools, but in technique, preparation, and attention to detail.
This guide walks through every phase of installing interior door trim—from selecting materials to nailing, caulking, and final touch-ups—so you can achieve clean lines and tight seams that resemble work done by a seasoned carpenter.
Choosing the Right Trim Material
The first decision is selecting the appropriate trim material. Common options include pine, MDF (medium-density fiberboard), poplar, and primed composite wood. Each has advantages depending on your project’s budget, durability needs, and desired finish.
| Material | Best For | Pros | Cons |
|---|---|---|---|
| Pine | Painted or stained traditional interiors | Inexpensive, easy to work with, takes stain well | Softwood—dents easily; prone to knots and warping |
| MDF | Paint-grade projects, modern spaces | Smooth surface, no grain, consistent shape | Cannot be stained; swells if exposed to moisture |
| Poplar | High-end painted trim | Stable, affordable hardwood alternative, sands smoothly | Greenish hues may show through thin paint |
| Composite | Bathrooms, high-moisture areas | Resists warping and moisture | More expensive; harder to cut cleanly |
Tools and Materials Checklist
Having the right tools ensures accuracy and reduces frustration. Here’s what you’ll need before starting:
- Miter saw (or circular saw with miter box)
- Tape measure
- Carpenter’s square or speed square
- Hammer or pneumatic nail gun
- Finishing nails (6d or 8d, galvanized or coated)
- Nail set
- Wood filler or painter’s caulk
- Sanding block or orbital sander
- Clamps (optional but helpful)
- Level
- Utility knife
“Precision in measuring and cutting is more important than the type of saw you use. A well-calibrated miter saw set at exactly 45 degrees makes all the difference.” — James Holloway, Master Carpenter & Contractor
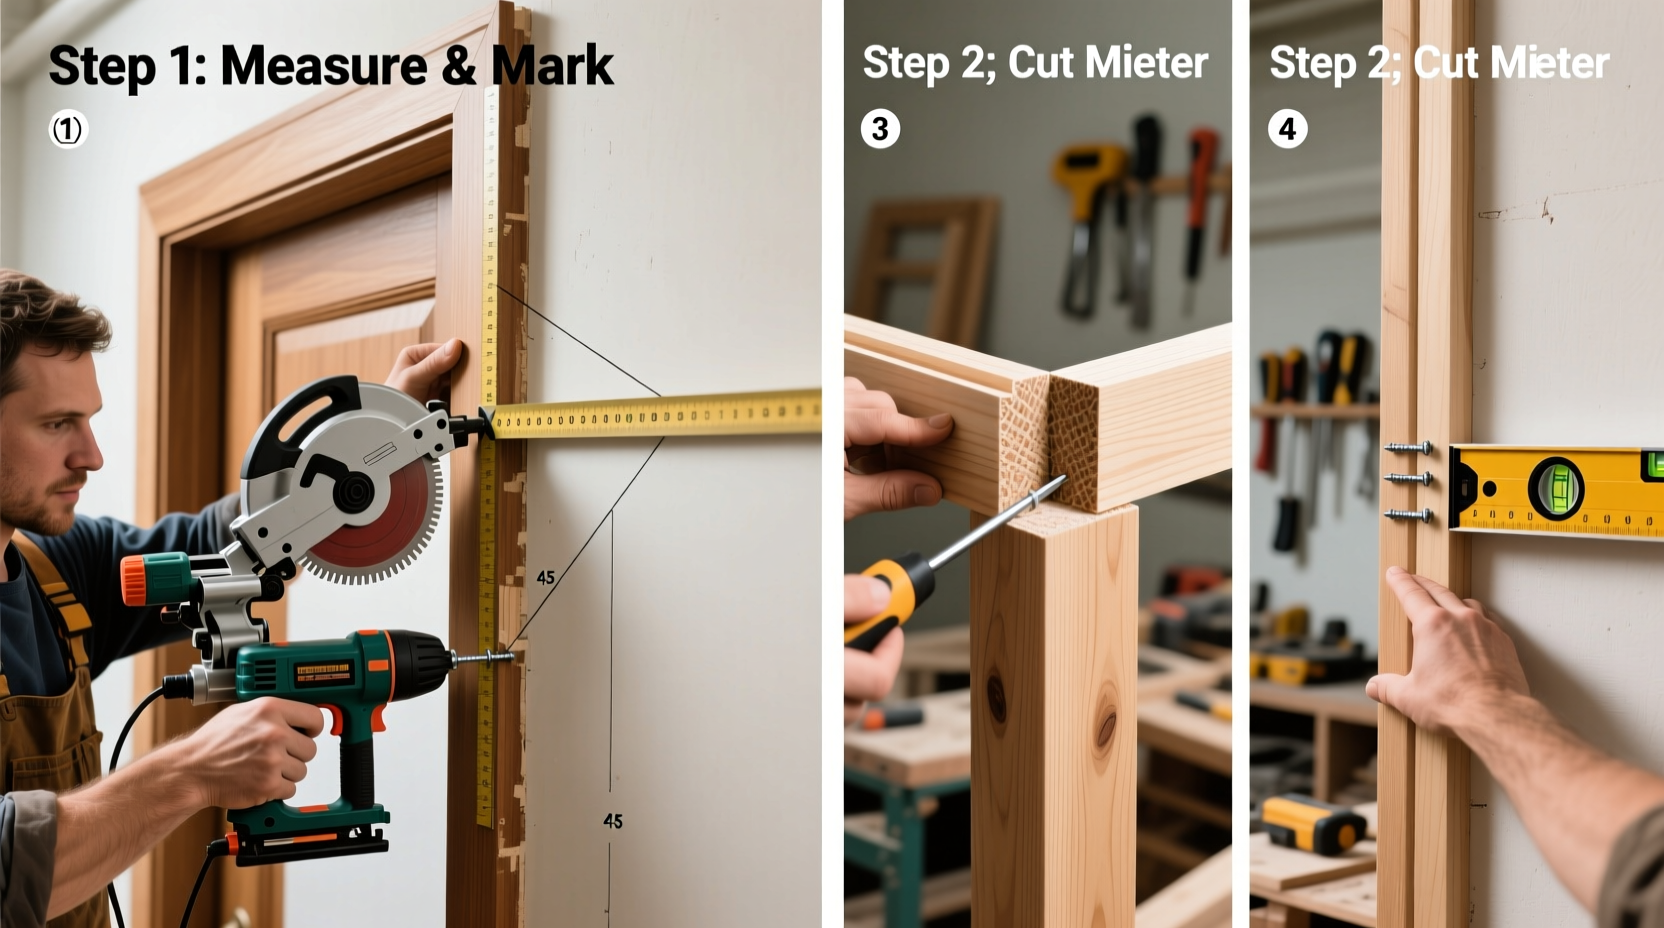
Step-by-Step Installation Process
Follow this sequence to install door trim with professional results:
- Prepare the Door Frame
Remove old trim carefully using a pry bar and utility knife to break any caulk seal. Clean the jamb edges of debris, paint drips, or protruding nails. Ensure the door frame is plumb and flush with the wall surface. - Measure and Cut the Side Jambs First
Measure from floor to top of header for each side. Cut two pieces at 45-degree angles with the miter saw, ensuring the long edge of the angle runs along the outside edge of the trim. Hold the piece in place and verify fit—adjust if needed. - Install Side Casings
Position the trim against the jamb, keeping the top end slightly proud of the header area (to allow for the head casing). Nail through the face near the top and bottom, driving nails at a slight angle into the framing. Use a nail set to sink the heads below the surface. - Measure and Cut the Head Casing
Measure the distance between the inside edges of the installed side casings across the top. Transfer this measurement to a new piece of trim and cut both ends at 45-degree angles—opposite to the side pieces so they form a seamless corner when joined. Dry-fit the head piece to ensure tight joints. - Install the Header Trim
Nail the head casing into place, securing it to the header above the door. Avoid overdriving nails, which can cause the wood to split. Check alignment with a level to prevent a crooked appearance. - Check and Adjust Joints
Inspect inside corners for gaps. If small, fill with caulk. If larger than 1/16 inch, recut the piece. Outside corners should be tight; sand lightly if needed to close minor openings. - Fill, Sand, and Finish
Fill nail holes and corner gaps with wood filler or paint-grade caulk. Once dry, lightly sand smooth. Wipe away dust before priming and painting.
Real-World Example: Installing Trim in a Renovated Entryway
Homeowner Maria Lopez recently updated her 1950s ranch-style home. In the front entry, she replaced an outdated sliding door with a solid core six-panel door and added custom 3-inch colonial-style trim. Initially, she attempted coping cuts instead of miters, resulting in uneven joints due to slight wall imperfections. After switching to mitered corners and shimming the jamb to plumb, her second attempt produced crisp, seamless joints. She used pre-primed poplar, nailed with a brad nailer, and finished with two coats of satin white paint. The transformation gave the entryway a tailored, high-end appearance that guests consistently compliment.
Her key takeaway? “Don’t rush the dry-fitting stage. Holding each piece in place and marking adjustments saved me more time than I thought.”
Avoiding Common Mistakes
Even experienced DIYers make avoidable errors. These are the most frequent pitfalls and how to prevent them:
- Miter gaps due to inaccurate angles – Calibrate your miter saw regularly. Test cuts on scrap wood before trimming actual pieces.
- Trim not sitting flush with wall – Walls are rarely perfectly flat. Use shims behind trim or scribe the back edge to match contours.
- Nail pops or splits – Pre-drill near ends of trim, especially with hardwoods. Use finishing nails no longer than 1.5 times the trim thickness.
- Visible caulk lines – Tool caulk with a damp fingertip or narrow putty knife for a smooth blend. Wipe excess immediately.
Frequently Asked Questions
Can I install trim without a miter saw?
Yes, though it's more challenging. You can use a circular saw with a miter guide or a handsaw with a miter box. Accuracy is harder to achieve, so practice on scrap wood first and double-check all angles.
Should I cope or miter inside corners?
Miters work best on square, stable corners. In older homes with uneven walls, coping (cutting one piece to follow the profile of the other) often produces tighter joints because it conforms to irregularities.
Do I paint the trim before or after installation?
For white or light-colored paint, pre-priming the entire piece (including back and edges) prevents moisture absorption and warping. However, final painting is best done after installation and caulking, especially when matching existing wall paint.
Final Touches for a Polished Look
The last steps define professionalism. After nailing and filling, inspect the trim under natural daylight. Run your hand along joints to feel for ridges. Lightly sand any raised areas. Apply a quality primer-sealer, then two topcoats of paint using a fine-bristle brush or small roller for smooth coverage.
Finally, apply a bead of painter’s caulk where the trim meets the wall, particularly along the top edge and at inside corners. This hides micro-gaps caused by settling or imperfect walls. Smooth the caulk with a wet finger for a seamless transition.
Conclusion: Take Pride in the Details
Door trim installation isn’t just about covering gaps—it’s about creating clean transitions that reflect care and craftsmanship. With accurate measurements, sharp tools, and patient execution, anyone can achieve results that look anything but DIY. Whether you're renovating a single room or upgrading an entire home, mastering trim work pays dividends in visual cohesion and perceived quality.


 浙公网安备
33010002000092号
浙公网安备
33010002000092号 浙B2-20120091-4
Comments
No comments yet. Why don't you start the discussion?