
A kitchen or bathroom backsplash does more than protect your walls from splashes and steam—it defines the character of your space. For homeowners looking to upgrade without the mess, cost, or complexity of traditional tile installation, peel and stick backsplash tiles offer an elegant, budget-friendly solution. When installed correctly, they can mimic the look of real ceramic, glass, or stone at a fraction of the effort.
But just because they’re easy to apply doesn’t mean results are guaranteed. A poorly installed peel and stick backsplash can bubble, peel, or look uneven in weeks. The key to success lies in preparation, precision, and patience. This guide walks you through every stage—from surface prep to final alignment—so you achieve a professional-looking result that lasts.
Why Choose Peel and Stick Backsplash Tiles?
Peel and stick tiles have gained popularity for good reason. They eliminate the need for grout, mortar, and specialized tools, making them ideal for DIYers and renters alike. Most options are made from durable PVC or vinyl with high-resolution printed finishes that convincingly replicate subway tile, marble, mosaic, or metallic surfaces.
According to interior designer Marcus Tran, “The best peel and stick tiles today are engineered for both aesthetics and longevity. When applied on a properly prepped surface, they perform nearly as well as permanent installations—especially in low-moisture areas.”
“Peel and stick tiles aren’t just temporary fixes anymore. With the right prep and application, they can be long-term solutions.” — Marcus Tran, Interior Designer & Remodeling Consultant
Still, their performance depends heavily on correct installation. Skipping steps like cleaning, priming, or dry-fitting can compromise adhesion and visual appeal. That’s why treating this project with the same care as a traditional backsplash is essential.
Essential Tools and Materials Checklist
Before starting, gather all necessary supplies. Having everything on hand prevents interruptions and ensures consistency in application.
- Peel and stick backsplash tiles (measured + extra)
- Measuring tape and pencil
- Level and straightedge ruler
- Utility knife or scissors
- Rubber roller or J-roller (optional but recommended)
- Mild cleaner (isopropyl alcohol or TSP substitute)
- Sponge or lint-free cloth
- Painter’s tape
- Caulk and caulk gun (for edges and seams near sinks)
- Grouting tool (if using tile-effect sheets with grout lines)
Most kits come with detailed instructions, but manufacturer guidelines vary. Always read them before beginning, especially regarding temperature and humidity requirements during installation.
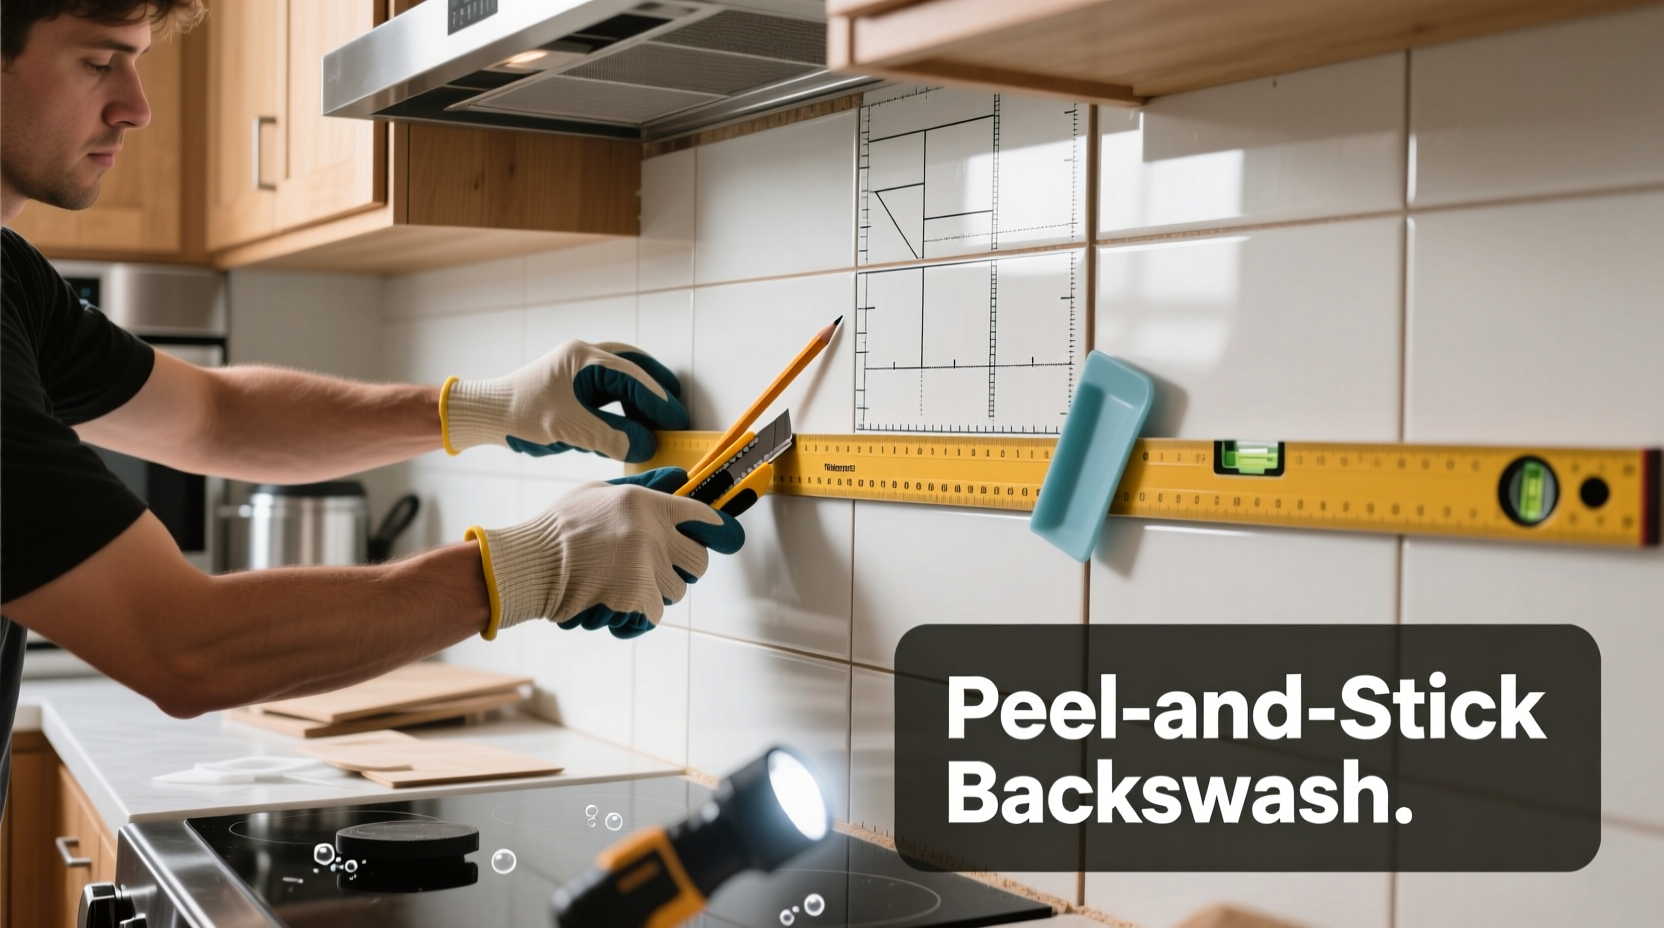
Step-by-Step Installation Process
Follow this proven sequence to ensure your backsplash looks seamless and stays firmly adhered.
- Measure and plan layout
Use a tape measure to calculate the square footage of your backsplash area. Decide on the orientation—vertical, horizontal, or staggered—and whether you want full tiles or cut pieces at the edges. Dry-fit a few tiles on the floor to visualize spacing and pattern flow. - Mark reference lines
Find the center point of your countertop or backsplash zone. Use a level to draw a vertical line from top to bottom. If tiling above a stove or sink, mark horizontal guidelines to keep rows straight. These act as anchors so your first tile starts perfectly aligned. - Deep clean the wall surface
This is the most critical step. Wipe down the entire area with a degreasing cleaner. Grease, dust, and residue from cooking or cleaning products prevent proper adhesion. Rinse with a damp cloth and let dry completely—usually 30 minutes. Avoid silicone-based cleaners, which leave behind films. - Test adhesion on small area
Peel and stick tiles require smooth, non-porous surfaces. Ideal substrates include glass, metal, painted drywall, or existing tile. Test one tile in an inconspicuous spot. Press it firmly and wait 24 hours. If it lifts easily, consider light sanding and priming with a bonding agent. - Begin with the first tile
Peel off about an inch of backing from the first tile. Align it with your reference lines, ensuring perfect vertical and horizontal placement. Press the exposed edge down gently, then continue peeling and smoothing the rest of the tile onto the wall. Use a squeegee or soft cloth to eliminate air bubbles as you go. - Install subsequent tiles
Work row by row, pressing each new tile firmly against the previous one. Maintain consistent pressure across the surface. If your design includes grout lines, use spacers or align printed gaps precisely. Overlap slightly if needed, then trim excess with a sharp utility knife and straightedge. - Cut around outlets and obstacles
Turn off power at the breaker before working near electrical outlets. Remove outlet covers. Measure the opening on the tile, transfer the dimensions, and make cross-cuts in an “X” pattern. Bend back the flaps and press the tile into place. Replace cover after installation. - Seal edges and joints
Once all tiles are in place, run a bead of waterproof silicone caulk along the bottom edge where the backsplash meets the countertop, and around faucets or stove edges. This prevents moisture intrusion. Smooth the caulk with a wet finger or tool for a clean finish. - Final rolling and inspection
Go over each tile with a rubber roller to maximize contact and adhesion. Check for lifting corners or trapped air. Gently lift and repress any bubbles, working from the center outward. - Wait before exposing to moisture
Allow at least 24–48 hours for the adhesive to fully bond before using the sink, stove, or wiping the surface regularly.
Common Mistakes and How to Avoid Them
Even experienced DIYers can fall into traps that undermine a great-looking backsplash. Here’s a comparison of what to do—and what not to do.
| Do’s | Don’ts |
|---|---|
| Wipe the wall with alcohol-based cleaner before applying tiles | Assume a quick wipe with soapy water is enough |
| Start from the center and work outward for symmetry | Begin in a corner with irregular spacing |
| Use a level after placing each tile | Rely only on the tile’s edge for alignment |
| Press firmly with a roller or cloth to eliminate bubbles | Leave air pockets thinking they’ll disappear |
| Seal edges with caulk in wet zones | Leave gaps open near sink or stove |
Real-Life Example: Sarah’s Kitchen Upgrade
Sarah, a homeowner in Portland, wanted to refresh her 1990s kitchen without remodeling. She chose a matte white subway tile peel and stick kit for her area behind the sink and stove. After watching several tutorials, she skipped surface cleaning, assuming the wall was “clean enough.” Within two weeks, tiles began peeling near the stovetop due to residual grease.
She removed the loose tiles, cleaned the wall with trisodium phosphate (TSP) substitute, and reapplied them following proper technique. This time, she used a J-roller and sealed all edges. Two years later, the backsplash remains intact—even after daily cooking and frequent cleaning.
Her lesson? “I thought the sticky part did all the work. But the real magic is in the prep. Now I tell everyone: spend 80% of your time cleaning, 20% sticking.”
Maximizing Longevity and Appearance
Peel and stick tiles can last 5–10 years or longer when maintained properly. Their lifespan depends on location, material quality, and environmental conditions.
- Avoid abrasive cleaners – Use mild soap and water or vinegar solution. Harsh scrubbing pads can scratch the surface.
- Minimize direct heat exposure – Don’t install too close to gas burners unless the product is rated for high heat.
- Inspect annually – Check for lifting edges, especially in high-splash zones. Re-seal with caulk or adhesive if needed.
- Keep humidity in check – In bathrooms, use an exhaust fan to reduce prolonged moisture exposure.
If a tile gets damaged, replacement is simple. Carefully peel it off, clean the patch, and apply a new piece. Because you saved extras, the color and texture will match perfectly.
Frequently Asked Questions
Can I install peel and stick tiles over existing tile?
Yes, as long as the old tiles are clean, flat, and free of cracks or grime. Deep-grooved or textured tiles may interfere with adhesion. In such cases, lightly sand and prime the surface first.
What if my wall isn’t perfectly flat?
Minor imperfections are usually fine, but deep dents, bumps, or crumbling drywall must be repaired. Use spackle or joint compound to smooth problem areas, then sand and clean before applying tiles.
Are peel and stick backsplashes waterproof?
Most are water-resistant, not fully waterproof. They handle splashes and humidity well, but shouldn’t be submerged or exposed to constant water streams. Sealing edges with silicone caulk improves moisture protection significantly.
Final Tips for a Pro-Level Finish
Professional results aren’t reserved for contractors. With attention to detail, anyone can install a backsplash that looks custom-made. Focus on these final touches:
- Take your time with the first tile—it sets the tone for the entire project.
- Use painter’s tape to hold tiles in place while adjusting alignment.
- Work in natural daylight or bright lighting to spot bubbles and misalignments.
- Keep leftover tiles stored in a labeled box for future touch-ups.
Conclusion: Transform Your Space with Confidence
Installing a peel and stick backsplash doesn’t require years of experience—just the right approach. By preparing thoroughly, following a logical sequence, and respecting the materials, you can achieve a polished, enduring upgrade that enhances your kitchen or bathroom for years to come.
This isn’t just about saving money or avoiding renovation chaos. It’s about taking pride in your home and proving that beautiful results are within reach, even on a weekend DIY timeline. Whether you're refreshing a rental or updating an older home, your effort will pay off every time you walk into the room.


 浙公网安备
33010002000092号
浙公网安备
33010002000092号 浙B2-20120091-4
Comments
No comments yet. Why don't you start the discussion?