
Pear puff pastry is a delicate balance of flaky layers, sweet fruit, and subtle spices—a dessert that looks impressive but is surprisingly simple to make at home. Whether you're preparing for a weekend brunch or a dinner party, this elegant treat requires minimal ingredients and maximum flavor. With a few essential techniques and attention to timing, you can create a golden, buttery masterpiece that will impress even the most discerning palates.
This guide walks you through every stage—from selecting the right pears to achieving the perfect crispness in your puff pastry—complete with tips, a detailed timeline, and insights from baking professionals. While we can't embed a video here, the instructions are structured to mirror a clear visual tutorial, so you can follow along as if watching one.
Selecting Ingredients for Success
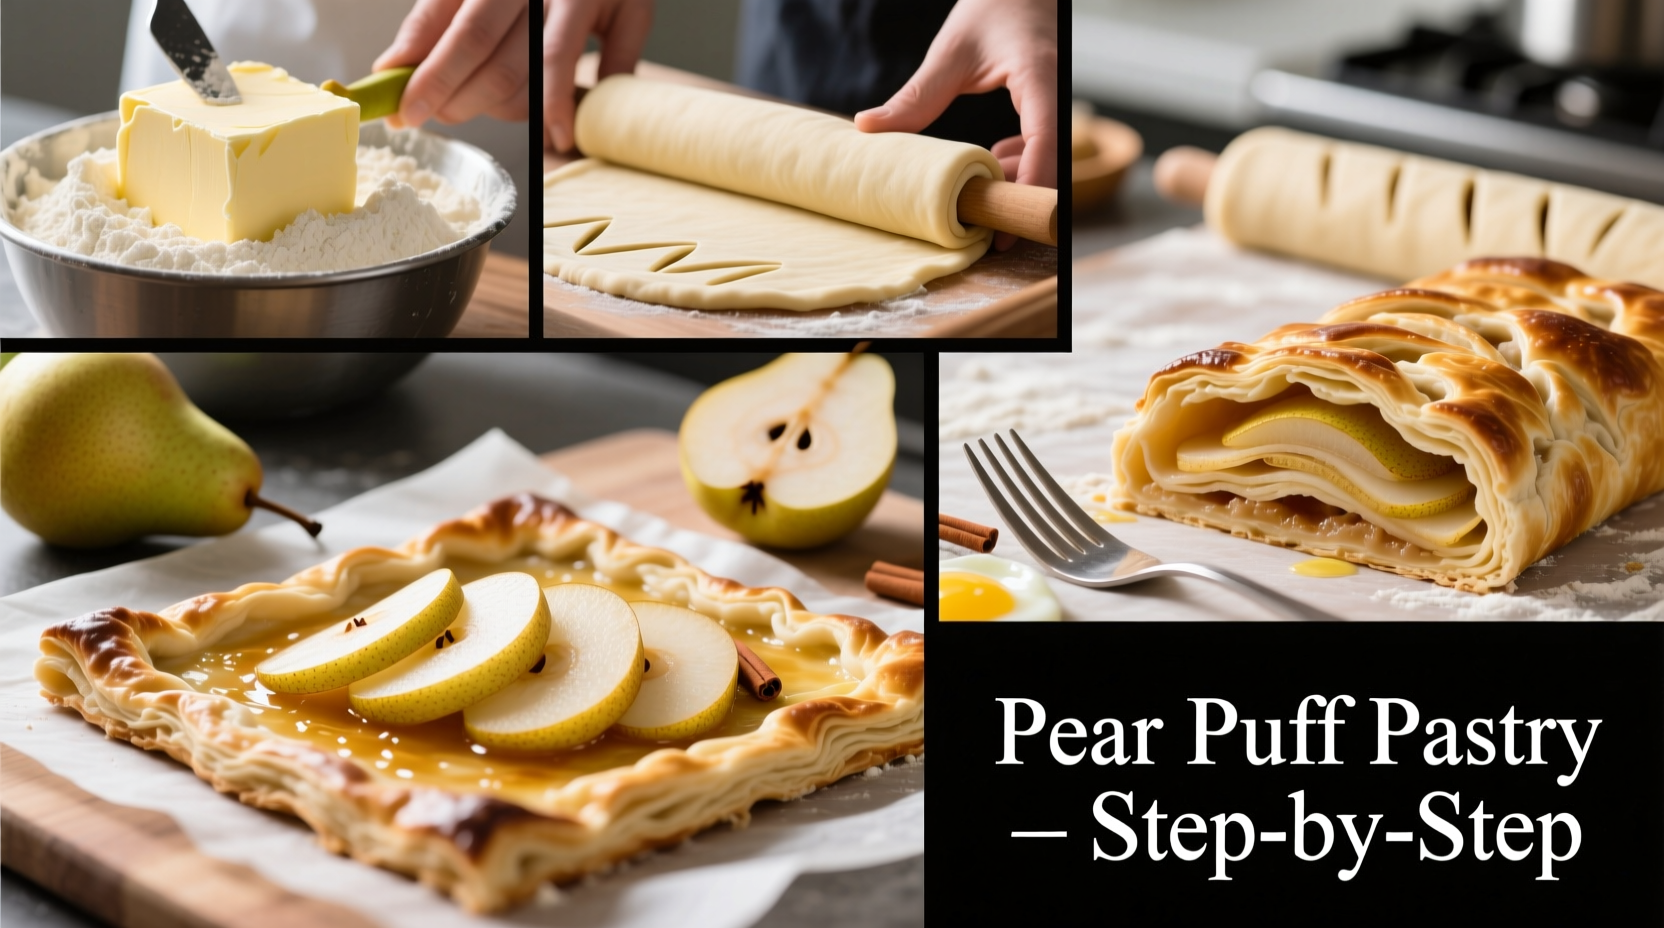
The foundation of any great dessert lies in its ingredients. For pear puff pastry, quality matters more than quantity. Each component plays a critical role in texture, flavor, and appearance.
- Puff pastry: Use store-bought all-butter puff pastry for convenience and reliability. Look for brands like Dufour or Trader Joe’s, which use real butter and no hydrogenated oils.
- Pears: Choose firm but ripe varieties such as Bosc or Anjou. These hold their shape during baking and offer a balanced sweetness without becoming mushy.
- Sugar: A mix of granulated and brown sugar enhances caramelization. Brown sugar adds depth, while granulated helps form a light crust.
- Lemon juice: Prevents browning and cuts through the richness of the butter.
- Spices: A pinch of cinnamon or cardamom elevates the fruit without overpowering it.
- Egg wash: A beaten egg or egg yolk mixed with a splash of milk gives the pastry its signature glossy finish.
Step-by-Step Preparation Timeline
Follow this chronological sequence for consistent results. Total active time: 25 minutes. Baking time: 25–30 minutes. Resting and cooling: 10 minutes.
- Thaw pastry (if frozen): Remove from freezer and let sit in the fridge for 8–12 hours. Do not open the package until ready to use.
- Preheat oven: Set to 400°F (200°C). Line a baking sheet with parchment paper.
- Prepare pears: Peel, core, and slice two medium pears into ¼-inch thick slices. Toss with 1 tablespoon lemon juice, 1 tablespoon granulated sugar, and a pinch of cinnamon.
- Roll out pastry: On a lightly floured surface, gently roll each pastry sheet into a 10x10 inch square. Use a ruler for precision if desired.
- Score edges: Using a knife, draw a border 1 inch from the edge of the pastry. This creates a raised rim when baked. Do not cut all the way through—just score the surface.
- Prick center: Dock the inner square with a fork 10–12 times to prevent puffing in the middle.
- Arrange pears: Fan the slices over the center section, overlapping slightly. Sprinkle with remaining sugar and spices.
- Egg wash: Brush the scored border with egg wash for a golden, shiny finish.
- Bake: Place on the center rack and bake for 25–30 minutes, until the pastry is puffed and deep golden brown.
- Cool and glaze: Let rest for 5–10 minutes. Optional: brush pears with warmed apricot jam for a professional shine.
“Pastry is about patience. The key is working cold ingredients gently and respecting the resting times.” — Clara Mendez, Pastry Chef & Instructor at Le Cordon Bleu Paris
Common Mistakes and How to Avoid Them
Even experienced bakers can run into issues with puff pastry. Here’s a breakdown of frequent pitfalls and how to sidestep them.
| Mistake | Why It Happens | How to Fix |
|---|---|---|
| Soggy bottom | Fruit releases moisture during baking | Dock the center well and avoid placing pears too close to the border |
| Shrinking pastry | Overhandling or improper thawing | Let pastry thaw slowly; handle minimally once rolled |
| Uneven rise | Oven hot spots or under-preheating | Rotate the tray halfway through baking; ensure full preheat |
| Burnt edges | Too much sugar on the rim or high heat | Shield edges with foil after 20 minutes if needed |
Tips for Elevation and Presentation
A beautifully made pear puff pastry deserves an equally thoughtful presentation. These small touches transform a simple tart into a showstopper.
- Add texture: Sprinkle with toasted sliced almonds or crushed pistachios before serving.
- Pair wisely: Serve with a dollop of mascarpone, vanilla ice cream, or crème fraîche to balance the sweetness.
- Garnish: A light dusting of powdered sugar or fresh mint leaves adds elegance.
- Make ahead: Assemble the tart up to 2 hours in advance and bake just before serving for peak freshness.
Mini Case Study: From Doubt to Delight
Sarah, a home cook from Portland, had tried puff pastry twice before—both attempts ended in flat, greasy disappointments. She assumed she lacked the “baker’s touch.” After following this method, including proper thawing and docking the center, her third attempt rose evenly and held its shape. The pears caramelized beautifully, and her guests asked for the recipe. Her secret? She chilled the shaped tart for 15 minutes before baking—this helped maintain structure. Now, she makes it monthly for family dinners.
Checklist for Perfect Pear Puff Pastry
Print or save this checklist to keep your process smooth and error-free:
- ☐ Thaw puff pastry in the refrigerator overnight
- ☐ Preheat oven to 400°F (200°C)
- ☐ Prepare pears with lemon juice and sugar
- ☐ Roll pastry to 10x10 inches
- ☐ Score 1-inch border (do not cut through)
- ☐ Dock center with fork
- ☐ Arrange pears inside the border
- ☐ Brush edges with egg wash
- ☐ Bake 25–30 minutes until golden
- ☐ Cool 5–10 minutes before serving
- ☐ Optional: glaze with warmed apricot jam
Frequently Asked Questions
Can I use canned pears?
No. Canned pears contain excess moisture and often added syrup, which leads to a soggy pastry. Always use fresh, firm pears for best results.
Is it possible to freeze the assembled tart?
Yes. Assemble the tart, wrap tightly in plastic, and freeze for up to 3 weeks. Bake from frozen—add 5–7 minutes to the baking time. Do not thaw before baking to prevent sogginess.
Can I make this gluten-free?
You can substitute with a high-quality gluten-free puff pastry, though results may vary. Brands like Jus-Rol GF have received positive reviews for flakiness and rise.
Final Thoughts and Next Steps
Pear puff pastry is more than a dessert—it's a celebration of simplicity done right. With just a few ingredients and careful technique, you’ve created something that feels luxurious and tastes unforgettable. The beauty of this recipe lies in its adaptability: swap pears for apples, add cheese like brie, or experiment with herbs like thyme for a savory twist.
If you've followed along, congratulations—you’ve mastered a classic French-inspired dessert with confidence. Share your creation with someone you love, or enjoy a quiet moment with a warm slice and a cup of tea.


 浙公网安备
33010002000092号
浙公网安备
33010002000092号 浙B2-20120091-4
Comments
No comments yet. Why don't you start the discussion?