
Making a flaky, golden-brown pie crust from scratch is one of the most satisfying skills in home baking. While store-bought crusts are convenient, nothing compares to the buttery richness and delicate texture of a homemade version. The key lies not in complexity, but in precision: keeping ingredients cold, handling the dough gently, and understanding how each step contributes to the final result. This comprehensive guide walks you through every stage, from selecting ingredients to blind baking, ensuring consistent success whether you're preparing a fruit pie, quiche, or savory tart.
The Science Behind a Perfect Crust
A great pie crust balances tenderness with structure. It should be crisp on the outside, flaky in layers, and hold its shape without becoming tough. This balance comes from three core principles: fat distribution, moisture control, and minimal gluten development.
Fat—typically butter, shortening, or a blend—creates pockets in the dough that expand during baking, producing flakiness. Cold fat is essential because it melts slowly in the oven, leaving behind steam-filled voids. Overworking the dough warms the fat prematurely and encourages gluten formation, leading to a dense, chewy crust.
“Temperature is everything. If your butter’s too warm, you’ll end up with a greasy mess instead of flaky layers.” — Claire Thompson, Pastry Chef & Instructor at Midwest Baking Academy
Essential Ingredients and Tools
Using high-quality ingredients makes a noticeable difference. Here’s what you’ll need for a standard 9-inch double-crust pie:
- 2 ½ cups (300g) all-purpose flour, plus extra for dusting
- 1 teaspoon salt
- 1 tablespoon granulated sugar (optional, for sweet pies)
- 1 cup (2 sticks / 226g) unsalted butter, very cold and cubed
- 6–8 tablespoons ice water
Optional additions include 1 teaspoon apple cider vinegar or lemon juice to inhibit gluten formation and improve tenderness.
Tools that help ensure consistency:
- Pastry cutter or food processor
- Large mixing bowl
- Rolling pin
- Plastic wrap
- Rimmed baking sheet (for chilling and transport)
Step-by-Step Guide to Making the Dough
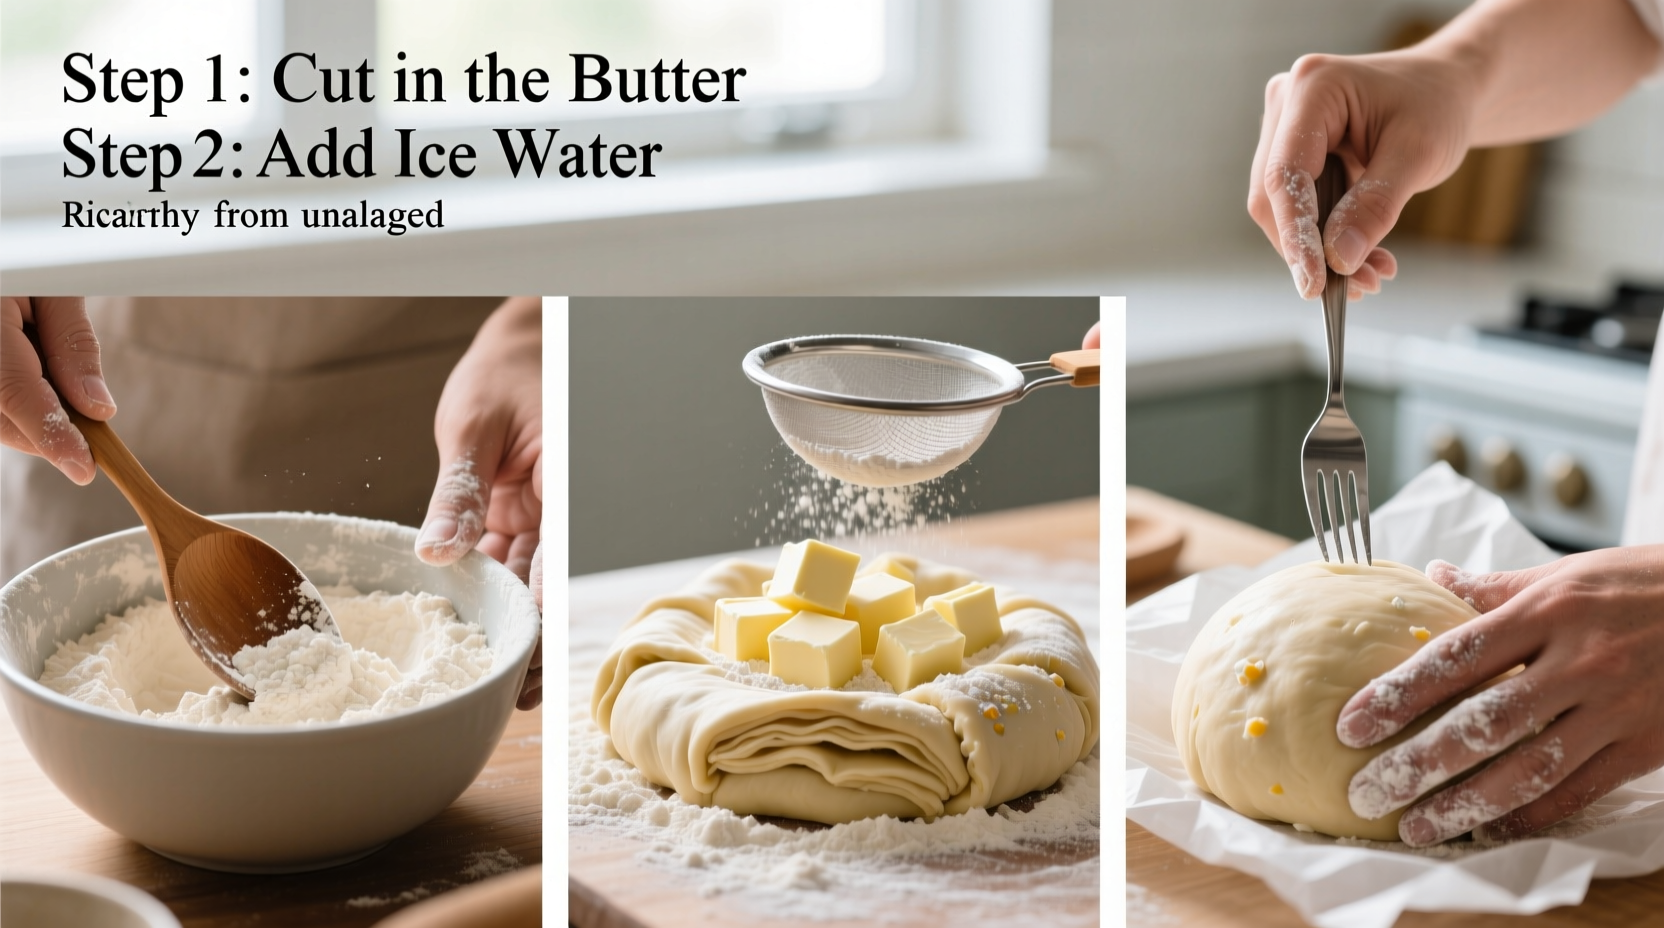
- Chill everything. Place flour, salt, and sugar in the freezer for 15 minutes. Cube the butter and return it to the fridge. Measure ice water and keep it nearby.
- Mix dry ingredients. In a large bowl, whisk together flour, salt, and sugar until evenly distributed.
- Cut in the fat. Add cold butter cubes. Use a pastry cutter or pulse in a food processor until the mixture resembles coarse crumbs with pea-sized pieces of butter remaining. These chunks are crucial—they create flakiness.
- Add ice water gradually. Sprinkle 1 tablespoon of ice water at a time over the mixture, tossing with a fork after each addition. Stop when the dough begins to clump and holds together when pressed. You may not need all 8 tablespoons.
- Form the dough. Divide into two equal portions, shape into discs, wrap in plastic, and refrigerate for at least 1 hour (up to 2 days). This relaxes the gluten and rechills the butter.
Never overmix. Once the dough forms, stop immediately. Overworking leads to toughness.
Rolling, Shaping, and Blind Baking
After chilling, the dough is ready to roll. Follow these steps for flawless results:
- Flour your surface lightly. Too much flour dries out the crust; just enough prevents sticking.
- Roll from center outward. Rotate the dough a quarter turn every few rolls to maintain an even circle. Aim for a 12-inch diameter for a 9-inch pie plate.
- Transfer carefully. Gently fold the dough in quarters, place over the pie dish, unfold, and press lightly into the bottom and sides without stretching.
- Trim and crimp edges. Leave a ½-inch overhang, fold under, and flute using fingers or a fork.
If your recipe calls for a prebaked shell (blind baking), follow this process:
- Prick the bottom with a fork to prevent puffing.
- Line with parchment paper and fill with pie weights or dried beans.
- Bake at 375°F (190°C) for 15 minutes. Remove weights and bake another 10–12 minutes until golden.
| Stage | Do | Don’t |
|---|---|---|
| Mixing | Use cold ingredients, work quickly | Overmix or let butter soften |
| Rolling | Rotate dough, use minimal flour | Stretch dough into pan |
| Baking | Preheat oven, use baking sheet | Bake on top rack where heat is uneven |
Common Mistakes and How to Avoid Them
Even experienced bakers encounter issues. Recognizing these pitfalls can save your crust:
- Soggy bottom: Caused by excess filling moisture. Prevent it by blind baking for custard or fruit pies, or brushing the unbaked crust with beaten egg white and sealing with a thin layer of chocolate for wet fillings.
- Cracking when rolling: Dough is too cold or too dry. Let it sit at room temperature for 5–10 minutes, or sprinkle with a few drops of water and knead gently.
- Shrinking during baking: Usually due to gluten tension. Always chill the shaped crust for 30 minutes before baking to relax the proteins.
- Burnt edges: Use a pie shield or foil to cover the rim during the last half of baking.
Real Example: Sarah’s Thanksgiving Rescue
Sarah had always relied on frozen crusts for her annual pumpkin pie. One year, she decided to make her own—but skipped the chilling step to save time. As she rolled the dough, it cracked and tore. She patched it, baked it, and ended up with a misshapen, tough crust that absorbed the custard and turned soggy.
The following year, she followed the full process: chilled ingredients, rested the dough, and blind baked with weights. The result was dramatically different—golden, crisp, and flaky, with clean slices that held their shape. Her family insisted it tasted better, though the filling was identical. The lesson? Technique matters more than talent.
Frequently Asked Questions
Can I make pie crust ahead of time?
Yes. Wrap the dough tightly and refrigerate for up to 2 days or freeze for 3 months. Thaw frozen dough in the refrigerator overnight before rolling.
Why use a mix of butter and shortening?
Butter provides superior flavor and flakiness, while shortening has a higher melting point and creates a more tender, stable crust. A blend (e.g., ¾ butter, ¼ shortening) offers the best of both.
My dough is sticky. What should I do?
Lightly dust with flour and chill for 10–15 minutes. Avoid adding too much flour, which can make the crust dry. Cold hands and surfaces help prevent stickiness.
Final Checklist for Success
- Keep all ingredients and tools cold.
- Leave visible butter pieces in the dough.
- Add water sparingly—moisture is the enemy of flakiness.
- Chill the dough for at least 1 hour before rolling.
- Roll gently, rotate often, avoid stretching.
- Chill the shaped crust before baking.
- Use pie weights when blind baking.
- Bake on a preheated baking sheet for even heat distribution.
Conclusion
Mastering pie crust isn’t about perfection on the first try—it’s about understanding the process and refining your technique. With attention to temperature, gentle handling, and a few smart tricks, you can consistently produce beautiful, flaky crusts that elevate any pie. Whether you’re baking for holidays, weeknight treats, or simply the joy of creation, this foundational skill opens doors to endless dessert possibilities.


 浙公网安备
33010002000092号
浙公网安备
33010002000092号 浙B2-20120091-4
Comments
No comments yet. Why don't you start the discussion?