
There’s something deeply comforting about the aroma of warm spices and freshly baked dough filling a kitchen. Pumpkin cinnamon rolls elevate that comfort into an art form—moist, tender, spiced with warmth, and crowned with a silky cream cheese glaze. While they may seem like a bakery-only treat, these rolls are entirely achievable in a home kitchen with careful attention to ingredients, technique, and timing. This comprehensive guide walks you through every stage, from activating yeast to pulling golden-brown rolls from the oven.
The Science Behind Soft and Fluffy Dough
The texture of cinnamon rolls hinges on three key factors: hydration, fat content, and proper fermentation. A high-hydration dough allows gluten to develop fully, creating a stretchy network that traps gas during rising. Fat—typically in the form of butter or oil—coats the gluten strands, contributing tenderness and preventing toughness. Fermentation, driven by active yeast, produces carbon dioxide that leavens the dough, giving it lift and airiness.
Pumpkin purée adds moisture and natural sugars, which feed the yeast and enhance browning. However, because pumpkin contains water, balancing the flour-to-liquid ratio is crucial. Too much liquid leads to sticky, dense rolls; too little results in dryness. Using canned pumpkin (not pie filling) ensures consistency in both moisture and flavor.
Ingredients and Equipment Checklist
Before beginning, gather all necessary ingredients and tools. Having everything ready streamlines the process and prevents interruptions during critical stages like rising or baking.
Essential Ingredients
- ¾ cup whole milk, warmed
- 2 ¼ tsp (1 packet) active dry yeast
- ½ cup pumpkin purée (unsweetened)
- ⅓ cup granulated sugar
- 2 large eggs, room temperature
- ⅓ cup unsalted butter, melted
- 4 cups all-purpose flour (plus extra for dusting)
- 1 tsp salt
- 1 ½ tsp ground cinnamon
- ¼ tsp ground nutmeg
- ¼ tsp ground ginger
- ⅛ tsp cloves (optional)
Filling & Glaze
- ½ cup packed brown sugar
- 2 tsp cinnamon
- ¼ cup unsalted butter, softened
- 4 oz cream cheese, softened
- 1 cup powdered sugar
- 1–2 tbsp milk or cream
- ½ tsp vanilla extract
Equipment Needed
- Stand mixer with dough hook (or large bowl and wooden spoon)
- Mixing bowls
- Rolling pin
- 9x13 inch baking pan
- Parchment paper or non-stick spray
- Kitchen towel
- Pastry brush
- Sharp knife or dental floss (for clean cuts)
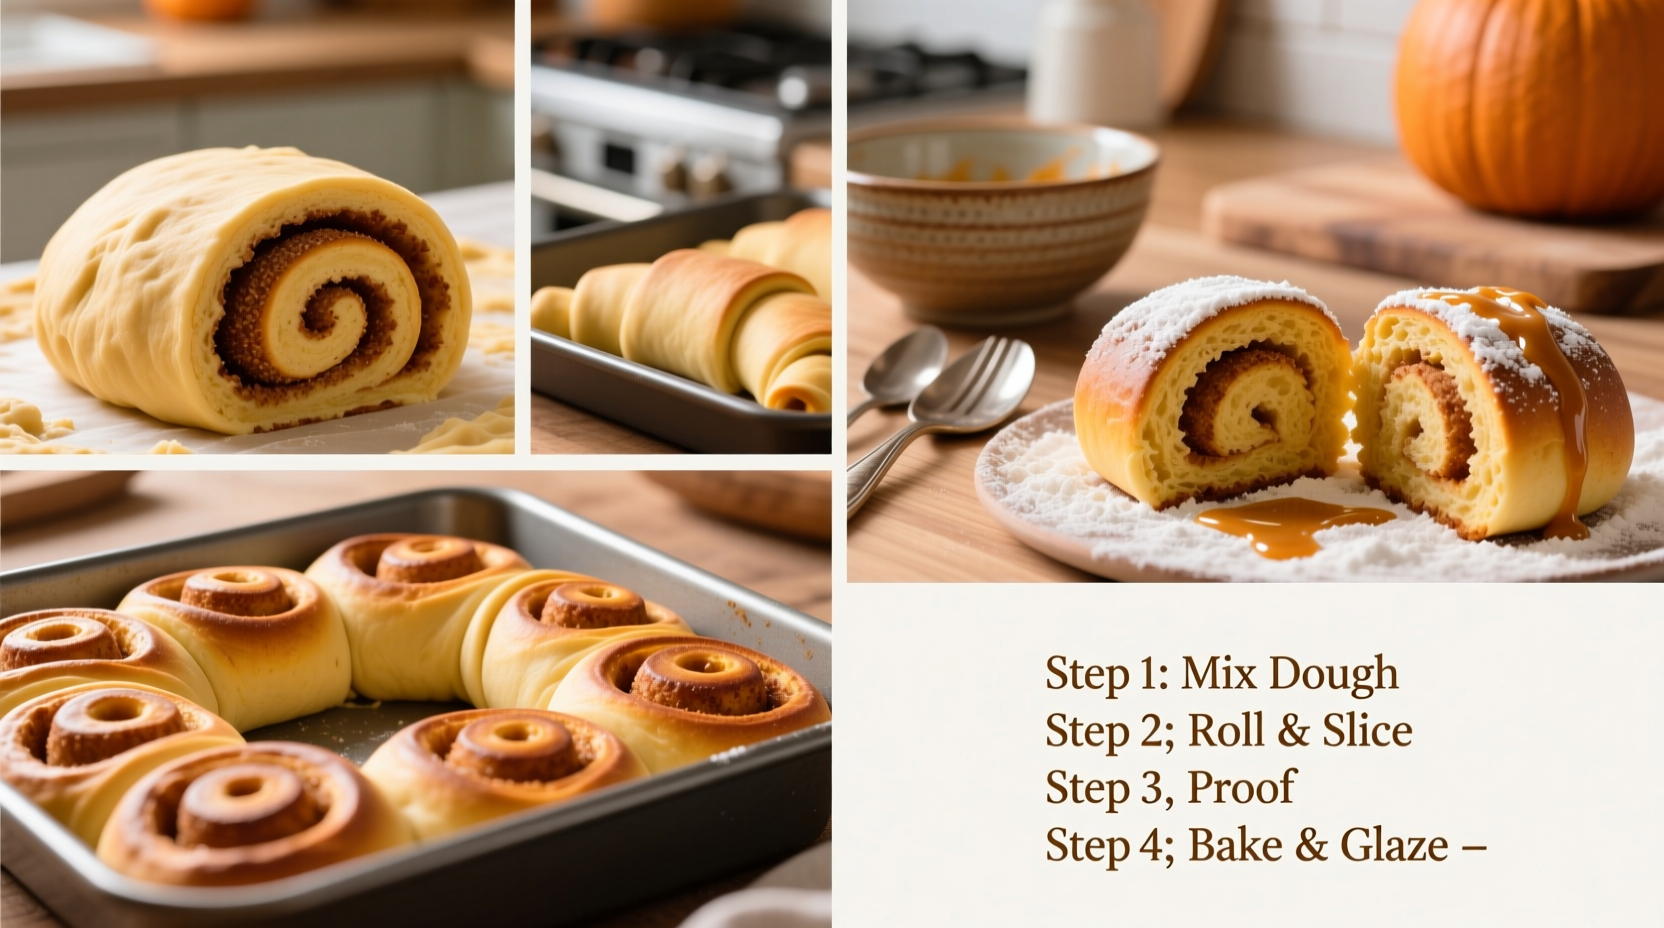
Step-by-Step Baking Process
- Activate the yeast: In a small bowl, combine warm milk (105–110°F), sugar, and yeast. Let sit for 5–10 minutes until foamy. If no bubbles form, the yeast is inactive—start over with fresh yeast.
- Mix wet ingredients: In a stand mixer bowl, whisk together pumpkin purée, eggs, melted butter, and yeast mixture until smooth.
- Add dry ingredients: Gradually add 3 cups of flour, salt, and spices. Mix on low with the dough hook until combined. Add remaining flour ¼ cup at a time until the dough pulls away from the sides but remains slightly tacky.
- Knead the dough: Knead on medium speed for 5–7 minutes until smooth and elastic. Alternatively, knead by hand on a floured surface for 8–10 minutes.
- First rise: Place dough in a lightly oiled bowl, cover with a damp cloth, and let rise in a warm place for 1–1.5 hours, or until doubled in size.
- Prepare filling: Mix brown sugar and cinnamon. Set aside. Soften butter so it spreads easily without tearing the dough.
- Roll out dough: Punch down risen dough and roll into a 12x16 inch rectangle on a floured surface.
- Spread and fill: Evenly spread softened butter over the dough, then sprinkle cinnamon-sugar mixture. Roll tightly from the long side, pinching seam to seal.
- Cut rolls: Use a sharp knife or unflavored dental floss to cut into 12 equal pieces. Place cut-side up in a greased 9x13 inch pan.
- Second rise: Cover and let rise 30–45 minutes until puffy. Preheat oven to 350°F during the last 15 minutes.
- Bake: Bake for 22–26 minutes until golden brown and internal temperature reaches 190°F.
- Glaze: Beat cream cheese, powdered sugar, vanilla, and milk until smooth. Drizzle over warm rolls.
Common Pitfalls and How to Avoid Them
Even experienced bakers can encounter issues when working with enriched doughs. The following table outlines frequent problems and their solutions.
| Issue | Possible Cause | Solution |
|---|---|---|
| Dense, heavy rolls | Over-flouring, under-proofing, dead yeast | Measure flour by weight or spoon-and-level method; ensure yeast is fresh and environment is warm enough for rising. |
| Rolls don’t rise | Cold kitchen, expired yeast, tight rolling | Place dough in oven with light on or near a warm appliance; verify yeast activity before use. |
| Filling leaks out | Overfilling, uneven sealing | Leave ½-inch border when spreading; pinch seam and ends gently but firmly. |
| Too dry | Overbaking, insufficient fat or pumpkin | Bake just until golden; use accurate measurements and quality ingredients. |
“Pumpkin adds richness and moisture, but it also introduces variability. Always adjust flour gradually to achieve the right dough consistency.” — Chef Lila Nguyen, Artisan Bakery Owner
Real-World Example: Baking for a Holiday Brunch
Sarah, a home baker from Vermont, decided to surprise her family with pumpkin cinnamon rolls on Thanksgiving morning. She followed the recipe precisely but placed the dough to rise near a drafty window. After 90 minutes, the dough had barely expanded. Remembering a tip from a baking class, she filled a large pot with boiling water and placed it on the lower oven rack, putting the dough beside it. Within 45 minutes, the dough had doubled. Her rolls baked evenly, filled the house with spice, and received rave reviews. The key? Creating a warm microclimate for proofing—a simple fix that saved the batch.
Frequently Asked Questions
Can I make the dough the night before?
Yes. After the first rise, punch down the dough, shape into a log, wrap in plastic, and refrigerate for up to 18 hours. The next day, roll, cut, and let rise 1–1.5 hours before baking.
Why did my rolls shrink after cutting?
This often happens if the dough was overworked or rolled too tightly. Allow the cut rolls to rest uncovered for 5 minutes before the final rise to relax the gluten.
Can I freeze pumpkin cinnamon rolls?
Absolutely. Bake and cool completely, then wrap tightly in plastic and foil. Freeze for up to 3 months. Thaw overnight and rewarm at 325°F for 10–12 minutes. For unbaked rolls, freeze after cutting and rising 20 minutes, then transfer to freezer bags. Bake from frozen, adding 5–8 minutes to baking time.
Final Tips for Success
- Use room-temperature eggs and butter to ensure even mixing.
- Don’t skip the second rise—this ensures maximum fluffiness.
- Let rolls cool 5–10 minutes before glazing so the icing melts slightly but doesn’t run off.
- Double the batch and freeze extras for quick weekend breakfasts.
Conclusion
Homemade pumpkin cinnamon rolls are more than a breakfast item—they’re a gesture of care, a centerpiece of celebration, and a testament to what’s possible in a home kitchen. With patience, precision, and a few expert-backed techniques, anyone can produce rolls that are soft, fluffy, and rich with autumnal flavor. The process may take a few hours, but the result—golden spirals dripping with cream cheese glaze—is worth every minute.


 浙公网安备
33010002000092号
浙公网安备
33010002000092号 浙B2-20120091-4
Comments
No comments yet. Why don't you start the discussion?