
Making sourdough bread begins long before the oven heats up—it starts with a living culture: your sourdough starter. This natural leavening agent, made from just flour and water, harnesses wild yeast and beneficial bacteria from the environment to ferment dough and give sourdough its signature tang and chewy texture. While creating a starter from scratch may seem intimidating, it’s actually a simple process when approached with consistency and patience. This guide walks you through each stage with precision, troubleshooting tips, and expert-backed practices to ensure success—even if you’ve failed before.
Why Make Your Own Sourdough Starter?
Commercial yeast offers speed and predictability, but it lacks the depth of flavor and complexity that wild fermentation provides. A homemade sourdough starter connects you to centuries of baking tradition and allows full control over ingredients and process. Unlike store-bought starters or dehydrated cultures, one cultivated in your own kitchen adapts to your local microbial environment, resulting in a unique flavor profile reflective of your region.
Beyond taste, sourdough fermentation improves digestibility by breaking down gluten and phytic acid, making nutrients more accessible. It also extends shelf life naturally—no preservatives needed. Starting from scratch means no reliance on specialty products, just flour, water, and time.
The Foolproof 7-Day Method: Daily Breakdown
Creating a healthy, active sourdough starter typically takes 5–7 days under ideal conditions. Temperature, flour type, hydration, and feeding schedule all influence development. The following timeline assumes room temperature between 70–75°F (21–24°C), which is optimal for microbial activity.
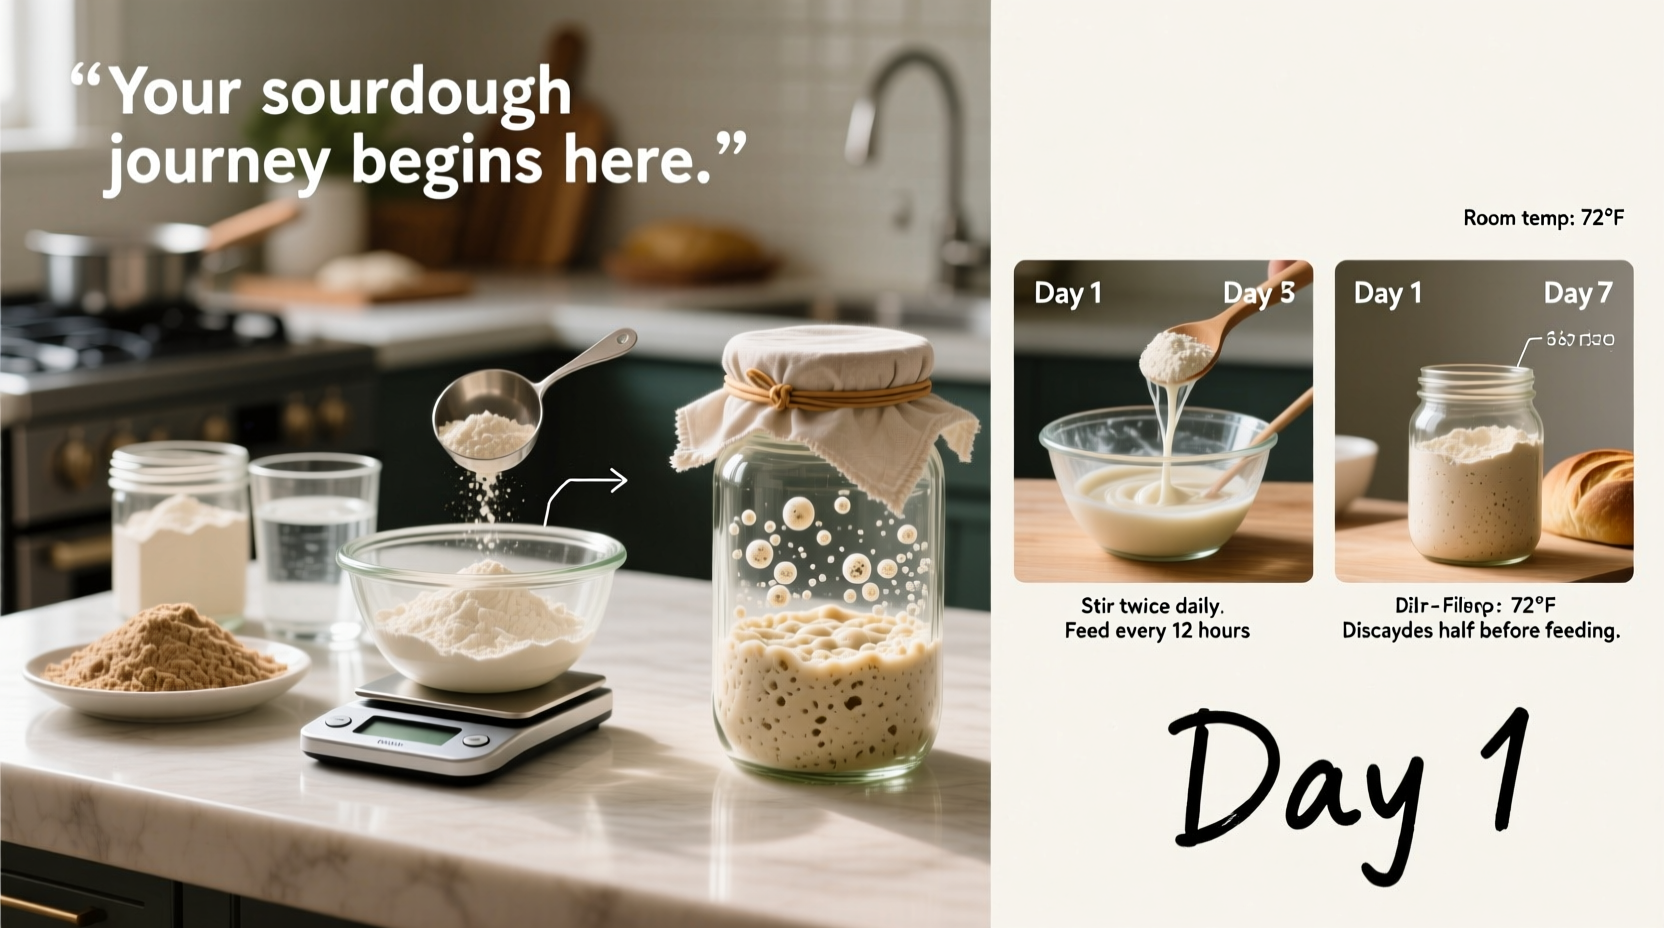
- Day 1: Initial Mix
Create a slurry of 60g whole grain flour (rye or whole wheat recommended) and 60g lukewarm water (about 80°F). Stir well until no dry bits remain. Cover loosely with a lid or cloth and leave at room temperature. Whole grains contain more nutrients and microbes, giving your starter a stronger beginning. - Day 2: First Signs of Life
You may see bubbles or notice a slightly sour smell. These are signs of early microbial activity. Discard half the mixture (about 60g), then feed with 60g all-purpose or whole grain flour and 60g water. Mix thoroughly and cover again. - Day 3: Peak Activity Begins
Fermentation intensifies. Expect bubbling, expansion, and a fruity or vinegary aroma. Some hooch (a grayish liquid) may form on top—this is normal. Stir it in, discard half, and feed again with equal parts flour and water (60g each). - Day 4: Transition to Stability
Activity might dip slightly as less resilient microbes die off—a common “sourdough slump.” Do not be discouraged. Continue daily discards and feedings. Use unbleached all-purpose flour now if desired for consistency. - Day 5: Renewed Vigor
Signs of strong fermentation return: doubling in size within 6–8 hours after feeding, pronounced bubbles, and a pleasant tangy fragrance. If this occurs, your starter is nearing maturity. - Day 6: Test Readiness
Perform a float test: place a small spoonful of starter in a glass of water. If it floats, it's producing enough gas to leaven bread. If not, continue feeding once daily. - Day 7: Active and Ready
By now, your starter should reliably double within 4–6 hours post-feeding, have a bubbly structure, and pass the float test. It’s ready to bake with!
Essential Tips for Success
While the process is simple, subtle details make the difference between a thriving starter and one that stalls. Consider these best practices:
- Use filtered or bottled water – Chlorine and chloramine in tap water can inhibit microbial growth.
- Maintain consistent temperature – Avoid cold drafts or hot spots. A kitchen cabinet away from appliances works well.
- Stick to a feeding ratio – A 1:1:1 ratio (starter:flour:water by weight) promotes balance. Adjust only if troubleshooting.
- Be patient during the slump – Days 3–4 often bring reduced activity. This is part of the ecosystem maturing.
- Smell matters – Healthy starter smells fruity, yogurty, or like ripe pineapple. Rotten garbage or sewage odors indicate contamination.
“Sourdough starters are resilient. They respond to routine. Feed them consistently, keep them warm, and they’ll reward you with reliable rise and rich flavor.” — Dr. Karl DeSaulniers, Fermentation Scientist and Author of *The Art of Sourdough*
Troubleshooting Common Issues
Even with careful attention, challenges arise. Below is a reference table outlining frequent problems and their solutions.
| Issue | Possible Cause | Solution |
|---|---|---|
| No bubbles after Day 2 | Cool temperature, low-microbe flour, chlorinated water | Switch to rye flour, use bottled water, move to warmer spot (75°F) |
| Starter rises slowly or not at all | Underfed, inactive culture, old flour | Feed twice daily, refresh with fresh flour, increase feeding ratio to 1:2:2 |
| Unpleasant odor (rotten eggs, vomit) | Acetic acid buildup, infrequent feeding | Discard 90%, feed two days consecutively; ensure regular feeding |
| Hooch forms frequently | Starvation due to delayed feeding | Feed more often or reduce starter volume between feeds |
| Mold appears (fuzzy patches) | Contamination from utensils or environment | Discard immediately; sterilize jar and tools before restarting |
Real Example: From Doubt to Daily Bread
Sarah, a home baker in Portland, tried making sourdough three times before succeeding. Her first attempts failed due to inconsistent feeding and using bleached flour. On her fourth try, she followed a strict 7-day plan using whole rye flour and bottled water. She kept the jar near a south-facing window (but not in direct sunlight) and fed it every 24 hours at 8 a.m. By Day 6, her starter doubled within five hours and passed the float test. Within a week, she baked her first loaf—chewy, open-crumbed, and tangy. Now, she maintains two starters: one white flour for everyday baking, and one rye-based for hearty loaves.
Her key insight? “I stopped treating it like a recipe and started seeing it as a pet. Once I committed to the routine, everything changed.”
Maintenance After Creation
Once established, your starter needs ongoing care. How you maintain it depends on baking frequency.
Room Temperature (Daily Baking)
If you bake every few days, keep your starter at room temperature and feed it once daily. Before baking, feed it and wait for peak activity (usually 4–8 hours) before incorporating into dough.
Refrigerated Storage (Occasional Baking)
For less frequent use, store the starter in the fridge. Feed it, let it sit at room temp for 1–2 hours, then refrigerate. Revive it 1–2 days before baking by feeding daily until active again.
Feeding Ratios and Hydration Explained
Most starters are maintained at 100% hydration—equal weights of flour and water. This creates a pourable, pancake-batter-like consistency ideal for mixing and monitoring.
Advanced bakers adjust ratios based on goals:
- 1:1:1 – Balanced maintenance (1 part starter, 1 part flour, 1 part water)
- 1:2:2 – Faster growth; useful for reviving weak starters
- 1:5:5 – Infrequent feeding; builds acidity and strength slowly
Changing ratios alters pH and microbial balance. Stick to 1:1:1 unless adjusting for specific outcomes.
FAQ: Common Questions Answered
Can I use all-purpose flour from the start?
Yes, but whole grain flour (especially rye) boosts early microbial diversity. You can transition to all-purpose after Day 3 for a milder flavor and smoother texture.
What if I forget to feed my starter?
Don’t panic. If it’s been a few days, discard most of it and feed twice in 24 hours. Hooch can be stirred in or poured off. As long as there’s no mold, it’s likely salvageable.
How do I know when my starter is “ready” to bake with?
An active starter will double predictably within 4–8 hours of feeding, be full of bubbles throughout, and pass the float test. It should smell pleasantly sour—not putrid or alcoholic.
Checklist: Building a Successful Sourdough Starter
Follow this checklist to stay on track during the first week:
- ✅ Use a clean glass jar and non-metallic spoon
- ✅ Start with whole rye or whole wheat flour
- ✅ Use filtered or bottled water
- ✅ Feed once daily at the same time each day
- ✅ Discard half before each feeding
- ✅ Keep in a warm, draft-free location
- ✅ Monitor rise, bubbles, and smell daily
- ✅ Perform float test on Day 6 or 7
- ✅ Begin baking only when consistently doubling
Conclusion: Your Living Culture Awaits
Creating a sourdough starter from scratch is both a science and an act of trust. It asks for little—consistency, observation, and care—and gives back generously in flavor, nutrition, and satisfaction. There’s deep joy in knowing your bread rises not from a packet, but from a living culture nurtured by your hands. Mistakes are part of the journey; even stalled starters can often be revived. What matters most is persistence and routine.
Now that you have the complete, step-by-step method, there’s nothing stopping you from beginning today. Mix your first batch, mark your calendar, and watch life emerge from flour and water. In less than a week, you could be pulling golden, crackling loaves from your oven—crafted entirely with your own wild yeast.


 浙公网安备
33010002000092号
浙公网安备
33010002000092号 浙B2-20120091-4
Comments
No comments yet. Why don't you start the discussion?