
Online shopping has become a daily habit for millions. With convenience comes risk—but Apple Pay was designed to balance both. It offers a secure, private, and seamless way to make purchases across websites, apps, and even in physical stores. Unlike traditional credit card transactions, Apple Pay doesn’t share your actual card number with merchants. Instead, it uses tokenization and biometric authentication to keep your data protected. Whether you're new to digital wallets or looking to maximize security, this guide walks you through every essential step of using Apple Pay safely for online payments.
How Apple Pay Works: The Security Advantage
Understanding the technology behind Apple Pay is key to trusting it. When you add a credit or debit card to Apple Pay, your actual card number isn’t stored on your device or shared with Apple. Instead, a unique Device Account Number (a digital token) is created, encrypted, and securely stored in the Secure Element—a dedicated chip on your iPhone, iPad, or Apple Watch.
Every transaction requires two layers of verification: your Face ID, Touch ID, or passcode, plus a one-time dynamic security code generated for that specific purchase. This means even if someone gains access to your phone, they can’t complete a transaction without biometric confirmation. Additionally, your payment details are never stored on Apple’s servers or passed to the merchant.
“Apple Pay sets the gold standard for mobile payment security by combining hardware-based encryption with real-time authentication.” — Dr. Lena Patel, Cybersecurity Researcher at Stanford University
Step-by-Step Guide to Setting Up Apple Pay
Before making any secure online purchase, you must first set up Apple Pay correctly. Follow these steps to ensure your wallet is ready and protected.
- Check Device Compatibility: Apple Pay works on iPhone 6 and later, iPad Air 2 and later, Apple Watch Series 1 and later, and Macs with Touch ID or paired with an Apple Pay-enabled iPhone or Apple Watch.
- Update Your Software: Go to Settings > General > Software Update to ensure you’re running the latest version of iOS, iPadOS, or watchOS.
- Open Wallet App: Tap the Wallet app on your iPhone or go to Settings > Wallet & Apple Pay on compatible iPads.
- Add a Card: Tap the “+” sign, then follow prompts to scan or manually enter your credit or debit card details.
- Verify with Your Bank: Your card issuer may require verification via text, email, or phone call. Some banks instantly approve; others may ask for additional documentation.
- Set as Default (Optional):strong> Choose whether this card should be your default for payments.
- Enable Biometrics: Confirm that Face ID or Touch ID is enabled under Settings > Face ID & Passcode (or Touch ID & Passcode).
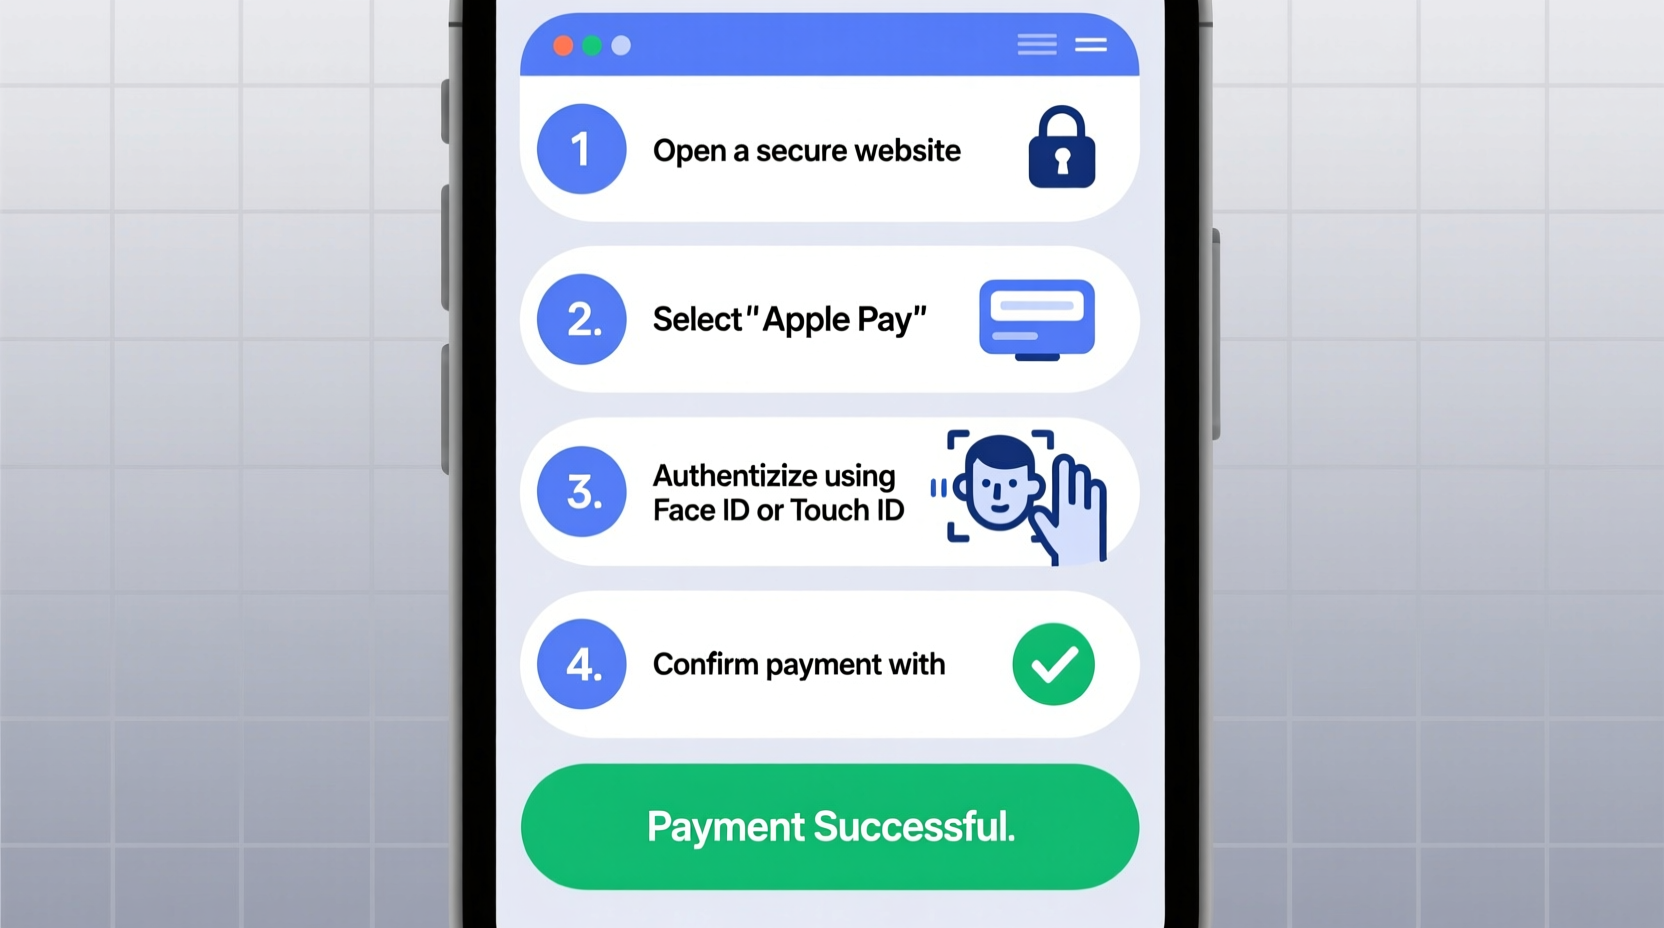
How to Make a Secure Online Purchase with Apple Pay
Once set up, using Apple Pay online is fast and secure. Here’s exactly what happens during checkout:
- When shopping on a website or within an app that supports Apple Pay, look for the Apple Pay button at checkout—usually labeled “Buy with Apple Pay” or showing the Apple Pay logo.
- Tap the Apple Pay button. Your default card will appear, along with billing, shipping, and contact information pulled from your Apple ID.
- Review all details. You can change your card, shipping address, or contact method if needed.
- Authenticate the payment using Face ID, Touch ID, or your device passcode.
- Upon successful verification, the purchase completes instantly. You’ll receive a confirmation in the Wallet app and often via email from the merchant.
Because Apple Pay generates a unique transaction code each time, your card information remains hidden—even from Apple. This process prevents replay attacks and reduces fraud risk significantly compared to entering card numbers manually.
Security Best Practices for Apple Pay Users
While Apple Pay is inherently secure, user behavior plays a critical role in maintaining safety. Follow this checklist to stay protected:
✅ Apple Pay Security Checklist
- ✅ Enable Find My iPhone to remotely lock or erase your device if lost.
- ✅ Turn on two-factor authentication for your Apple ID.
- ✅ Only add cards you personally own and monitor them regularly.
- ✅ Review recent transactions in the Wallet app weekly.
- ✅ Avoid public Wi-Fi when making payments; use cellular data or a trusted network.
- ✅ Remove old or expired cards promptly from the Wallet app.
| Do’s | Don’ts |
|---|---|
| Use biometric authentication for every transaction | Share your device passcode with anyone |
| Keep your software updated | Save card details on untrusted websites |
| Monitor transaction history in Wallet | Use Apple Pay on jailbroken devices |
| Set up notifications for purchases | Click suspicious links asking to “verify” Apple Pay |
Real-World Example: A Secure Travel Booking Experience
Sophia, a frequent traveler based in Seattle, recently booked a last-minute flight to Tokyo. She used Safari on her iPhone 14 to visit an airline’s website. At checkout, she saw the Apple Pay option and selected it. Her default card loaded instantly, along with her saved passport details (stored securely in iCloud Keychain). She reviewed the total, tapped the Apple Pay button, and confirmed with Face ID. The booking completed in seconds.
Later, while reviewing her monthly statement, Sophia noticed a small charge from a different merchant. She opened the Wallet app, tapped her card, and saw all recent transactions—including timestamps and merchant names. The unfamiliar charge wasn’t linked to Apple Pay, confirming that her digital wallet remained uncompromised. She reported the other charge to her bank immediately.
This scenario highlights how Apple Pay not only simplifies checkout but also enhances visibility and control over spending.
Frequently Asked Questions
Is Apple Pay safer than using my credit card directly online?
Yes. Traditional online payments expose your full card number to the merchant, increasing the risk of data breaches. Apple Pay uses tokenization—your real card number is never shared. Each transaction is authorized with biometrics and a one-time code, making it far more secure than typing in card details.
Can someone use Apple Pay if they steal my phone?
It’s extremely unlikely. Without unlocking the device via Face ID, Touch ID, or passcode, no transaction can be made. Even in offline mode, Apple Pay requires authentication. Additionally, if your phone is lost, you can use Find My iPhone to suspend Apple Pay remotely via iCloud.com or the Find My app.
Does Apple store my purchase history?
No. Apple does not track or store what you buy, where you shop, or how much you spend. Transaction details are visible only to you in the Wallet app and come directly from your card issuer. This privacy-first approach ensures your financial behavior stays private.
Final Thoughts: Take Control of Your Digital Payments
Using Apple Pay for online purchases isn’t just about speed—it’s about shifting control back into your hands. By eliminating the need to type sensitive card numbers, leveraging advanced encryption, and requiring biometric confirmation, Apple Pay redefines what secure digital commerce should feel like.
The setup takes minutes. The protection lasts indefinitely. And the peace of mind? Priceless. Whether you're buying groceries, booking hotels, or renewing subscriptions, Apple Pay delivers consistent security across platforms. Now that you know how to use it properly and avoid common pitfalls, there’s no better time to make it your default payment method.


 浙公网安备
33010002000092号
浙公网安备
33010002000092号 浙B2-20120091-4
Comments
No comments yet. Why don't you start the discussion?