
A well-fitted chain link bracelet enhances both comfort and style. Too loose, and it slides around; too tight, and it pinches or restricts circulation. While many purchase bracelets off-the-rack, few come with a perfect fit. Fortunately, resizing a chain link bracelet is a manageable task with the right tools and technique. Whether you're tailoring a gift or adjusting a favorite piece for daily wear, this comprehensive guide walks you through every stage—from measuring your wrist to reassembling the chain securely.
Understanding Chain Link Bracelet Construction
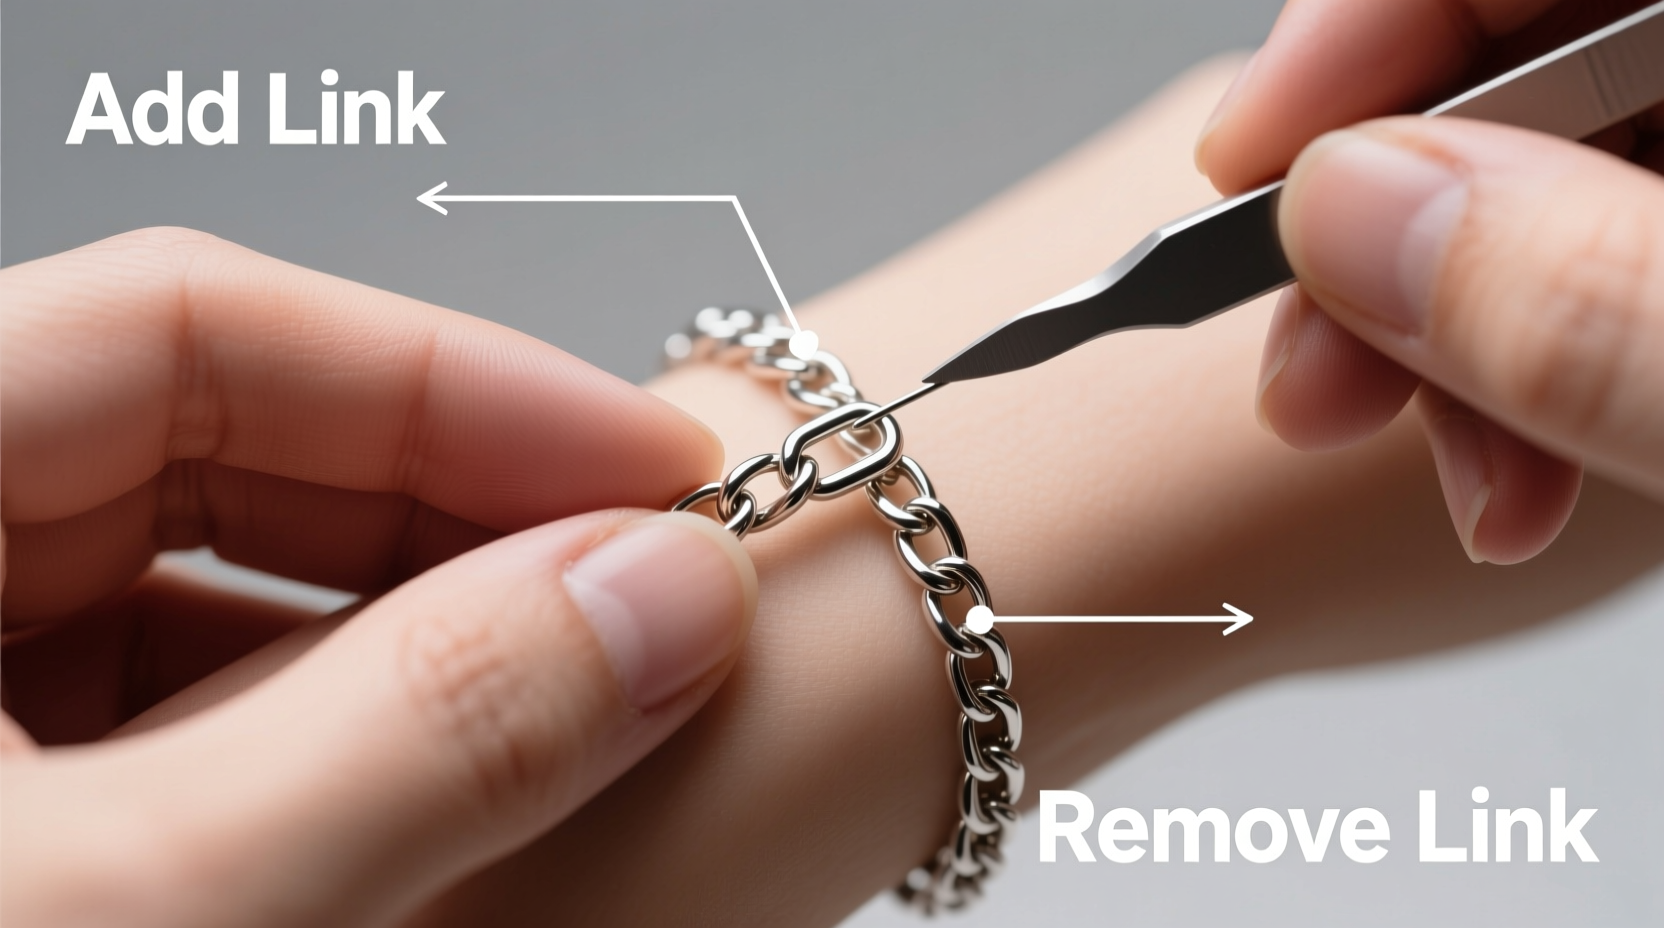
Chain link bracelets are typically made of interlocking metal links—often stainless steel, sterling silver, or gold—connected by small pins or jump rings. Each link is joined to its neighbor through these connectors, forming a continuous loop. To resize such a bracelet, you must either remove or add links, then reconnect the ends seamlessly.
Not all chains are built the same. Some use solid pins that require precise extraction and reinsertion, while others feature spring-loaded clasps or screw-in links designed for easier adjustment. Knowing your bracelet’s construction is essential before beginning any modification.
Essential Tools for Resizing
Attempting to resize a bracelet without proper tools risks damaging the metal, misaligning links, or losing tiny components. Here’s what you’ll need:
- Precision pliers (chain-nose and flat-nose) – for gripping small parts without marring the surface.
- Pin removal tool or fine awl – specifically designed to push out retaining pins.
- Jeweler’s loupe or magnifier – allows accurate visualization of tiny mechanisms.
- Soft jaw vise or padded clamp – holds the bracelet steady during work.
- Measuring tape or caliper – for precise length assessment.
- Safety glasses – protects eyes from flying pins or metal fragments.
“Never underestimate the importance of precision tools. A bent pin or scratched link can ruin an otherwise flawless piece.” — Daniel Ruiz, Master Jewelry Technician
Step-by-Step Guide to Adjusting Bracelet Size
Follow this sequence carefully to resize your chain link bracelet without compromising its integrity.
- Measure Your Wrist
Use a flexible measuring tape to wrap snugly around your wrist at the bone. Add ½ inch (1.3 cm) for comfort. For example, if your wrist measures 6.5 inches, aim for a finished bracelet length of 7 inches. - Determine How Many Links to Remove (or Add)
Lay the bracelet flat and count the total number of links. Measure the length of one full link (including the connector). Divide the amount you need to reduce by the size per link. If each link is 0.4 inches and you need to shorten by 1.2 inches, remove three links. - Locate the Removal Point
Most bracelets have a designated link near the clasp marked for removal—often indicated by a small arrow or different finish. If not, choose a link symmetrically opposite the clasp to maintain balance. - Secure the Bracelet
Place the bracelet in a soft-jaw vise or hold it firmly between non-slip pads. Avoid applying pressure directly on decorative surfaces. - Remove the Pin
Identify the direction the pin was inserted—usually visible as a slight offset in the hole. Insert the pin removal tool at the same angle and gently tap with a micro hammer or press steadily until the pin begins to emerge. Do not force it. Once partially out, grip with chain-nose pliers and pull straight out. - Separate and Remove the Link
Carefully disconnect the targeted link. Keep the pin safe in a labeled container. If adding links, align a replacement link and insert the pin halfway. - Reconnect the Chain
Align the two ends precisely. Insert the pin back through the holes using steady pressure. Ensure it goes in smoothly—if resistance occurs, realign. The pin should sit flush on both ends. - Test Fit and Final Check
Fasten the clasp and try the bracelet on. It should rest comfortably without sliding past the wrist bone. Visually inspect all connections for alignment and security.
Do’s and Don’ts When Adjusting Chain Links
| Do’s | Don’ts |
|---|---|
| Use proper lighting and magnification | Work under dim light or without eye protection |
| Keep track of removed pins in a compartmentalized tray | Place pins on open surfaces where they can roll away |
| Apply even pressure when inserting pins | Hammer aggressively, risking deformation |
| Clean the bracelet before and after adjustment | Handle with greasy hands, leaving residue |
| Test the clasp mechanism post-adjustment | Assume the clasp works without verification |
Real Example: Resizing a Gift for a Loved One
Sarah purchased a sterling silver curb chain bracelet for her sister, whose wrist measures 5.75 inches. The smallest available size was 7 inches. Rather than returning it, Sarah decided to resize it herself. Using a jeweler’s loupe, she identified the manufacturer’s removal link near the clasp. After measuring each link at 0.35 inches, she calculated that removing four links would bring the bracelet to 6.25 inches—ideal with room for comfort.
With a bench block and pin tool, she carefully extracted the pins, removed the links, and rejoined the chain. She polished the connection points lightly with a jewelry cloth. The final result fit perfectly, and her sister wore it daily without slippage or irritation. Sarah saved time and preserved the sentimental value of a personalized gift.
Expert Tips for Long-Term Wearability
For bracelets with hollow links or delicate finishes, consider professional resizing. Over-tightening or misaligned pins can weaken structural integrity over time. Additionally, frequent adjustments may wear down pin holes, especially in softer metals like gold-filled or brass.
Frequently Asked Questions
Can I resize a chain link bracelet at home without special tools?
While improvised methods exist—such as using needles or nails—they carry a high risk of scratching the metal or bending pins. Without proper tools, you may compromise the bracelet’s durability. Invest in basic jewelry tools for reliable results.
How do I know which direction to push the pin?
Inspect the link closely. One side will have a slightly protruding end, indicating the pin head. Push from the opposite, recessed side. Forcing it the wrong way can damage the hole or snap the pin.
What if I remove too many links?
If the bracelet becomes too short, contact a jeweler to add new links. Most manufacturers sell matching extension pieces. Avoid attempting to stretch the chain, as this weakens the metal and distorts the design.
Final Checklist Before Wearing
- ✅ Wrist measurement confirmed
- ✅ Correct number of links removed or added
- ✅ Pins fully inserted and flush
- ✅ Clasp operates smoothly
- ✅ No visible gaps or misalignment in links
- ✅ Bracelet sits comfortably on wrist
Conclusion
Perfectly fitting jewelry transforms how it feels and looks. Taking the time to adjust your chain link bracelet ensures it stays secure, complements your style, and avoids unnecessary wear. With patience, the right tools, and attention to detail, you can achieve professional-quality results at home. Whether it’s a personal accessory or a thoughtful gift, a properly sized bracelet reflects care and craftsmanship.


 浙公网安备
33010002000092号
浙公网安备
33010002000092号 浙B2-20120091-4
Comments
No comments yet. Why don't you start the discussion?