
Adding a blingbling (sparkly, decorative) back cover to your iPhone is one of the most satisfying ways to personalize your device. Whether it’s rhinestones, holographic finishes, or glitter-infused silicone, these covers turn your phone into a statement piece. But too often, users rush the installation, risking scratches, misalignment, or even internal pressure on delicate components. A flawless application isn’t just about aesthetics—it protects your investment while enhancing its style.
This guide walks you through a meticulous, damage-free process to install any iPhone blingbling back cover, regardless of model or material. From preparation to final inspection, every step is designed to preserve your phone’s integrity and ensure long-term durability.
Why Proper Installation Matters
A poorly installed back cover does more than look sloppy—it can compromise your iPhone’s functionality. Gaps around the edges trap dust and moisture. Excess pressure from tight-fitting cases may interfere with camera alignment or wireless charging. Glitter particles or adhesive residue can migrate into ports or speakers if not managed correctly.
Moreover, many blingbling covers use delicate materials like soft TPU, tempered glass accents, or embedded crystals that are easily scratched during improper handling. Taking time to install the cover correctly extends both the life of the case and the phone itself.
“Over 60% of case-related iPhone damage stems from rushed or incorrect installation, not daily wear.” — Dr. Lena Park, Mobile Device Durability Researcher, TechShield Labs
Essential Tools and Materials Checklist
Before beginning, gather the following items to ensure a smooth process:
- Cleaning microfiber cloth (lint-free)
- Isopropyl alcohol (70%) or screen-safe wipe
- Compressed air duster (optional but recommended)
- Plastic pry tool or guitar pick
- Magnifying glass or bright lamp (for inspection)
- Soft surface workspace (e.g., clean towel or felt pad)
- The new blingbling back cover (ensure compatibility with your iPhone model)
Step-by-Step Installation Process
Follow this precise sequence to achieve a perfect, damage-free fit:
- Power Off Your iPhone
Turn off your device completely. This prevents accidental inputs during installation and reduces risk if static discharge occurs. - Clean the iPhone Thoroughly
Use the microfiber cloth dampened slightly with isopropyl alcohol to wipe down the entire back surface, sides, and camera bezel. Remove all fingerprints, oils, and debris. Let it dry completely—about 60 seconds. For hard-to-reach areas like speaker grilles or port openings, use short bursts of compressed air. - Inspect the New Cover
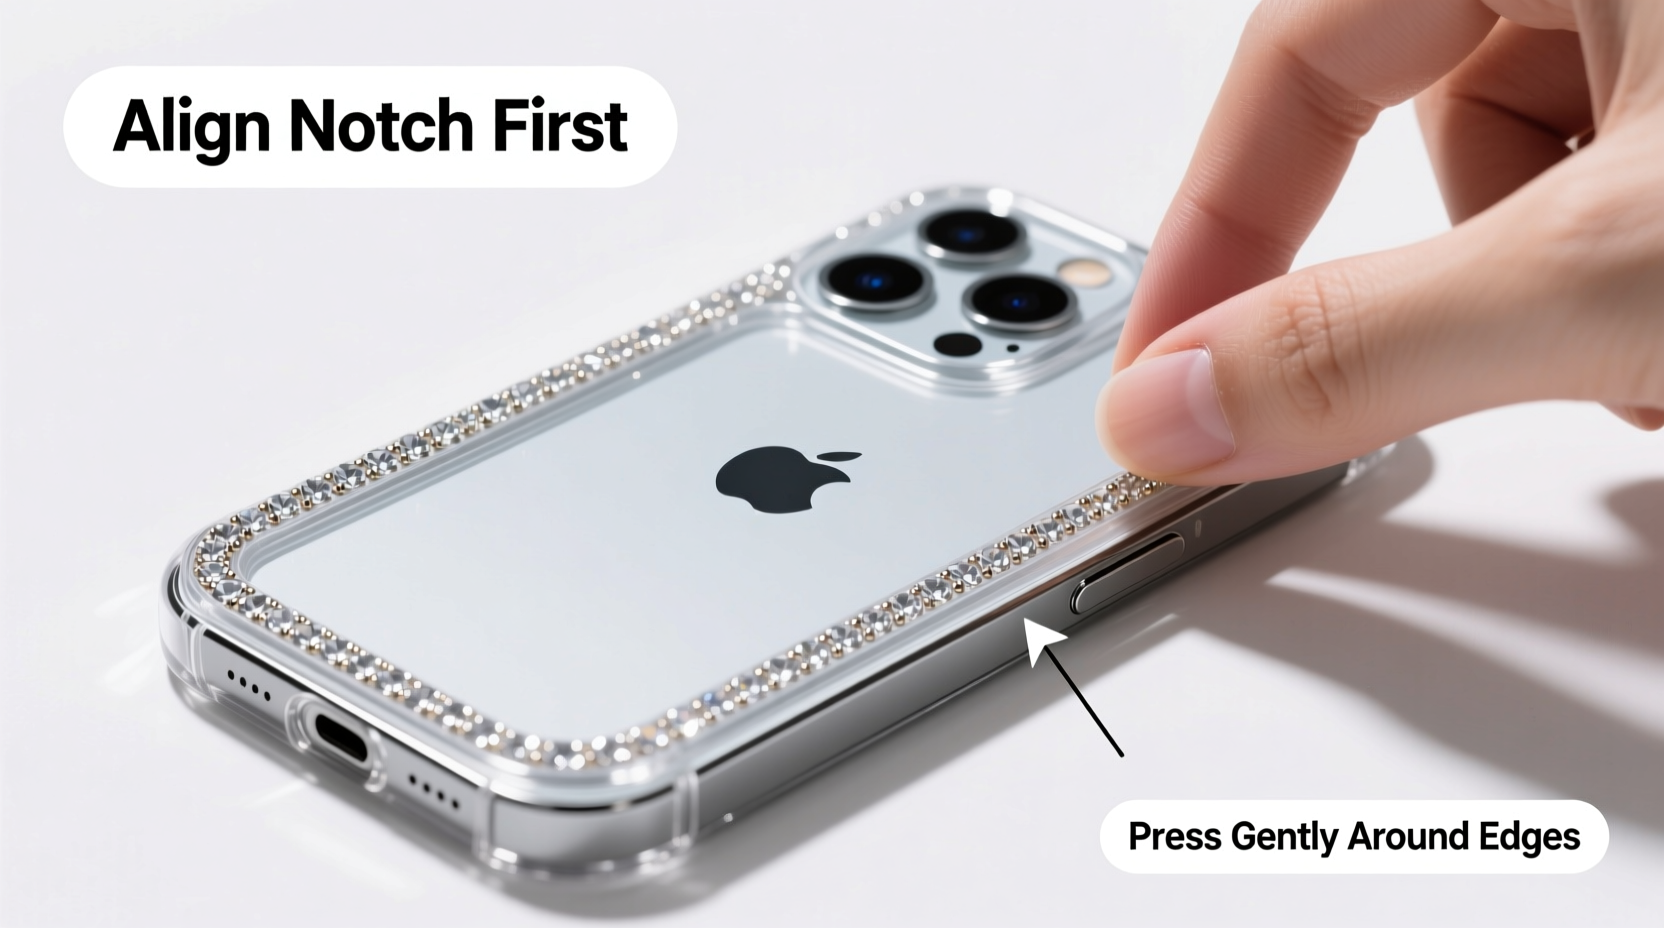
Examine the interior of the blingbling cover under good lighting. Look for loose glitter, manufacturing defects, or residual dust inside the lining. If present, gently tap it upside down or use a sticky lint roller (lightly) to remove particles. Avoid touching the inner surface with fingers. - Align the Camera Cutout First
Hold the cover above the iPhone, aligning the camera module precisely. Most blingbling cases have raised ridges around the lens—this must sit flush without pressing against the glass. Misalignment here often leads to stress cracks over time. - Start at the Top Edge
Gently lower the top edge of the cover onto the iPhone. Ensure the mute switch and volume buttons align with their respective cutouts. Do not force anything. If resistance occurs, lift and reposition—never push. - Press Down Along the Sides
Using thumbs along both long edges, slowly press downward in small sections from top to bottom. Work symmetrically to avoid twisting. High-quality TPU or hybrid cases will snap into place with light resistance; rigid plastic may require firmer but still controlled pressure. - Check Bottom Port Clearance
Verify that the Lightning port (or USB-C on newer models) is fully exposed and unobstructed. Some decorative cases extend too far inward, which can prevent cable insertion or cause overheating during charging. - Final Inspection Under Light
Rotate the phone under a bright light source. Check for gaps, warping, or uneven edges. Run a fingernail gently along the seam between the case and phone—if it catches, there may be internal stress.
Do’s and Don’ts During Installation
| Do’s | Don’ts |
|---|---|
| Use a soft, flat surface when handling your iPhone | Install the case on a carpeted or dusty floor |
| Double-check model compatibility before purchase | Assume all \"iPhone 15\" cases fit Pro and non-Pro variants |
| Test button responsiveness after installation | Leave factory stickers or protective films inside the case |
| Store the original packaging for future reference | Use scissors or keys to adjust the case position |
Real-World Example: The Cost of Rushing
Sophia, a freelance photographer in Austin, bought a premium crystal-embedded iPhone 15 Pro Max case online. Excited to show it off, she installed it within minutes of unboxing—without cleaning her phone first. Within days, she noticed a faint clicking sound when using the camera. Upon inspection, a tiny glitter flake had lodged between the lens and the case, causing the autofocus motor to strain. After sending her phone to Apple Support, she learned the constant pressure had slightly decentered the telephoto lens. Repair cost: $189. The oversight? Skipping the cleaning and inspection phase.
Her experience underscores a simple truth: five extra minutes of care can save hundreds in repair costs.
Maintenance Tips for Long-Term Shine and Protection
Once installed, maintaining your blingbling cover ensures lasting brilliance and function:
- Remove the case weekly to clean both the phone and inner lining with a dry microfiber cloth.
- Avoid exposing the phone to extreme heat (like car dashboards), which can warp plastic and loosen adhesive elements.
- If the cover uses glue-based embellishments, monitor for lifting edges—repair early with nano-glue (designed for electronics).
- Never submerge a decorated case in water, even if marketed as “water-resistant.” Moisture seeps beneath crystals and causes clouding.
Frequently Asked Questions
Can I install a blingbling cover on a phone with a screen protector?
Yes, but ensure the protector doesn’t extend beyond the screen edge. Overhang can interfere with certain case designs, especially those with raised lips. Most modern full-coverage protectors are compatible.
What if the case feels too tight and won’t snap on?
Do not force it. Double-check that you have the correct model. Some third-party cases are molded inaccurately. If alignment is correct but resistance persists, try warming the case slightly with a hairdryer on low for 10–15 seconds to increase flexibility—then retry immediately.
Are magnetic blingbling cases safe for iPhones?
Most are designed with MagSafe compatibility and pose no risk. However, avoid cheap knockoffs with unshielded magnets—they can interfere with compass calibration or battery efficiency. Stick to MFi-certified products.
Conclusion: Shine Smart, Protect Better
Your iPhone deserves more than flashy accessories slapped on haphazardly. Installing a blingbling back cover with precision reflects respect for both craftsmanship and technology. By following this methodical approach, you safeguard your device, enhance its beauty, and enjoy peace of mind knowing every detail was handled with care.


 浙公网安备
33010002000092号
浙公网安备
33010002000092号 浙B2-20120091-4
Comments
No comments yet. Why don't you start the discussion?