
Deleting a Facebook page is more complex than simply logging out or deactivating an account. Whether you're managing a personal profile linked to a brand, a business that’s closing, or a community page you no longer wish to maintain, the process requires careful planning. Missteps can leave behind digital traces, compromise privacy, or even allow others to claim your page. This guide walks you through every stage—from preparation to final deletion—with clear instructions, expert insights, and real-world considerations to ensure your Facebook presence is removed completely and securely.
Understand the Difference: Deactivate vs. Delete
Before taking action, it's crucial to distinguish between deactivating and deleting a Facebook page. Deactivation is temporary. The page disappears from public view but remains in Facebook’s system, preserving all content, followers, and admin roles. You can reactivate it at any time. Deletion, however, is permanent. Once confirmed, the page and all its content—photos, posts, messages, comments—are irreversibly erased after a 14-day grace period.
If you're uncertain about permanent removal, consider downloading your data first and deactivating temporarily. But if your goal is a clean digital break, proceed with full deletion.
Step-by-Step Guide to Permanently Delete Your Facebook Page
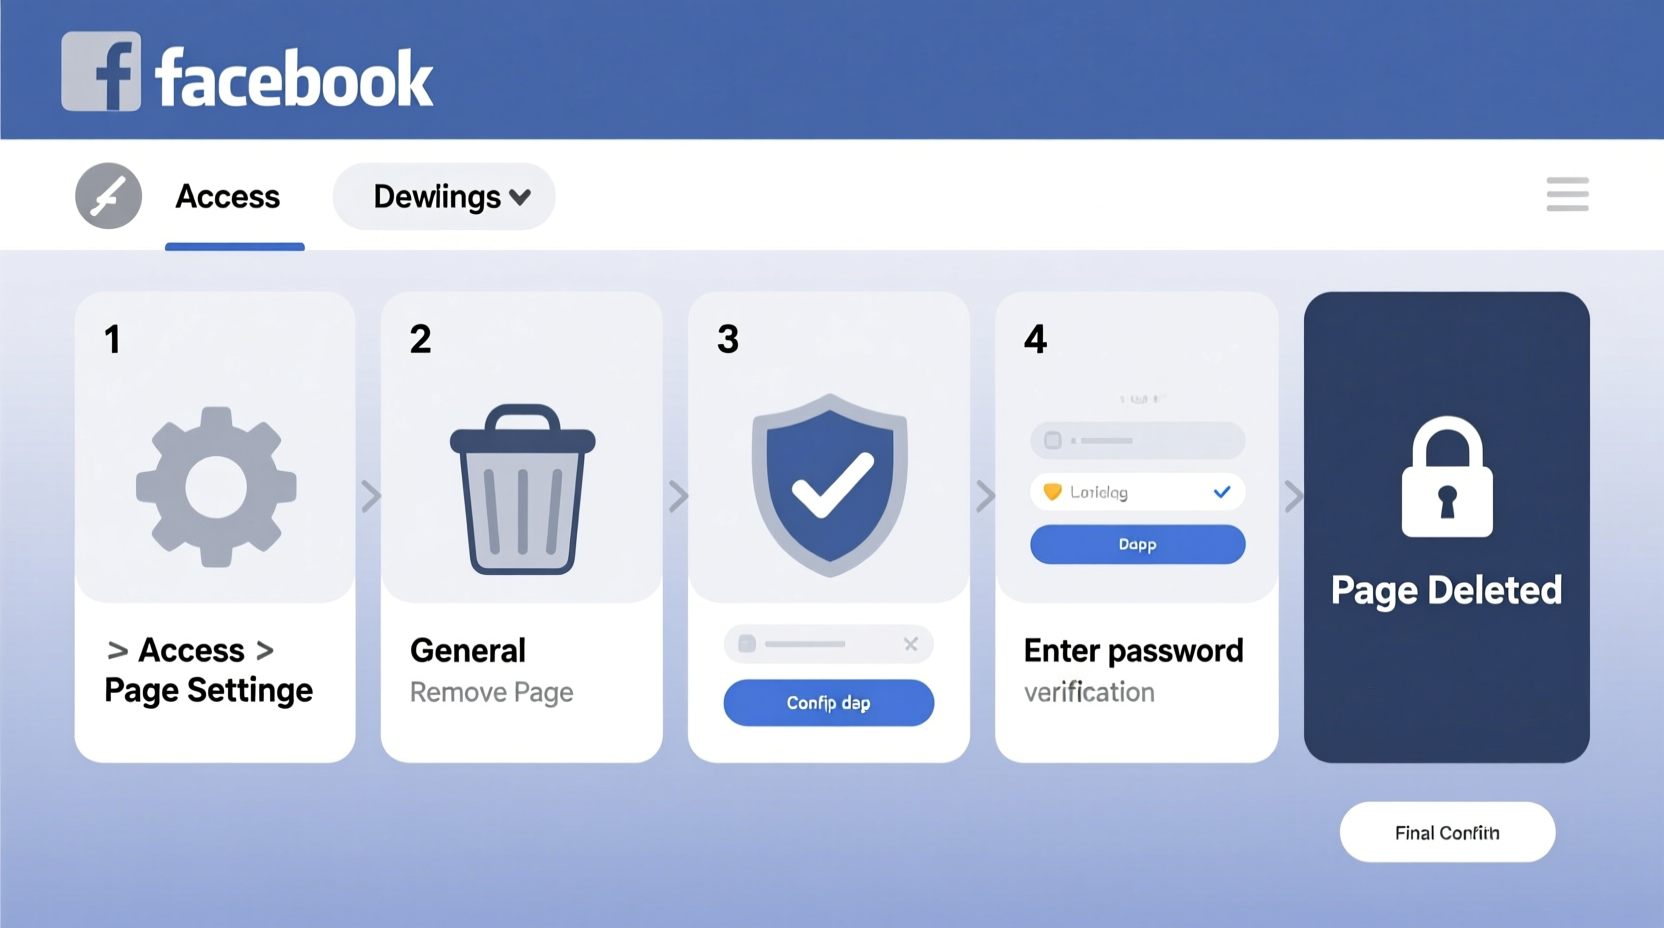
- Log in to Facebook as a Page Admin: Ensure you’re logged into the correct account with full administrative rights to the page.
- Navigate to Your Page: Go to facebook.com/pages and select the page you want to delete.
- Access Settings: Click “Settings” in the top-right menu of your page dashboard.
- Select “General” Tab: In the left sidebar, choose “General,” then scroll down to “Remove Page.”
- Click “Delete Page”: Facebook will prompt you to confirm. Note: You must have been an admin for at least seven days to initiate deletion.
- Confirm Identity and Submit Request: Enter your password and click “Submit.”
- Wait 14 Days: Facebook places the deletion on hold for two weeks. During this time, you can cancel the request by visiting the page and clicking “Cancel Deletion.”
- Final Removal: After 14 days, the page is permanently erased from Facebook’s servers.
This timeline ensures users don’t accidentally lose their pages. However, once the countdown ends, recovery is impossible.
Essential Pre-Deletion Checklist
Before initiating deletion, complete these critical steps to protect your data and maintain control over your digital footprint.
- Download all photos, videos, and posts using Facebook’s “Access Your Information” tool.
- Export important messages or customer inquiries stored in Messenger.
- Notify followers via a final post explaining the closure (optional but recommended).
- Revoke third-party app permissions linked to the page.
- Remove or reassign admin roles if others manage the page.
- Update any external websites or directories linking to the Facebook page.
- Ensure no active ads are running under the page.
Common Pitfalls and How to Avoid Them
Many users believe removing a page from public view equals deletion. Others assume that deleting their personal account automatically removes associated pages. Both assumptions are incorrect.
| Do | Don’t |
|---|---|
| Verify admin status before starting deletion | Assume any team member can delete the page |
| Wait out the 14-day deletion window without interference | Log into the page during the grace period unless canceling |
| Back up content and metadata | Delete without archiving valuable customer interactions |
| Check for scheduled posts or ads | Ignore ongoing ad campaigns tied to the page |
| Use official Facebook tools for deletion | Rely on third-party apps claiming to “erase” your page |
Mistakes like failing to remove admin access can lead to disputes or unauthorized reactivation. Always ensure you’re the one controlling the final steps.
Real Example: A Small Business Closure
Sarah ran a local bakery and used her Facebook page to share daily specials, collect orders, and build community engagement. When she decided to retire, she wanted to close her online presence respectfully and securely. She began by announcing the closure a week in advance, giving loyal customers time to say goodbye. She downloaded five years’ worth of photos, reviews, and private messages from clients. Then, she canceled her active Facebook Ads promoting weekend deals. As the sole admin, she followed the deletion steps precisely. For 14 days, she avoided logging into the page, allowing the deletion timer to run. Two weeks later, the page was gone—no trace remained. Her customers appreciated the transparency, and Sarah felt confident her digital legacy was handled with care.
“Digital closure is just as important as physical closure. A well-managed exit preserves trust and protects your reputation.” — Lena Torres, Digital Transition Consultant
Frequently Asked Questions
Can I recover my Facebook page after deletion?
No. Once the 14-day deletion period ends, the page and all its content are permanently removed. There is no recovery option. If you change your mind, you must cancel the deletion within those 14 days by accessing the page and selecting “Cancel Deletion.”
Does deleting my personal Facebook account delete my business page?
Not necessarily. If you’re the only admin of a business page, deleting your personal account may eventually cause the page to be removed—but not immediately, and not reliably. To ensure full removal, delete the page directly while still logged in. Better yet, assign another admin before deleting your personal account.
What happens to messages and comments after deletion?
All messages sent through the page’s inbox, along with comments on posts, are permanently deleted. Recipients may still have copies of messages they received, but the page-side records vanish. Public comments on other pages or profiles will remain unless manually deleted by the commenter.
Final Steps and Post-Deletion Considerations
After confirming deletion, monitor your email for Facebook’s confirmation notice. While rare, technical glitches can delay processing. If the page reappears after deletion, contact Facebook Support immediately. Additionally, consider updating your Google search footprint. Even after deletion, cached versions of your page might appear in search results for weeks. Use Google’s removal tool to expedite the disappearance of outdated links.
Finally, reflect on why you chose to close the page. Was it due to privacy concerns? Brand evolution? Personal reasons? Understanding your motivation helps prevent future digital clutter and reinforces intentional online behavior.
Conclusion
Permanently closing a Facebook page isn’t just a technical task—it’s a deliberate act of digital hygiene. By following the correct procedure, backing up essential data, and avoiding common errors, you ensure a clean, secure exit. Whether you're stepping away from social media, closing a business, or reclaiming your online identity, this process empowers you to take full control. Don’t rush it. Plan carefully, execute precisely, and close the chapter with confidence.


 浙公网安备
33010002000092号
浙公网安备
33010002000092号 浙B2-20120091-4
Comments
No comments yet. Why don't you start the discussion?