
In an era of increasing digital privacy concerns, many users are choosing to leave social media platforms entirely. Facebook, despite its global reach, has faced repeated scrutiny over data handling, targeted advertising, and mental health impacts. If you’ve decided it’s time to leave for good, simply logging out isn’t enough. Permanently closing your Facebook account requires careful planning to protect your personal information, preserve memories, and avoid accidental reactivation.
This comprehensive guide walks you through the exact steps to delete your Facebook account permanently — not just deactivate it — while ensuring your data is secured and your digital footprint minimized.
Understanding Deactivation vs. Permanent Deletion
Before taking action, it's critical to understand the difference between deactivating and deleting your Facebook account:
- Deactivation is temporary. Your profile, photos, and posts disappear from view but remain stored on Facebook’s servers. You can reactivate your account at any time by logging in.
- Permanent deletion removes your account and associated data after a 30-day waiting period. Once confirmed, recovery is impossible.
Facebook intentionally adds a 30-day grace period to prevent impulsive deletions. During this window, if you log in, the deletion process is canceled automatically.
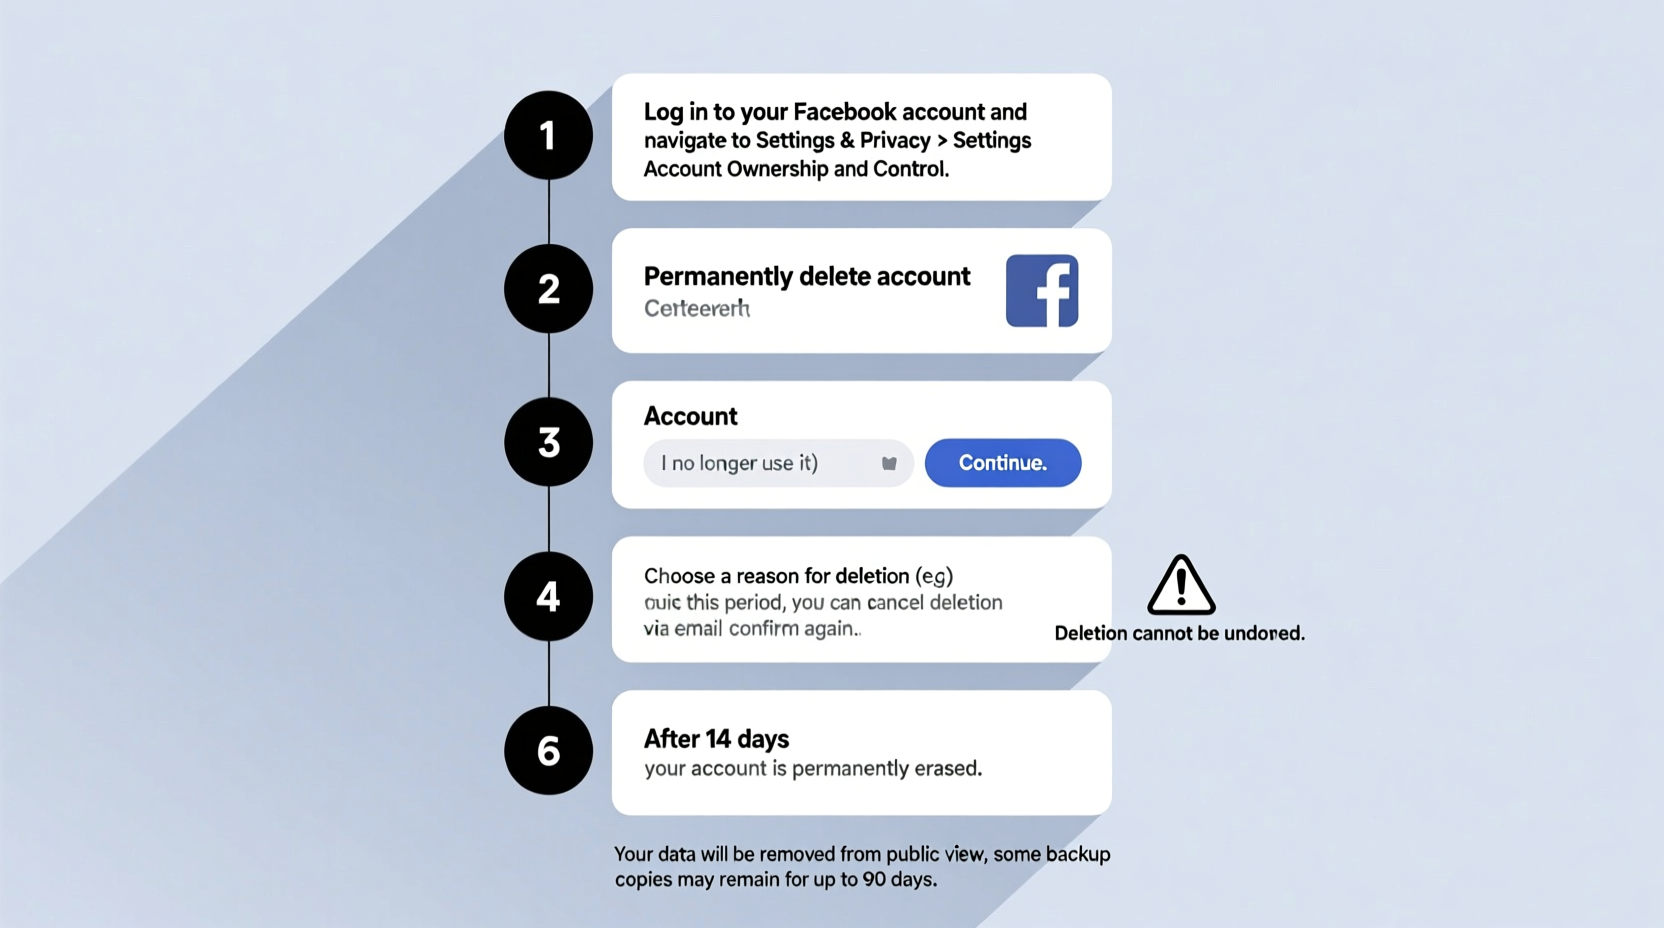
Step-by-Step Guide to Permanent Account Closure
Follow these steps carefully to ensure your account is deleted permanently and securely.
- Download your Facebook data
Before initiating deletion, archive everything you want to keep. Facebook allows you to download all your photos, messages, posts, and even ad preferences. - Log into Facebook from a trusted device
Use a computer or phone you control. Avoid public networks or shared devices during this process. - Navigate to the account deletion page
Go to: facebook.com/help/delete_account - Select “Delete Account”
Click the option to permanently delete your account, not “Deactivate.” - Enter your password
Confirm your identity when prompted. - Review the consequences
Facebook will list what will be lost: profile, photos, comments, likes, Messenger history, etc. - Submit the request
Click “Continue to Account Deletion” and confirm. - Wait 30 days
During this time, do not log in. Logging in cancels the deletion. - Account is permanently removed
After 30 days, your account and most data are erased from Facebook’s active systems.
Data Retention: What Facebook Keeps (and Why)
While Facebook claims your account is “permanently deleted,” some residual data may persist for legal or operational reasons. Understanding what remains helps set realistic expectations.
| Data Type | Status After Deletion | Notes |
|---|---|---|
| Profile Information | Deleted | Name, bio, education, work history removed. |
| Photos & Videos | Deleted | Unless saved by others in messages or tags. |
| Messages | Partially retained | Your side of conversations may remain visible to recipients. |
| Ad Interests & History | Deleted | But device-level ad tracking may continue unless disabled. |
| Logs & Metadata | Retained temporarily | Used for security, fraud prevention, or legal compliance. |
| Payment Information | Removed or anonymized | Credit card details are purged; transaction logs may remain internally. |
“We aim to remove all user data upon deletion, but certain logs are kept in line with regulatory requirements and platform integrity.” — Facebook Data Policy Team
Pre-Deletion Checklist: What to Do Before You Delete
Ensure nothing important is lost. Use this checklist before initiating deletion:
- ✅ Download your Facebook data archive via Settings > Your Facebook Information > Download Your Information
- ✅ Save important photos and videos locally or to cloud storage
- ✅ Export chat histories you want to keep (screenshots or third-party tools)
- ✅ Inform close contacts of your departure, especially if they rely on Messenger
- ✅ Unlink third-party apps connected to Facebook (e.g., Spotify, Instagram if not standalone)
- ✅ Update passwords for other services that used “Login with Facebook”
- ✅ Remove Facebook-associated email addresses or phone numbers from other accounts
- ✅ Consider keeping a backup of your downloaded data for at least six months
Real Example: How Sarah Successfully Left Facebook
Sarah, a 34-year-old teacher from Portland, used Facebook for over 12 years. She posted family updates, organized events, and messaged friends daily. But after noticing increased anxiety and unwanted political arguments, she decided to leave.
She began by downloading her entire data archive — a 15GB file containing photos, life milestones, and messages. She saved baby photos to Google Drive and printed select memories. She informed her sister and best friend via text about her departure and switched to Signal for private chats.
Sarah deactivated her account for two weeks to test how she felt. When she realized she wasn’t missing it, she initiated permanent deletion. She avoided logging in during the 30-day window and now uses a digital detox app to limit screen time.
“I didn’t realize how much mental space Facebook occupied until it was gone,” she says. “Deleting it was one of the clearest decisions I’ve made.”
Frequently Asked Questions
Can I recover my account after deletion?
No. Once the 30-day deletion period passes, your account and most personal data are permanently erased. Reactivation is not possible.
Will my messages disappear from other people’s inboxes?
No. While your profile disappears, your messages remain in recipients’ inboxes. They’ll see your name as “Facebook User” or your last displayed name, but no link to your profile.
What happens to groups or pages I admin?
Any group or page you solely administer will become inactive unless you assign a new admin beforehand. Facebook recommends transferring ownership before deletion to prevent loss of community content.
Final Steps and Ongoing Privacy
Even after deletion, consider additional actions to fully disconnect:
- Clear Facebook cookies and site data from your browser settings.
- Opt out of Facebook’s off-platform tracking via their Ad Preferences page.
- Delete the Facebook app from all devices, including phones and tablets.
- Review app permissions on your smartphone and revoke access for any remaining Facebook-linked services.
Remember, deletion doesn’t erase every trace — especially if others have tagged you in posts or saved your messages. For maximum privacy, ask close contacts to remove shared content if needed.
Conclusion
Permanently closing your Facebook account is a powerful step toward reclaiming your digital autonomy. By following this guide, you ensure your personal data is preserved where you want it, removed where you don’t, and handled with intention. The process takes preparation, patience, and resolve — but the benefits of reduced distraction, improved focus, and enhanced privacy are lasting.


 浙公网安备
33010002000092号
浙公网安备
33010002000092号 浙B2-20120091-4
Comments
No comments yet. Why don't you start the discussion?