
Facebook has become a central part of many people’s digital lives, but over time, concerns about data privacy, mental health, and online clutter have led millions to consider leaving the platform for good. While deactivating your account is temporary, permanently deleting it is irreversible—and requires careful planning. Done incorrectly, you risk losing personal data, leaving digital traces, or even falling victim to impersonation. This comprehensive guide walks you through every stage of permanently closing your Facebook account with precision, security, and peace of mind.
Understanding Deactivation vs. Permanent Deletion
Before taking any action, it’s essential to distinguish between deactivating and deleting your Facebook account. Many users confuse the two, leading to unintended consequences.
| Feature | Deactivation | Permanent Deletion |
|---|---|---|
| Status | Temporary | Irreversible |
| Data Retention | All data stored; restored upon reactivation | Data erased after 30-day grace period |
| Profile Visibility | Hidden from others | Permanently removed |
| Recovery Time | Instant (log back in) | Not possible after deletion completes |
| Messages | Still visible to recipients | Removed from your end only; copies remain with others |
If you're unsure, deactivation offers a trial break. But if you’re ready to exit Facebook for good, permanent deletion is the only way to ensure your personal information is no longer accessible to advertisers, third parties, or Facebook itself.
Preparing to Delete: Critical Pre-Steps
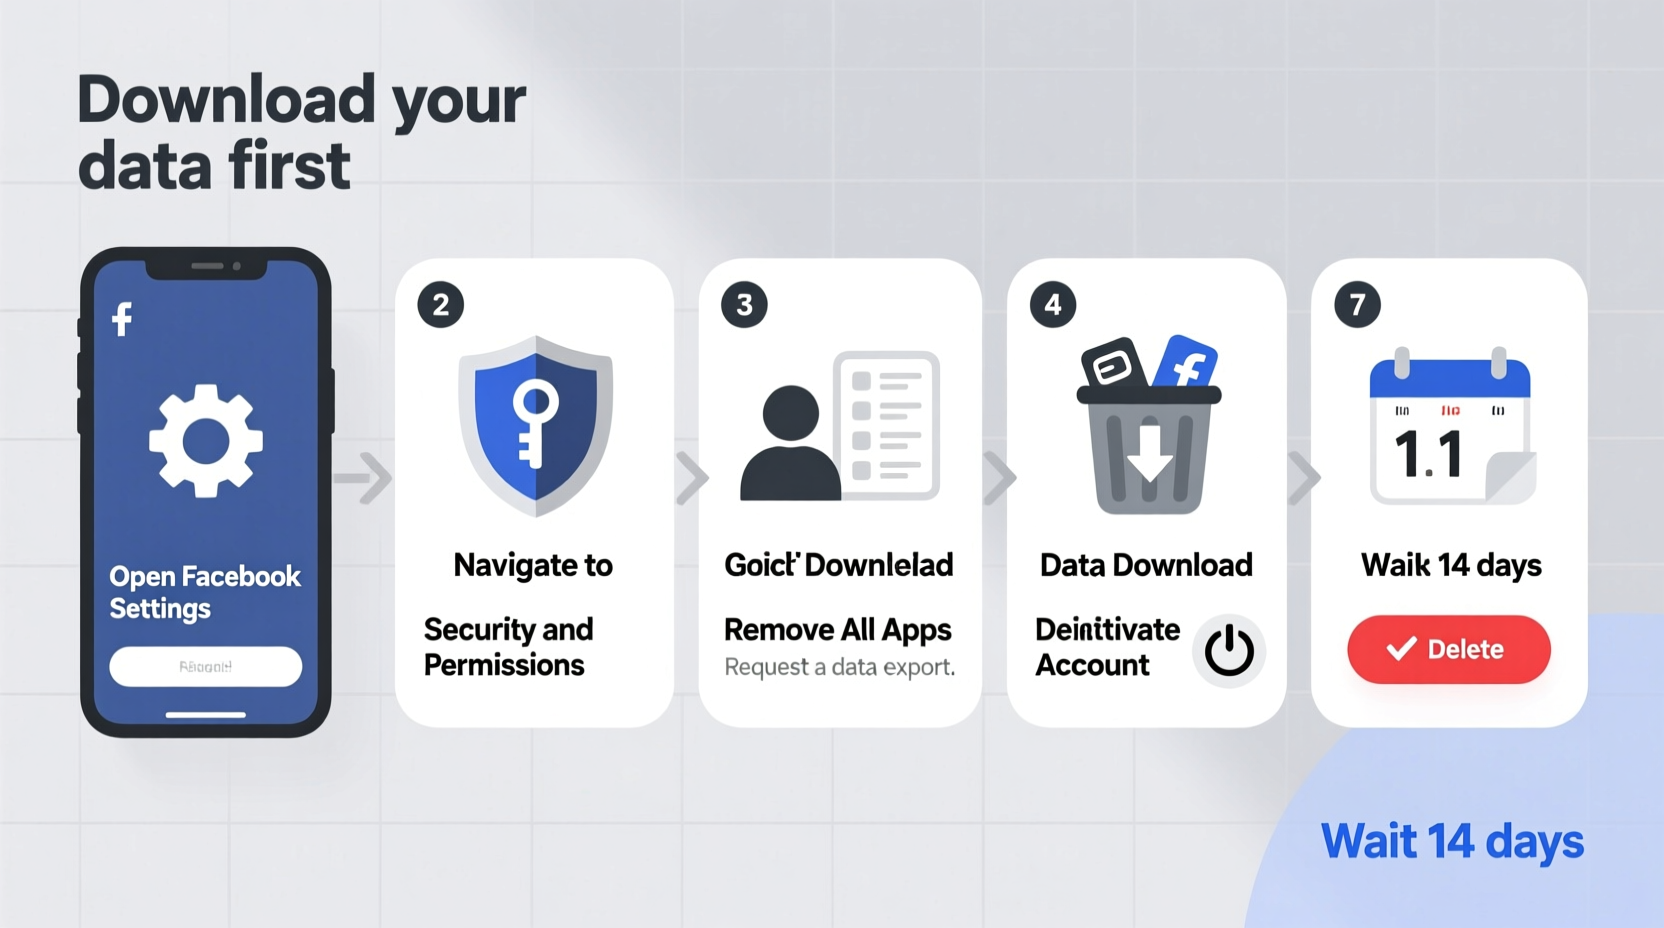
Deleting your account is fast, but preparation takes time. Rushing this process can result in lost photos, forgotten login details, or broken connections on other platforms.
- Download Your Data Archive: Facebook allows you to export all your information—photos, messages, posts, friends list, and more. Go to Settings > Your Facebook Information > Download Your Information. Choose format (HTML or JSON), media quality, and date range. The download may take hours or days depending on volume.
- Update Linked Accounts: Many services use Facebook for login (e.g., Spotify, Instagram, games). If you plan to keep using these, switch to email or phone logins before deletion. Otherwise, you may lose access.
- Inform Close Contacts: Let family and close friends know your plans. Share an alternative contact method like email or Signal so they can reach you post-deletion.
- Save Important Content: Extract key photos, event dates, or messages manually. Don’t rely solely on the archive; some metadata may not transfer cleanly.
- Unlink Third-Party Apps: In Settings > Apps and Websites, review and remove connected apps. This prevents future data leaks or automatic logins.
How to Permanently Delete Your Facebook Account: Step-by-Step
The actual deletion process occurs through Facebook’s official deletion page. Follow these steps precisely to initiate permanent removal.
- Log into Facebook using the account you wish to delete.
- Navigate to the Account Deletion Page.
- Select Delete Account Permanently.
- Enter your password to confirm identity.
- Solve any CAPTCHA challenge presented.
- Click Continue to Account Deletion.
- Confirm final deletion.
After submission, Facebook initiates a 30-day grace period. During this time, logging in will cancel the deletion. After 30 days, your account and all associated data are permanently erased from Facebook’s servers.
“Once deletion begins, there’s no technical recovery. Users must treat those 30 days as their last chance to reverse course.” — Dr. Lena Patel, Digital Privacy Researcher at CyberRights Institute
Post-Deletion Considerations and Security Measures
Even after deletion, remnants of your presence may linger. Protect yourself from future exposure with these follow-up actions.
- Monitor for Impersonation: Others may create fake profiles using your name or photos. Report impersonation via Facebook’s Help Center even without an active account.
- Remove Facebook Pixel Traces: If you ran ads or had a business page, ensure Facebook Pixel is removed from your website to stop ongoing tracking.
- Clear Browser Data: Delete cookies, cache, and saved passwords related to Facebook in Chrome, Safari, or Firefox to prevent auto-login attempts.
- Check Instagram Connection: If your Instagram was linked to Facebook, verify that it still functions independently or adjust login settings accordingly.
- Review Email Subscriptions: Unsubscribe from newsletters like “Facebook Memories” or “Friend Anniversaries” that may continue arriving temporarily.
Real-World Example: Sarah’s Clean Exit Strategy
Sarah, a freelance writer from Portland, decided to leave Facebook after noticing increased anxiety and targeted political ads influencing her mood. She didn’t want a half-measure—she wanted out completely.
Over two weeks, she downloaded her 10-year archive (which totaled 18GB), migrated her Spotify and dating app logins to email, and informed her book club via email. She waited until after a major family reunion to preserve photo access, then initiated deletion on a Sunday morning. For the next 30 days, she avoided logging in, even when curious. One month later, she received confirmation: her account was gone.
“It felt like digital spring cleaning,” she said. “I didn’t miss the noise, and I gained back two hours a week I used to spend scrolling.”
Frequently Asked Questions
Can I recover my account after deletion?
No. Once the 30-day grace period ends, your account and all data—including photos, messages, and comments—are permanently deleted and cannot be recovered.
Will my messages disappear from other people’s inboxes?
No. Messages you sent will remain in the recipients’ inboxes. They’ll appear as “Facebook User” if they try to reply, but your identity will no longer be linked.
What happens to groups or pages I managed?
Any group or page you solely administered will be deleted. If there are other admins, ownership transfers to them. Always assign backup admins before deletion if you want the page to survive.
Final Checklist Before You Delete
- ✅ Downloaded full data archive
- ✅ Saved important photos and messages
- ✅ Updated logins on third-party apps
- ✅ Removed connected apps and websites
- ✅ Notified close contacts
- ✅ Unlinked Instagram (if applicable)
- ✅ Scheduled deletion during low-engagement period
Take Back Control of Your Digital Life
Leaving Facebook isn’t just about deleting an app—it’s a conscious decision to protect your privacy, reduce digital overload, and reclaim autonomy over your attention. By following this guide, you ensure the process is thorough, secure, and aligned with your long-term well-being. There’s no obligation to stay on a platform that no longer serves you. When you’re ready, take the final step with confidence. Your digital freedom begins the moment you hit delete.


 浙公网安备
33010002000092号
浙公网安备
33010002000092号 浙B2-20120091-4
Comments
No comments yet. Why don't you start the discussion?