
Pouring concrete steps is a critical part of building access points to homes, decks, or commercial entrances. When done correctly, well-poured steps can last decades with minimal maintenance. However, poor technique leads to cracking, uneven surfaces, and structural failure over time. This guide walks through the entire process—from planning to curing—with professional insights and practical advice to ensure your concrete steps are both strong and aesthetically pleasing.
Planning Your Concrete Steps
Before any tools touch the ground, proper planning ensures safety, compliance, and durability. Begin by measuring the rise (vertical height) and run (horizontal depth) of your entryway. Standard building codes recommend each step tread be at least 10 inches deep and risers no taller than 7.75 inches for residential applications. Use these dimensions to calculate how many steps you'll need.
Sketch a layout that includes footings beneath the first step. These footings must extend below the frost line in your region to prevent heaving during freeze-thaw cycles. For most climates, this means digging at least 36–48 inches deep. Always check local building regulations before proceeding.
Essential Materials and Tools Checklist
Gathering everything ahead of time prevents delays once mixing begins. Here’s what you’ll need:
- Portland cement mix (use Type I/II for general use)
- Gravel and sand (or pre-mixed concrete)
- Reinforcing steel (rebar or wire mesh)
- Wooden stakes and 2x4s for formwork
- Wheelbarrow or mixer for blending
- Trowel, float, edger, and darby
- Level, tape measure, and string line
- Vibrator or poker tool (optional but recommended)
- Curing compound or plastic sheeting
“Proper consolidation during pouring eliminates air pockets and doubles the strength potential of concrete.” — James Holloway, Structural Concrete Technician
Step-by-Step Guide to Pouring Concrete Steps
- Dig and Prepare the Base: Excavate soil to accommodate footings and step structure. Compact the base thoroughly using a hand tamper or plate compactor. Add 4–6 inches of gravel for drainage and further compaction.
- Build the Formwork: Construct wooden forms shaped like a staircase using plywood and 2x4s. Brace them securely with stakes driven into the ground. Double-check level and alignment using a string line and bubble level.
- Install Rebar Framework: Place rebar cages or wire mesh inside the form, elevated slightly above the base with chairs or stones. Tie intersections with wire to prevent movement during pouring. Extend rebar from footings into lower steps for continuity.
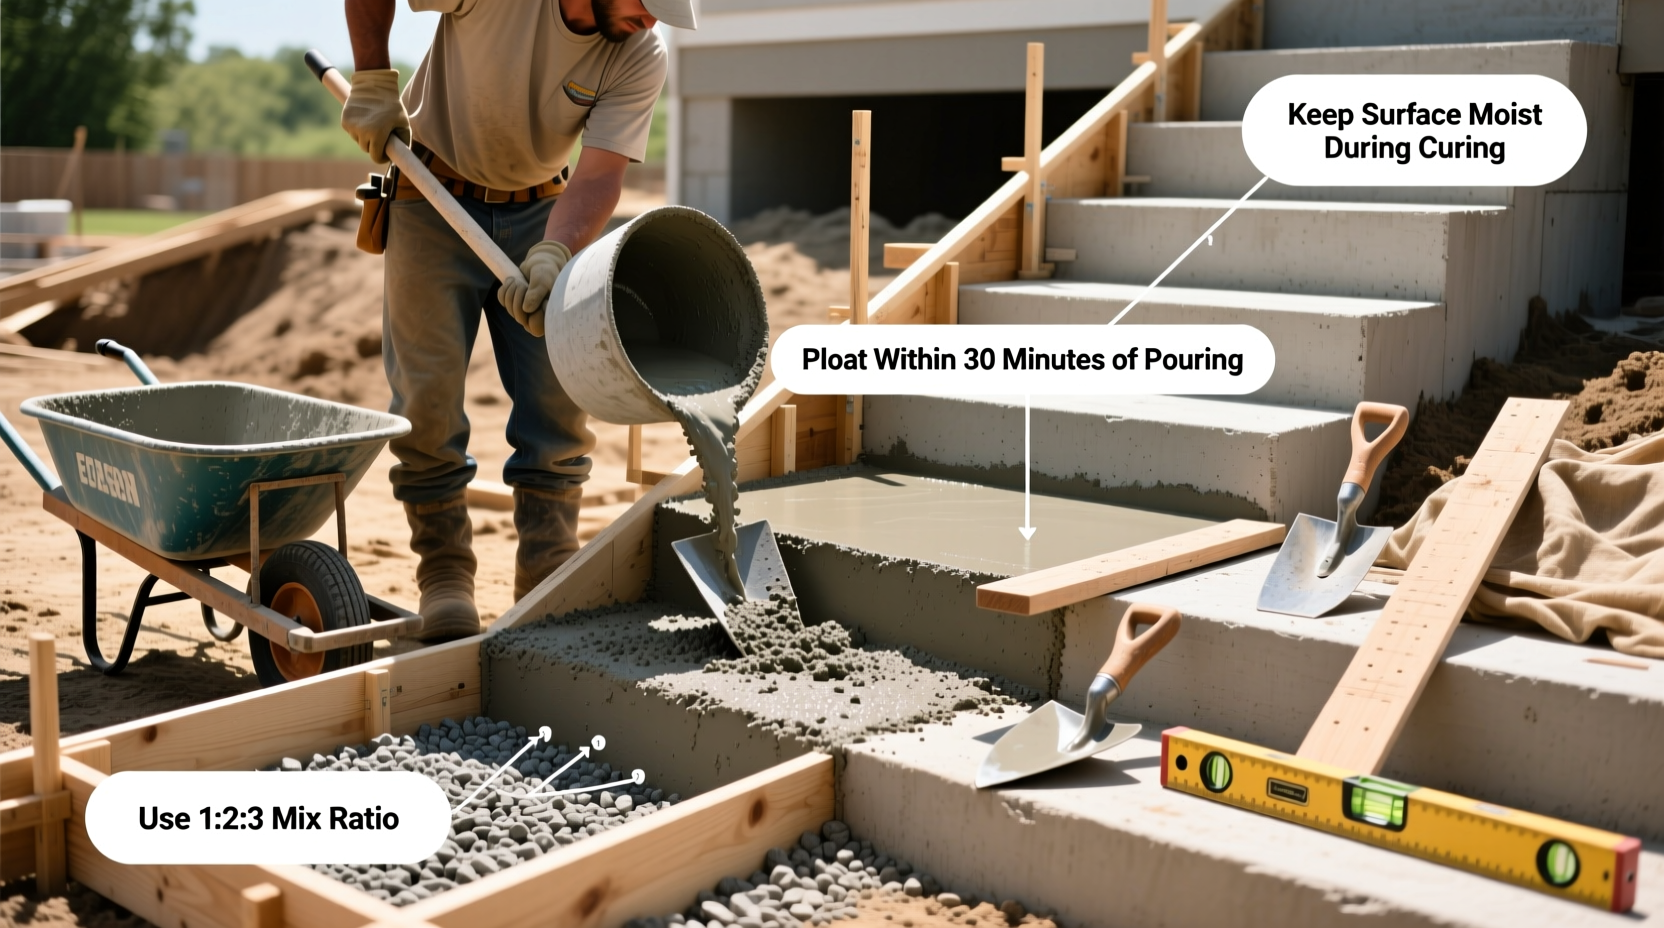
- Mix the Concrete: Follow manufacturer instructions for water-to-cement ratio. Overwatering weakens concrete significantly. Mix in small batches if hand-mixing, or rent a drum mixer for larger projects.
- Pour in Stages: Start at the bottom, filling the footing first. Then pour each step one at a time, beginning with the lowest. Work upward to avoid disturbing freshly poured lower treads.
- Consolidate and Vibrate: Use a concrete vibrator or manually poke the mixture with a rod to release trapped air. This increases density and reduces honeycombing.
- Screed and Float: Drag a straight board across the top edges of the form to level the surface (screeding). Follow with a magnesium float to smooth out imperfections.
- Edge and Finish: Run an edging tool along all corners to create rounded, chip-resistant edges. Apply a broom finish for slip resistance, especially important for outdoor steps.
- Cure Properly: Cover steps with plastic sheeting or apply a liquid curing compound within 30 minutes after final finishing. Maintain moisture for at least 7 days to allow full hydration.
Do’s and Don’ts During the Pouring Process
| Do’s | Don’ts |
|---|---|
| Use clean, uncontaminated water when mixing | Add extra water to make concrete easier to work with |
| Check weather forecast—avoid rain or extreme heat | Pour concrete in temperatures below 40°F (4°C) without protection |
| Secure all forms tightly before pouring | Allow forms to shift or bulge during placement |
| Finish edges before the surface sets | Wait too long to begin finishing; lose workability |
| Cure slowly and consistently | Let concrete dry too quickly in sun or wind |
Avoiding Common Mistakes: A Real-World Example
In suburban Denver, a homeowner attempted to pour basement entrance steps without proper footings. He built forms directly on uncompacted soil and skipped rebar reinforcement. Within two years, winter frost lifted the entire structure, causing visible cracks and a dangerous tilt. The repair cost tripled the original job due to demolition and redesign.
The fix involved excavating down 42 inches, installing gravel base and rebar cage, rebuilding forms, and repouring with air-entrained concrete suitable for freeze-thaw environments. By following code-compliant practices, the new steps have remained stable for over eight years.
Frequently Asked Questions
How long should I wait before removing the forms?
Forms can typically be stripped after 48–72 hours, depending on temperature and humidity. Avoid rushing this step—premature removal can damage edges or compromise shape. Ensure the concrete has reached sufficient hardness (usually around 70% strength) before deforming load.
Can I pour concrete steps in multiple sessions?
It's best to pour all steps in one continuous operation to ensure monolithic bonding. If unavoidable, create a keyway or roughened cold joint between pours and clean debris thoroughly. Never leave rebar exposed for more than 24 hours before continuing.
What causes concrete steps to crack, and how can I prevent it?
Cracking often stems from rapid drying, inadequate control joints, overwatering the mix, or poor sub-base preparation. Prevent it by including contraction joints every 2–3 feet, curing properly, avoiding excess water, and ensuring solid, compacted support underneath.
Final Thoughts and Next Steps
Durable, smooth concrete steps start with precision and end with patience. Every stage—from excavation to curing—impacts longevity and appearance. Rushing any phase compromises the integrity of the finished product. Investing time in quality materials, correct reinforcement, and thoughtful finishing pays off in both safety and curb appeal.
Whether you're enhancing your home’s entrance or constructing access for a new deck, applying these techniques ensures professional-grade results. Remember: concrete isn't just poured—it's crafted.


 浙公网安备
33010002000092号
浙公网安备
33010002000092号 浙B2-20120091-4
Comments
No comments yet. Why don't you start the discussion?