
Carpet binding is more than just a finishing touch—it's a crucial step in ensuring the longevity and appearance of your carpet installation. Unsecured edges fray quickly, especially in high-traffic areas, leading to premature wear and an unprofessional look. Whether you're installing wall-to-wall carpeting, area rugs, or custom floor coverings, properly bound edges prevent fraying, enhance durability, and give your project a polished, finished appearance. This comprehensive guide walks you through the entire process using professional-grade methods that deliver lasting results.
Why Carpet Edge Binding Matters
When carpet is cut during installation, the fibers along the edge are left exposed. Over time, foot traffic, furniture movement, and cleaning can cause these fibers to unravel. Edge binding reinforces the perimeter, preventing fraying and maintaining structural integrity. It also provides a clean transition between flooring materials and protects against moisture ingress at the edges.
Professionals use binding not only for functionality but also for aesthetics. A well-bound edge gives carpets a tailored look—especially important in open-concept spaces where edges are visible. Unlike tacking or stretching alone, binding ensures that even irregularly shaped rugs or loose-lay installations remain stable and attractive over time.
“Edge binding isn’t optional if you want a carpet to last beyond two years in a residential setting. It’s one of the most cost-effective ways to extend lifespan.” — Daniel Reyes, Master Floor Installer with 25+ years in commercial and residential installations
Essential Tools and Materials
Before beginning, gather the right supplies. Using proper tools ensures precision, efficiency, and durability. Here’s what you’ll need:
- Cotton or nylon binding tape – Available in various widths and colors; choose one that matches or complements your carpet.
- Heavy-duty curved needle – Ideal for hand-sewing through thick carpet layers.
- Upholstery thread (polyester or bonded nylon) – Resistant to abrasion and UV degradation.
- Seam roller and seam adhesive – For securing seams before binding (if applicable).
- Utility knife or carpet cutter – For trimming excess material cleanly.
- Staple gun or carpet tacker – To temporarily secure edges during binding.
- Tape measure and fabric chalk – For marking consistent edges.
- Pliers or binding hemmer tool (optional) – Helps fold and shape the binding smoothly.
Step-by-Step Process: How to Bind Carpet Edges Professionally
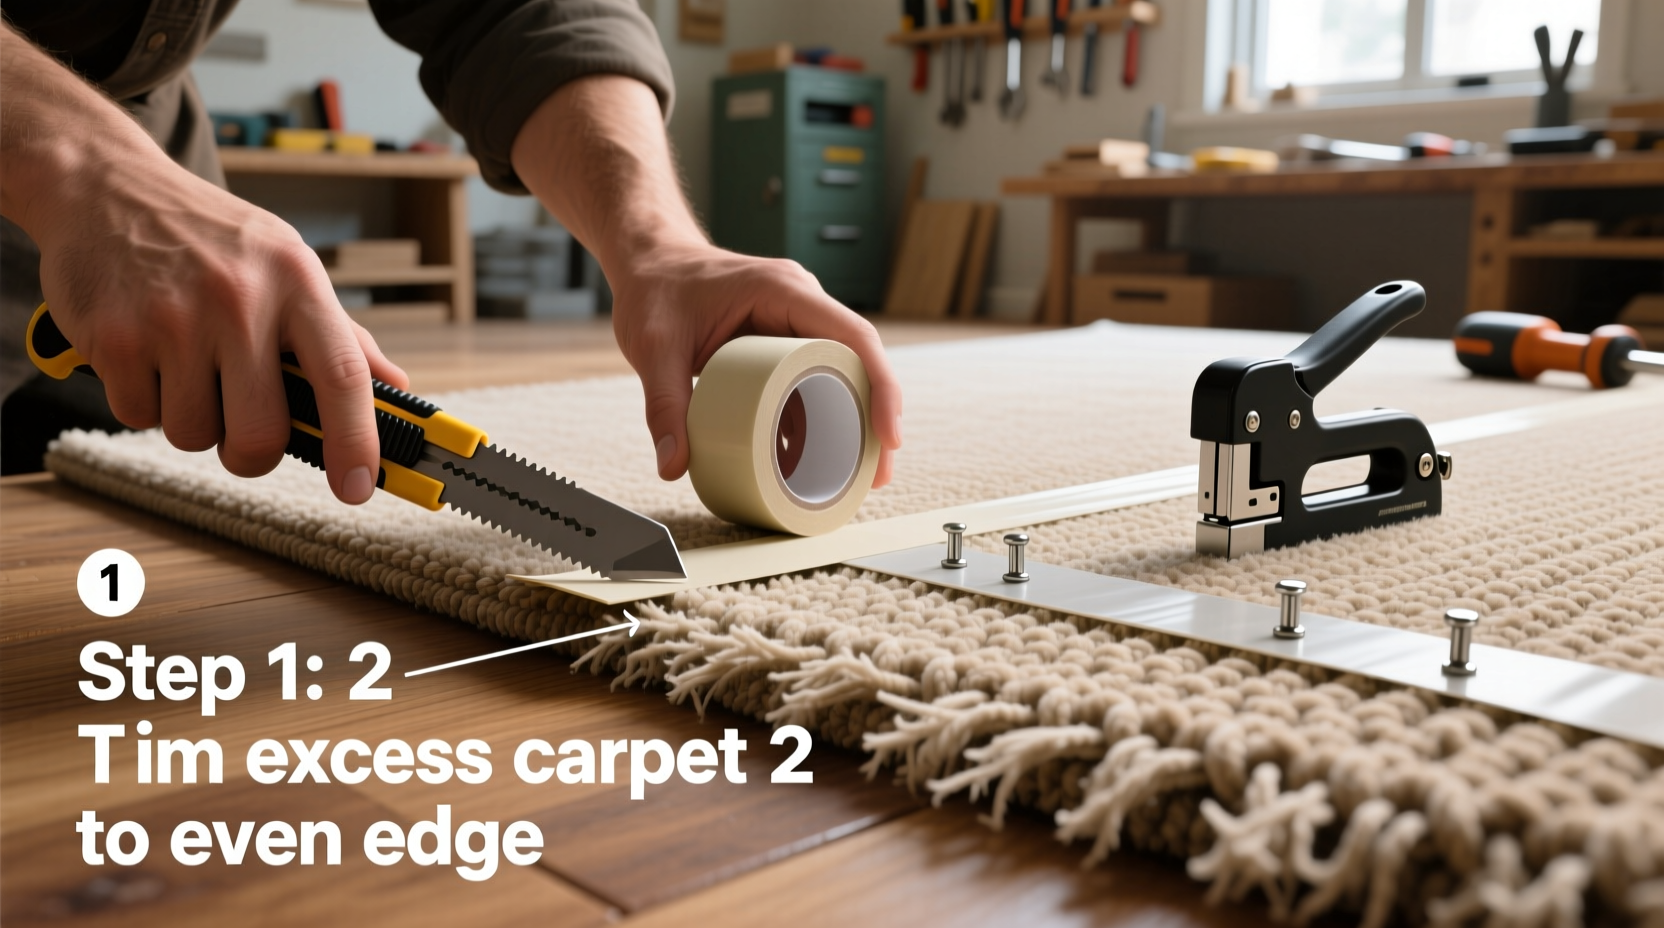
- Prepare the Carpet Edge
Cut the carpet cleanly using a utility knife and straightedge. Remove any loose fibers or uneven sections. The edge should be straight and free of jagged ends. - Measure and Cut Binding Tape
Measure the perimeter of the carpet and cut the binding tape to length, adding 2–3 inches extra for overlap. Join ends diagonally with a lapped seam if necessary to avoid bulky joints. - Align the Binding
Place the binding tape over the raw edge so that it covers exactly half on the top side and half on the underside. Use clips or staples every 6 inches to hold it in place temporarily. - Fold and Secure One Side
Fold the top portion of the binding down over the carpet edge, creating a smooth crease. Then flip the carpet over and pull the underside flap tight before folding it under. This creates a snug, wrapped effect around the edge. - Sew the Binding in Place
Using a curved needle and strong upholstery thread, sew along the inner edge of the binding where it meets the carpet. Use a whipstitch or blind stitch for durability and minimal visibility. Keep stitches close together—about 1/8 inch apart—for maximum strength. - Reinforce High-Stress Areas
Double-stitch corners and areas prone to heavy wear. These points experience the most tension and benefit from added reinforcement. - Trim Excess and Inspect
Once sewing is complete, remove temporary fasteners and trim any stray threads. Run your hand along the edge to check for smoothness and consistency.
Alternative Method: Heat-Sealed Binding for Synthetic Carpets
For synthetic carpets like nylon or olefin, heat-activated binding tape offers a no-sew option. This method uses a hot iron or heat sealer to bond the tape directly to the carpet edge. While faster, it requires careful temperature control to avoid melting the carpet fibers.
| Binding Method | Best For | Durability | Time Required |
|---|---|---|---|
| Hand-Sewn Cotton Tape | Natural fiber carpets, heirloom rugs | ★★★★★ | High |
| Synthetic Heat-Seal Tape | Indoor/outdoor carpet, patios | ★★★☆☆ | Low |
| Metal Edge Trim (L-rail) | Commercial installations, stairs | ★★★★☆ | Medium |
| Adhesive-Backed Fabric Tape | Temporary fixes, rentals | ★☆☆☆☆ | Very Low |
Common Mistakes to Avoid
- Using weak thread – Standard sewing thread lacks the tensile strength needed for carpet binding and will break under stress.
- Skipping edge preparation – Ragged or uneven cuts lead to poor binding alignment and early failure.
- Overstretching the binding tape – This causes puckering and weak spots along the seam.
- Ignoring corners – Mitering corners correctly prevents bulkiness and maintains a clean line.
Real-World Example: Restoring a Handmade Wool Rug
A homeowner in Portland had a family heirloom wool rug that began fraying after being moved to a sunroom with daily foot traffic. The original serged edge had degraded due to UV exposure and lack of protection. A local flooring specialist recommended full perimeter binding using heavyweight cotton tape and waxed polyester thread.
The technician first cleaned the rug, then trimmed the damaged edge evenly. After attaching navy-blue binding tape to match the rug’s border, they used a blind whipstitch technique to secure it. The result was a seamless, durable edge that preserved the rug’s integrity while enhancing its visual appeal. Two years later, the owner reported no signs of wear at the seams, despite continued use.
Professional Checklist for Durable Carpet Binding
- ✔ Assess carpet type and select appropriate binding material
- ✔ Cut carpet edge straight and remove loose fibers
- ✔ Choose matching or complementary binding tape
- ✔ Temporarily secure binding with staples or clips
- ✔ Fold and align binding precisely over the edge
- ✔ Sew with strong, weather-resistant thread using tight, even stitches
- ✔ Reinforce corners and high-wear zones
- ✔ Trim excess and inspect for uniformity
- ✔ Test durability by gently pulling on the binding
- ✔ Clean and condition surrounding carpet if needed
Frequently Asked Questions
Can I bind carpet edges without sewing?
Yes, but with limitations. Heat-activated or adhesive-backed tapes offer temporary solutions, especially for outdoor or low-traffic areas. However, these methods lack the long-term durability of hand-sewn binding and may fail under heavy use or temperature extremes.
How do I choose the right binding color?
Select a shade that closely matches your carpet’s dominant hue. If an exact match isn’t available, opt for a slightly darker tone—it’s less noticeable than a lighter one. Some installers use contrasting binding for decorative effect, particularly on custom rugs.
Is binding necessary for all carpet types?
While not always mandatory, binding is highly recommended for any carpet with exposed edges—especially cut pile, wool, or loosely woven materials. Loop pile and commercial-grade broadloom may resist fraying longer but still benefit from binding in high-movement zones.
Final Thoughts: Invest in Quality Finishing
Professional carpet edge binding transforms a functional floor covering into a refined, long-lasting feature. It’s a skill that combines craftsmanship with practical engineering, protecting your investment and elevating the overall quality of the installation. Whether you’re a DIY enthusiast or a contractor, taking the time to bind edges correctly pays off in durability, safety, and aesthetic coherence.


 浙公网安备
33010002000092号
浙公网安备
33010002000092号 浙B2-20120091-4
Comments
No comments yet. Why don't you start the discussion?