
Hanging Christmas lights is more than just festive decoration—it’s an art form that transforms homes into seasonal landmarks. Done poorly, tangled strands and uneven spacing can ruin the effect. But when executed with planning, precision, and care, outdoor lighting elevates curb appeal and spreads holiday cheer. This guide walks you through every stage of installing exterior Christmas lights like a professional, from choosing the right gear to final connections—all while prioritizing safety, efficiency, and visual impact.
Plan Your Layout Before Hanging a Single Bulb
The difference between amateur and pro-level displays starts long before stepping on a ladder. Professionals begin with a clear vision and a detailed plan. Walk around your property and assess architectural features: rooflines, windows, trees, columns, and entryways. These elements serve as natural anchors for light placement.
Sketch a rough diagram of your home’s exterior or use free online tools to map out where lights will go. Decide whether you want a subtle glow or a full-blown spectacle. A common mistake is overloading one area while neglecting others. Aim for balance—use symmetry and repetition to create rhythm across your façade.
Choose the Right Lights for Outdoor Use
Not all Christmas lights are created equal. For exterior installations, only use lights rated for outdoor use—this information appears on packaging and product labels. Look for the UL (Underwriters Laboratories) certification mark indicating they’ve passed safety tests for moisture, temperature, and electrical load.
LEDs have become the gold standard due to their energy efficiency, durability, and cooler operation. They consume up to 80% less energy than incandescent bulbs and last significantly longer—often 25,000 to 50,000 hours. While the upfront cost may be higher, the long-term savings in replacement and electricity make LEDs ideal for annual displays.
“Professionals don’t just pick the brightest string—they match light type to application. Warm white for traditional charm, cool white for modern crispness, and multicolor for playful flair.” — James Holloway, Residential Lighting Designer
Essential Tools and Materials Checklist
Having the right equipment streamlines installation and reduces risk. Here’s what you’ll need before climbing any ladder:
- Outdoor-rated extension cords (preferably heavy-duty, 12- or 14-gauge)
- Cord clips or gutter hooks (plastic or rubber-coated to prevent damage)
- Non-contact voltage tester
- Sturdy, stable ladder with levelers
- Gloves and non-slip footwear
- String lights (pre-tested for functionality)
- Power strips with surge protection
- Tape measure and marker
- Zip ties (UV-resistant for long-term use)
- Weatherproof outlet covers
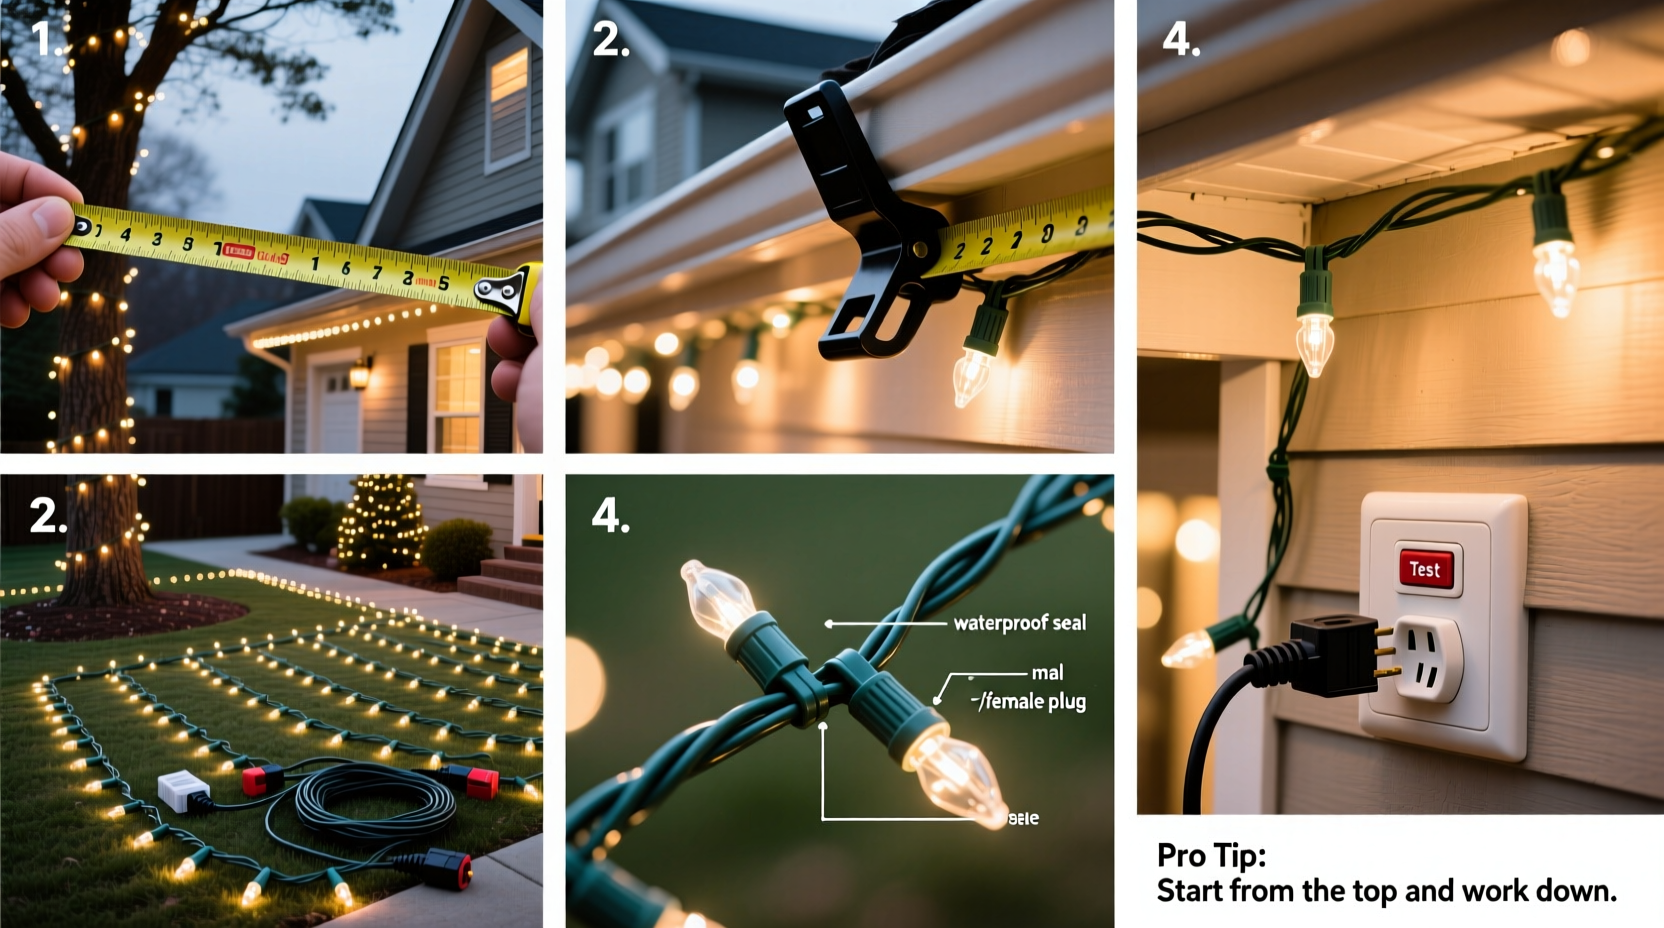
Step-by-Step Installation Process
Follow this logical sequence to install your lights efficiently and safely:
- Map Power Sources: Identify accessible outdoor outlets. If none exist near your display zones, consider installing a dedicated GFCI (Ground Fault Circuit Interrupter) outlet—consult an electrician if needed.
- Measure and Section: Break your project into zones (e.g., front porch, roofline, tree wrap). Calculate how many strings fit each zone based on bulb spacing (typically 4–6 inches apart).
- Start at the Power Source: Run extension cords along safe pathways—avoid driveways, walkways, or areas prone to snow accumulation. Secure cords with flat, lawn-safe staples or weights to prevent tripping.
- Attach Clips Strategically: Install plastic clips every 8–12 inches along gutters, eaves, or fascia boards. Never nail directly into siding or roofing materials.
- Hang Lights Horizontally First: Begin at one end of a section and weave lights through clips, maintaining even tension. Avoid pulling too tight—allow slight slack for wind movement.
- Connect Vertically When Needed: For multi-tiered displays (e.g., wrapping columns), run vertical runs using zip ties or specialized fasteners designed for downward hangs.
- Avoid Daisy-Chaining Too Many Sets: Most manufacturers recommend no more than three light strings connected end-to-end. Exceeding limits risks overheating and circuit overload.
- Secure All Connections: Elevate plug connections off the ground using outlet risers or waterproof enclosures. Seal unused openings with rubber gaskets.
- Test Before Finalizing: Turn on the system after each major section. Verify brightness, color consistency, and function.
- Final Inspection: Walk around at dusk to evaluate visibility and uniformity. Adjust misaligned sections or add missing spots.
Safety and Efficiency Best Practices
Working at heights and with electricity demands caution. The Consumer Product Safety Commission reports hundreds of emergency room visits annually related to holiday light installation—most preventable with proper precautions.
| Do’s | Don’ts |
|---|---|
| Use fiberglass ladders near power lines | Stand on metal ladders outdoors |
| Turn off power before making connections | Work in wet or icy conditions |
| Inspect cords for fraying or cracking | Run cords under rugs or through windows |
| Label circuits and breakers used for lights | Overload household circuits (max ~80% capacity) |
| Use timers to automate on/off cycles | Leave lights on unattended overnight without supervision |
Energy conservation matters too. Connect your display to a programmable timer set to operate only during peak viewing hours (e.g., 5 PM to 10 PM). Smart plugs allow remote control via smartphone and integration with voice assistants—ideal for adjusting schedules or troubleshooting remotely.
Real-World Example: Transforming a Suburban Home
Consider Sarah M., a homeowner in Denver who transformed her split-level ranch into a neighborhood favorite. She started with a simple roofline outline but expanded over years using strategic upgrades. In year one, she mapped her entire perimeter and invested in commercial-grade LED mini lights with replaceable bulbs. By year two, she added synchronized icicle lights along the eaves, controlled via a single smart hub. She installed two weatherproof outlets flanking her garage to eliminate cord clutter. Her secret? “I treat it like a renovation project—plan, phase, perfect.” Now, her display draws visitors from neighboring streets, yet consumes less power than a single space heater thanks to efficient LEDs and timed operation.
Frequently Asked Questions
How many lights do I need for my house?
A general rule is 100 bulbs per linear foot of roofline or 50 bulbs per square foot of tree surface. Measure your key areas and multiply by these benchmarks. For example, a 30-foot roofline might require three 100-light strands. When in doubt, slightly overestimate to allow for creative flexibility.
Can I leave Christmas lights up all year?
While possible, it’s not recommended. Prolonged exposure to UV rays, rain, snow, and temperature swings degrades insulation and connectors. Remove lights within a few weeks after the holidays. Clean and store them properly to extend lifespan.
What should I do if part of my string doesn’t light up?
First, check fuses located in the plug end—many sets have two small replaceable fuses. Use a fuse tester or swap with known-good ones. If that fails, inspect for broken bulbs or loose sockets. Some LED strings include shunt technology that bypasses dead bulbs; others fail entirely if one diode goes out.
Final Touches and Long-Term Maintenance
Once installed, maintain your display throughout the season. Check weekly for displaced clips, sagging wires, or animal interference (squirrels love chewing insulation). Keep connections dry and debris-free. At season’s end, remove lights carefully—coil each strand neatly and label them by location (e.g., “Front Roof,” “Porch Rail”) for faster setup next year.
Store lights on cardboard spools or in compartmentalized bins to prevent tangling. Wrap cords loosely and never fold sharply. Keep everything in a cool, dry place away from rodents. Proper storage can extend light life to 10+ seasons.
“A well-maintained lighting system pays dividends every December. Ten extra minutes of careful coiling saves hours of untangling later.” — Luis Rivera, Seasonal Display Technician
Bring the Holidays to Life—One Light at a Time
Putting up Christmas lights outside like a pro isn’t about extravagance—it’s about intention. With thoughtful planning, the right tools, and attention to detail, anyone can achieve a polished, safe, and dazzling display. Whether you're outlining eaves, wrapping trees, or crafting a custom pattern, the effort reflects care and celebration. Start small, learn each season, and build toward something memorable. Your home could become the beacon of joy your neighbors look forward to all year.


 浙公网安备
33010002000092号
浙公网安备
33010002000092号 浙B2-20120091-4
Comments
No comments yet. Why don't you start the discussion?