
Disney wristwatches are more than just timekeepers—they’re keepsakes of magical memories, birthday gifts, or daily companions for kids and collectors alike. When the second hand slows or stops entirely, it’s usually not the end of the road. Most often, a simple battery replacement is all that’s needed to bring your watch back to life. While many assume this task requires a trip to a jeweler or repair shop, you can safely and effectively replace the battery at home with minimal tools and a bit of patience.
This guide walks you through every step of the process, from identifying your watch type to sealing it back up securely. Whether it's a Mickey Mouse classic or a Frozen-themed digital model, you’ll learn how to handle it properly and avoid common mistakes that could damage the case or movement.
Understanding Your Disney Watch Type
Before attempting any repair, it's crucial to identify what kind of Disney wristwatch you have. The method for opening the back and replacing the battery varies significantly between models:
- Analog watches: Feature clock hands and typically have a metal case back secured with screws or a snap-on cover.
- Digital watches: Use an LCD screen and often have a snap-off back with a rubber gasket for water resistance.
- Hybrid models: Combine analog hands with digital functions (like alarms or chronographs), requiring careful handling during disassembly.
Most children’s Disney watches fall into the snap-back category due to simpler construction. However, older or collectible models may use screw-down backs, which require precision tools.
Essential Tools and Supplies
You don’t need a professional toolkit to replace a watch battery, but having the right items on hand makes the job safer and more efficient. Here’s what you’ll need:
| Item | Purpose | Notes |
|---|---|---|
| Plastic pry tool or guitar pick | To gently lift snap-on backs without scratching | Avoid metal tools—they can gouge the case |
| Precision screwdriver set (Phillips #00) | For removing small screws on case backs | Only required for screw-down models |
| New battery (matching original) | Replacement power source | Common types: CR1616, CR1620, CR2032 |
| Tweezers (non-magnetic) | For safely removing and placing the battery | Metal tweezers can short-circuit the movement |
| Clean workspace with magnifying glass | To see small components clearly | Prevents losing tiny parts |
“Replacing a watch battery at home saves money and teaches valuable care habits—especially when involving kids in maintaining their own accessories.” — Daniel Reyes, Watch Repair Technician, 15+ years experience
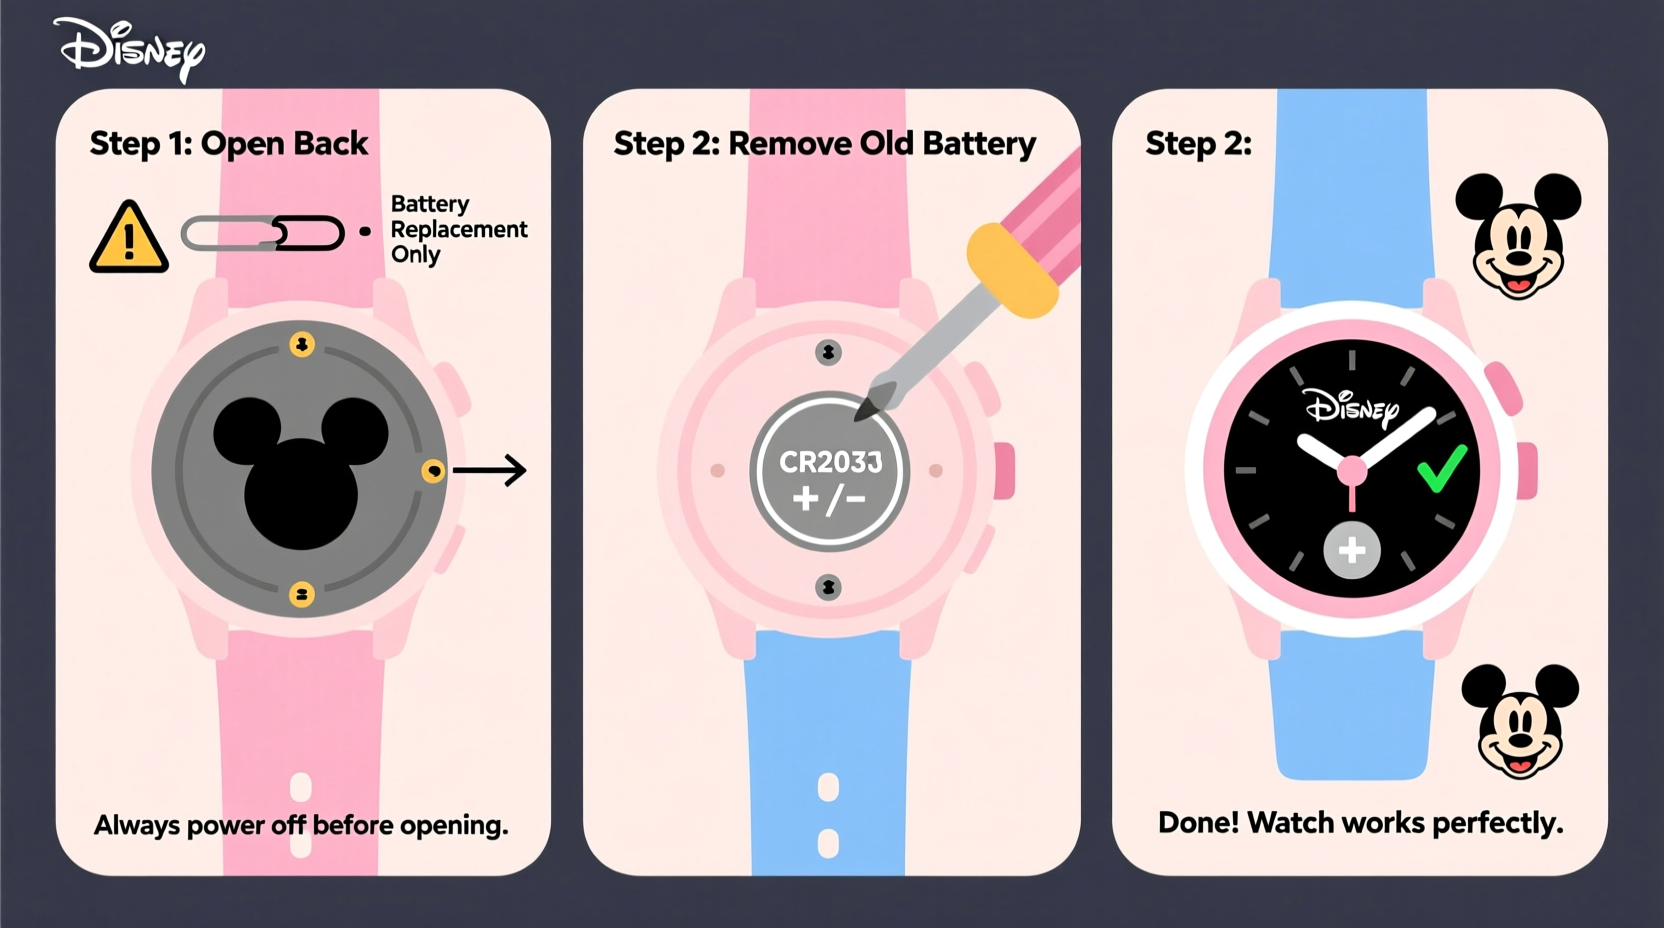
Step-by-Step Battery Replacement Process
Follow these steps carefully to replace the battery in your Disney wristwatch without causing damage.
- Power down the watch (if possible): For digital models, press and hold the mode or reset button until the display blanks. This reduces risk of electrical interference.
- Prepare your workspace: Lay out a soft cloth on a flat surface. Have all tools and the new battery ready. Good lighting is essential.
- Remove the watch band (optional): If the band obstructs access, slide it off the spring bars. Set aside safely.
- Open the case back:
- For snap-back models: Slide the plastic pry tool under the edge of the back. Gently twist to pop it open. Work slowly around the perimeter.
- For screw-down models: Use the correct screwdriver to remove each tiny screw. Place them on a labeled tray to avoid loss.
- Locate the battery: Inside, you’ll see a small silver disc held in a metal clip or housing. Note its orientation—positive side up (+) is most common.
- Remove the old battery: Use non-magnetic tweezers to lift it out. Do not touch the internal contacts with fingers; oils can corrode circuits over time.
- Clean the battery compartment: Wipe with a dry cotton swab. Check for corrosion—if present, gently rub with a pencil eraser and wipe clean.
- Insert the new battery: Place it with the correct polarity (match the + sign). Press lightly if a retaining clip holds it in place.
- Test before sealing: Wait 10–15 seconds for the watch to power on. On analog models, ensure the second hand moves smoothly. Digital screens should light up.
- Reattach the case back:
- Snap-back: Align the back and press evenly around the edges until it clicks.
- Screw-down: Reinsert screws carefully and tighten gently—over-tightening strips threads.
Real Example: Restoring a Vintage Mickey Watch
Sarah from Austin inherited her daughter’s first Disney watch—a red-faced Mickey Mouse model with a leather strap. After two years of occasional use, it stopped working. She assumed it was broken beyond repair. Instead of discarding it, she followed a DIY battery replacement using a $10 toolkit from an online retailer.
She discovered the back had four tiny screws. Using a precision screwdriver, she opened the case, found a CR1620 battery, replaced it, and reassembled the watch. To her delight, the second hand began moving immediately. Her daughter wore it proudly the next day, calling it “Mickey’s comeback.”
This story illustrates how even vintage-style Disney watches respond well to basic maintenance. With proper care, sentimental value doesn’t have to fade with function.
Do’s and Don’ts of Watch Battery Replacement
| Do’s | Don’ts |
|---|---|
| Use non-metallic tools to avoid scratches | Use sharp knives or screwdrivers as prying tools |
| Match the exact battery model number | Assume all \"3V\" batteries are interchangeable |
| Work on a clean, static-free surface | Handle internal parts with bare fingers |
| Check water resistance after reassembly | Submerge the watch immediately after repair |
| Keep screws and parts organized | Work near open windows or fans where parts can blow away |
Frequently Asked Questions
How long does a Disney watch battery last?
Most Disney wristwatch batteries last between 1 and 2 years, depending on usage. Watches with backlight features or alarms tend to drain faster than simple analog models.
Can I ruin my watch by replacing the battery myself?
It’s unlikely if you follow proper procedures. The main risks are scratching the case, misaligning the back, or inserting the battery backward. Using plastic tools and double-checking polarity minimizes these risks significantly.
Where can I buy the right replacement battery?
CR1616, CR1620, and CR2032 batteries are widely available at pharmacies, electronics stores, and online retailers like Amazon or Walmart. Always match the number printed on the old battery. Specialty sites like iFixit also sell watch-specific kits.
Final Checklist Before You Begin
- ✅ Identify your watch type (snap-back or screw-down)
- ✅ Gather necessary tools (plastic pry tool, tweezers, screwdriver)
- ✅ Purchase the correct replacement battery
- ✅ Choose a clean, well-lit workspace
- ✅ Remove the watch from the wrist and lay it face-up
- ✅ Take a photo of the interior before removing the battery
Conclusion
Replacing the battery in your Disney wristwatch doesn’t require expert skills—just attention to detail and a gentle touch. By following this guide, you preserve both the function and emotional value of a beloved accessory. Whether it’s a child’s first watch or a nostalgic collectible, keeping it running is a small act of care that extends its story.


 浙公网安备
33010002000092号
浙公网安备
33010002000092号 浙B2-20120091-4
Comments
No comments yet. Why don't you start the discussion?