
Succulents are resilient plants, but even the hardiest species can outgrow their pots. When roots begin circling the container or push through drainage holes, it’s a clear signal: your succulent needs more space. Repotting an overgrown succulent isn’t just about moving it to a larger pot—it’s about preserving root integrity, preventing stress, and encouraging healthy growth. Done incorrectly, this process can damage delicate root systems and lead to rot or decline. With careful handling and the right tools, however, you can successfully transplant your plant without harm.
This comprehensive guide walks you through every stage of repotting an overgrown succulent—identifying when it's time, preparing materials, gently freeing compacted roots, selecting the ideal soil and container, and post-transplant care. Whether you're dealing with a tightly wound Echeveria or a sprawling Jade plant, these steps ensure minimal disruption and maximum recovery.
When to Repot: Signs Your Succulent Has Outgrown Its Pot
Recognizing the signs of an overgrown succulent is the first step toward timely intervention. Waiting too long can lead to stunted growth, poor water absorption, or root-bound decay. Key indicators include:
- Roots emerging from drainage holes: This is one of the most obvious signals that roots have filled the available space.
- Soil dries out too quickly: A dense root mass leaves little room for soil, reducing moisture retention.
- Plant lifts easily from the pot: If the entire root ball comes out intact like a solid mass, it’s severely root-bound.
- Slow or distorted growth: Nutrient uptake becomes inefficient when roots are cramped.
- Pot cracking or bulging: Especially in plastic containers, outward pressure from roots can deform the sides.
Avoid repotting during dormancy (typically winter), as metabolic activity slows and healing takes longer. Also, never repot a stressed or diseased plant; address issues like pests or sunburn first.
Essential Tools and Materials Checklist
Gathering the right supplies before beginning ensures a smooth, efficient process. Having everything on hand reduces handling time and minimizes root exposure.
- New pot: 1–2 inches larger in diameter than the current one. Must have drainage holes.
- Well-draining succulent mix: Commercial blend or homemade (2 parts potting soil, 1 part perlite, 1 part coarse sand).
- Small trowel or spoon: For removing old soil and placing new mix.
- Soft brush or paintbrush: To gently remove dust and debris from crevices and roots.
- Pruning shears or scissors: Sharp, sterilized tools for trimming dead or damaged roots.
- Gloves (optional): Some succulents have irritating sap or spines.
- Tray or workspace: Covered with newspaper or paper towel to catch soil and protect surfaces.
- Watering can with narrow spout: For controlled watering after repotting.
Step-by-Step Guide to Safely Remove and Inspect Roots
The removal phase requires patience. Rushing can tear roots or break stems. Follow these steps carefully:
- Stop watering 5–7 days prior: Dry soil makes extraction easier and reduces root fragility.
- Tilt the pot sideways: Gently tap the rim against a table edge to loosen the root ball.
- Support the plant at the base: Use fingers around the stem near the soil line to avoid snapping.
- Slide the plant out slowly: If resistance occurs, don’t pull. Try tapping harder or using a chopstick to push up from below.
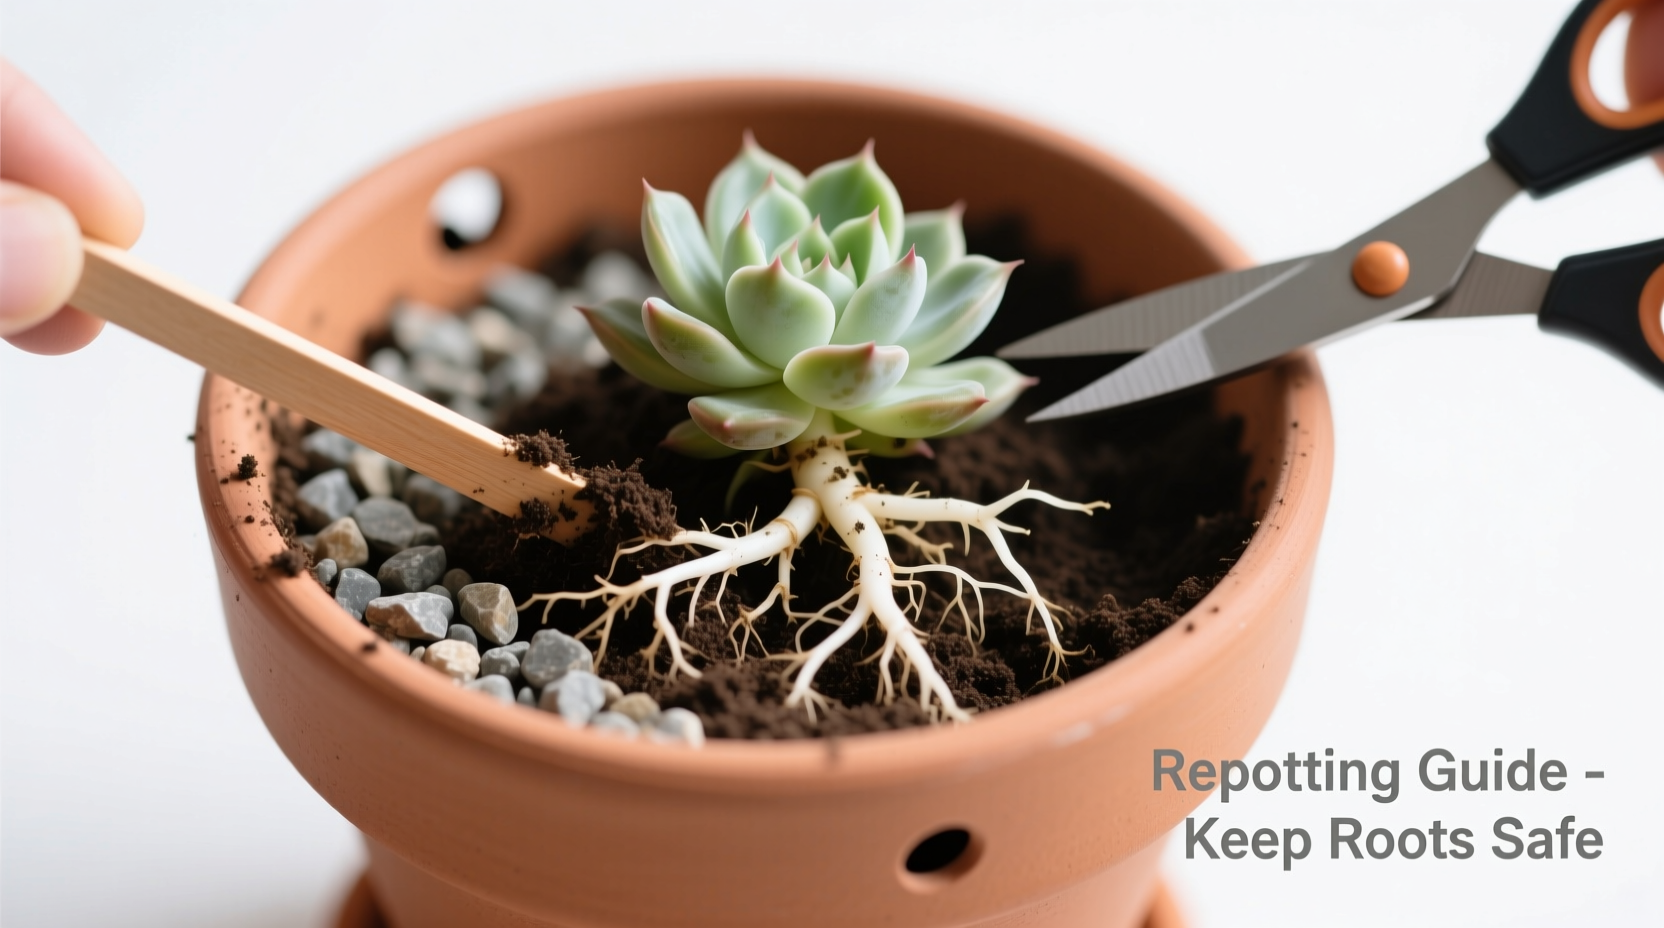
- Inspect the root system: Healthy roots are firm and white or light tan. Brown, mushy, or black roots indicate rot and should be trimmed.
- Loosen compacted roots: Use fingers or a soft brush to gently tease apart outer roots without breaking them.
If roots are tightly spiraled, make 3–4 shallow vertical cuts (about ½ inch deep) along the sides of the root ball with sterilized shears. This encourages new root growth into the fresh soil.
“Root pruning isn’t harmful if done correctly. In fact, it stimulates regeneration and helps break the cycle of circling roots.” — Dr. Lena Torres, Horticulturist & Plant Stress Specialist
Choosing the Right Soil and Container
The success of repotting hinges on two critical choices: soil composition and pot design. Using the wrong type can undo all your careful work.
| Factor | Do | Don't |
|---|---|---|
| Pot Size | Choose 1–2 inches wider than current pot | Use a pot more than 2 inches larger—excess soil retains too much moisture |
| Drainage | Select pots with bottom drainage holes | Use decorative pots without holes unless lined with a perforated inner pot |
| Soil Type | Use gritty, fast-draining succulent mix | Use standard potting soil—it holds too much water and causes rot |
| Pot Material | Porous terracotta or unglazed ceramic | Dense plastic or glass unless closely monitored for moisture |
Terracotta pots are ideal because they wick away excess moisture and promote airflow to roots. However, they dry out faster, so adjust watering frequency accordingly.
For soil, avoid pre-moistened mixes. Fill the new pot halfway with dry succulent mix before placing the plant. Center the succulent at the same depth it was previously growing—never bury the stem deeper, as this increases rot risk.
Replanting and Post-Care: Ensuring a Smooth Transition
Once the succulent is positioned, complete the repotting process with precision:
- Add soil around the sides, lightly pressing to eliminate air pockets.
- Leave about ½ inch of space between the soil surface and pot rim for easy watering.
- Do not water immediately. Wait 5–7 days to allow any root wounds to callous over.
- Place the plant in bright, indirect light during recovery. Avoid direct sun, which can stress the plant.
- After the waiting period, water thoroughly until excess drains out. Then resume normal care based on species needs.
Monitor the plant closely for the next few weeks. Leaf shriveling may occur as the roots re-establish—this is normal. However, blackening stems or sudden leaf drop suggest rot or infection.
Mini Case Study: Reviving a Root-Bound Echeveria ‘Perle von Nürnberg’
Sarah, a home gardener in Arizona, noticed her prized lavender-blue Echeveria had stopped growing and its lower leaves were thinning. Upon inspection, roots were protruding from the pot’s base and the soil dried within hours of watering. She waited until late spring to repot.
Using a 4-inch terracotta pot (up from 3 inches), she prepared a gritty mix of cactus soil and pumice. After gently removing the plant, she found tightly coiled roots with no visible rot. She made four vertical slits and loosened the outer layer before replanting.
Sarah waited six days before watering. Within three weeks, new rosette growth appeared, and the plant began producing offsets. By fall, it had doubled in size and bloomed for the first time in two years.
This case illustrates how timely repotting—even for seemingly healthy plants—can unlock renewed vitality.
Frequently Asked Questions
Can I repot a succulent while it’s flowering?
It’s best to wait until flowering ends. Blooming is energy-intensive, and repotting adds stress. If absolutely necessary, proceed gently and avoid disturbing the central roots near the bloom stalk.
How often should succulents be repotted?
Most mature succulents need repotting every 2–3 years. Fast-growing varieties like Sedum or Graptopetalum may require annual repotting. Slow growers like Haworthia can go 4+ years.
What if I accidentally break a root during repotting?
Minor root breaks are not fatal. As long as the main root crown remains intact and you allow proper drying time before watering, the plant will heal. Trim jagged ends cleanly if possible.
Final Tips for Long-Term Succulent Health
Repotting is not just maintenance—it’s an opportunity to assess overall plant health. Take note of root color, soil condition, and pest presence each time you transplant. Rotate your succulents periodically to ensure even light exposure and balanced growth.
Keep a simple journal tracking repotting dates, soil changes, and observations. Over time, you’ll recognize individual plant rhythms and refine your care approach.
“The secret to thriving succulents isn’t perfection—it’s consistency. Regular observation, thoughtful repotting, and responsive care build resilience.” — Marcus Reed, Botanical Garden Curator
Conclusion: Take Action for Healthier, Happier Succulents
Repotting an overgrown succulent doesn’t have to be intimidating. With the right timing, tools, and technique, you can free constricted roots, refresh depleted soil, and give your plant room to flourish—all without causing damage. The key lies in gentle handling, informed decisions, and patience during recovery.
Now that you know the full process—from spotting early signs to post-repot care—take a look at your collection. Is there a plant that’s been struggling or simply grown too big for its home? Apply these steps confidently and watch your succulents respond with stronger growth and vibrant color.


 浙公网安备
33010002000092号
浙公网安备
33010002000092号 浙B2-20120091-4
Comments
No comments yet. Why don't you start the discussion?