
Rolling sushi at home doesn’t require expensive tools or years of culinary training. Even if you don’t own a bamboo sushi mat, you can still create clean, tightly rolled maki using simple household alternatives. With the right technique, fresh ingredients, and a bit of patience, you’ll be crafting restaurant-quality sushi in your kitchen. This guide walks you through every stage—from selecting ingredients to slicing your first perfect roll—using only basic tools and beginner-friendly methods.
Why You Don’t Need a Sushi Mat
The bamboo sushi mat (or *makisu*) is traditionally used to apply even pressure while rolling. However, its absence shouldn’t stop you from making sushi. Many home cooks successfully use alternatives like reusable silicone mats, parchment paper, plastic wrap, or even a clean kitchen towel. The key isn’t the tool—it’s understanding how to control tension and layer ingredients properly.
“Sushi is more about precision than equipment. A steady hand and balanced fillings matter far more than the rolling surface.” — Chef Naomi Tanaka, Japanese Cuisine Instructor
Essential Ingredients and Tools
Before rolling, gather everything you need. Having all components prepped ensures smooth assembly and prevents rice from drying out during the process.
Core Ingredients
- Sushi rice: Short-grain Japanese rice seasoned with rice vinegar, sugar, and salt.
- Nori sheets: Dry seaweed sheets, preferably unroasted for maki rolls.
- Filling options: Fresh cucumber, avocado, crab sticks, smoked salmon, cooked shrimp, or tamagoyaki (Japanese omelet).
- Condiments: Soy sauce, wasabi, pickled ginger (for serving).
Household Tools That Replace a Sushi Mat
- Parchment paper: Cut to fit a cutting board; provides a non-stick surface and helps shape the roll.
- Plastic wrap: Use a double layer over a flat surface to prevent sticking and allow easy release.
- Silicone baking mat: Flexible and food-safe, offers grip similar to bamboo.
- Clean cotton towel: Thin and taut, works well when rolled gently with firm hands.
Step-by-Step Guide to Rolling Sushi Without a Mat
Follow this detailed sequence to assemble your first roll confidently and cleanly.
1. Prepare the Sushi Rice
Rinse 1 cup of short-grain rice under cold water until the water runs clear. Cook according to package instructions or using a rice cooker. Once cooked, let it cool slightly. Mix in 2 tablespoons of sushi vinegar (a blend of rice vinegar, sugar, and salt) while gently folding with a wooden spatula. Avoid mashing the grains. Cover with a damp cloth to keep moist.
2. Prep Fillings
Cut your chosen fillings into long, thin strips. For example:
- Avocado: Remove pit and skin, slice into ¼-inch thick ribbons.
- Cucumber: Seed and cut into matchsticks.
- Smoked salmon or crab: Cut into strips about the length of the nori sheet.
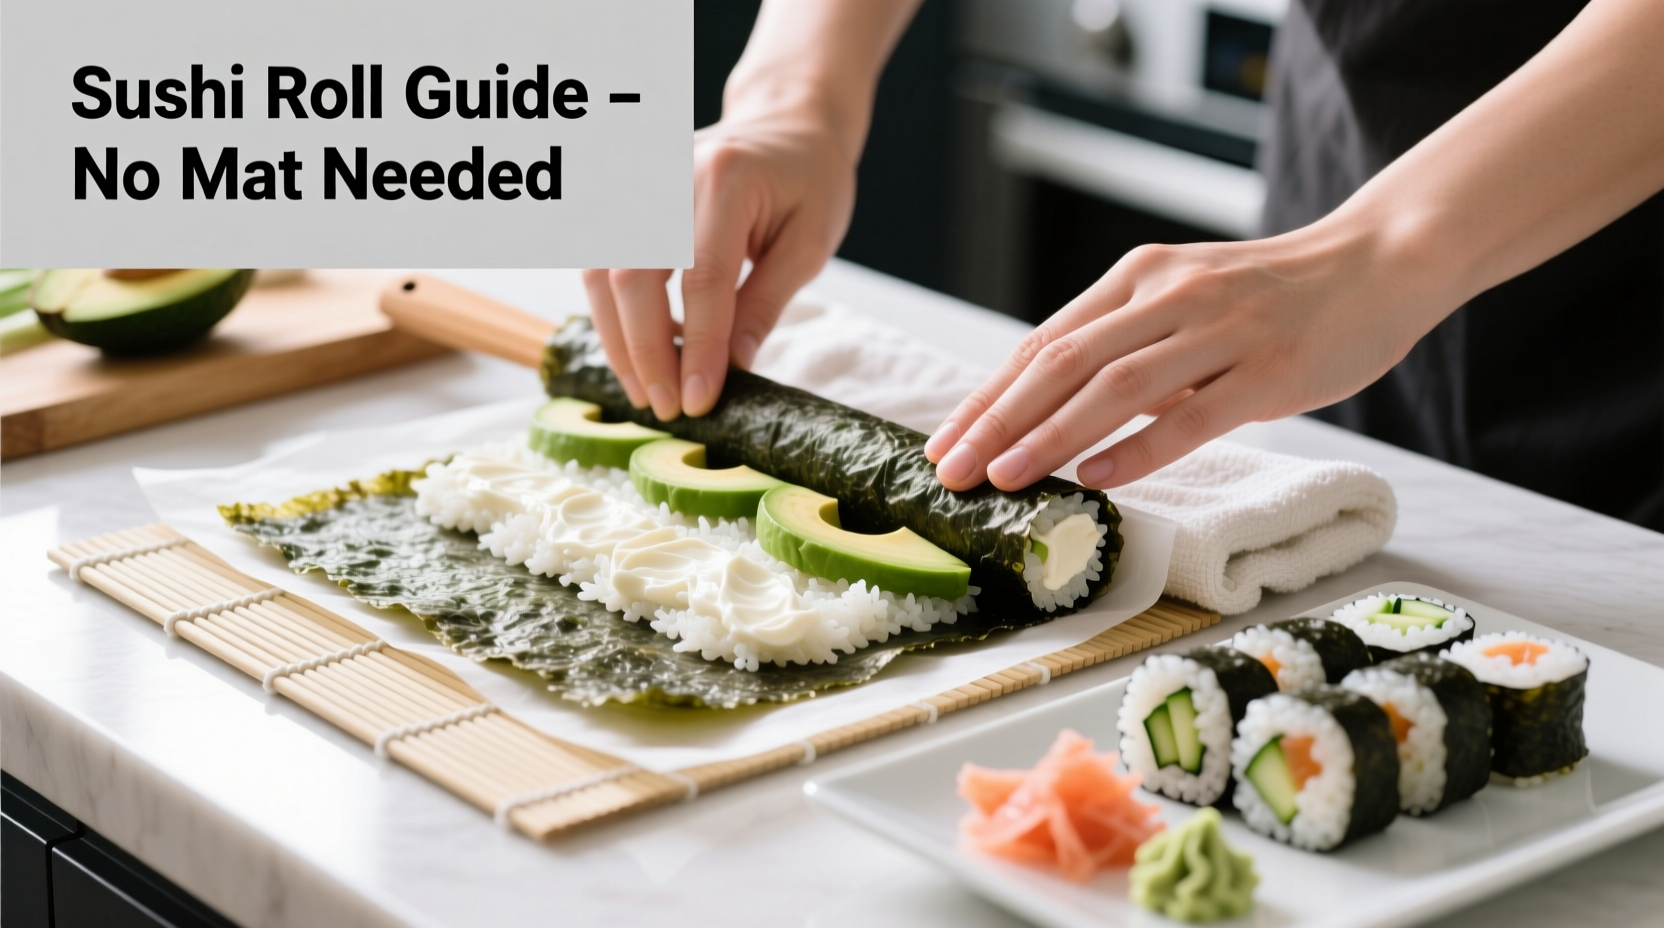
3. Set Up Your Rolling Surface
Place a sheet of parchment paper or plastic wrap on a clean cutting board. Position one nori sheet shiny-side down on top. The rough side should face up, as it holds rice better.
4. Spread the Rice Evenly
Wet your fingers lightly. Scoop about ¾ cup of sushi rice onto the nori. Gently press and spread it into a thin, even layer, covering about ⅘ of the sheet. Leave a 1-inch border at the top edge free of rice—this creates a seal when rolling.
5. Add Fillings Strategically
Arrange 2–3 fillings horizontally across the center of the rice-covered nori. Don’t overfill. Ideal combinations:
- Avocado + cucumber (classic veggie roll)
- Crab stick + avocado
- Smoked salmon + cream cheese
6. Begin Rolling Using a Substitute Base
This is where your alternative to a bamboo mat comes in.
If using parchment or plastic wrap: Lift the edge closest to you and begin rolling the nori over the fillings. Use the paper or wrap to guide and compress the roll as you go. Apply gentle, consistent pressure.
If using a kitchen towel: Place the nori on the towel. Roll the towel’s edge over the filling, using your thumbs to tuck and your other fingers to support. Pause halfway to tighten the roll before finishing.
Seal the edge by moistening the bare strip of nori with a fingertip dipped in water, then complete the roll.
7. Shape and Compress
Once rolled, place the sushi seam-side down. Use your palms to gently press along the length, shaping it into a firm cylinder. Don’t squeeze too hard—this can cause fillings to burst out.
8. Slice with a Sharp Knife
Use a sharp, non-serrated knife. Wipe it with a damp cloth between cuts to prevent sticking. Cut the roll in half first, then each half into thirds—yielding six even pieces.
Common Mistakes and How to Avoid Them
Even experienced cooks make errors when rolling sushi. Recognizing these pitfalls early improves results quickly.
| Mistake | Why It Happens | How to Fix |
|---|---|---|
| Rice sticks to hands | Dry fingers or insufficient moisture | Keep a bowl of water nearby; wet fingers lightly before handling rice |
| Roll falls apart | Overfilling or uneven rice layer | Use less filling; spread rice uniformly |
| Nori tears during rolling | Too much pressure or dry nori exposed to humidity | Roll gently; store nori in a sealed container |
| Roll is loose or misshapen | Inconsistent pressure during rolling | Pause halfway to tighten; use substitute mat for compression |
| Slices are messy | Dull knife or pressing too hard | Use a sharp blade and wipe clean between cuts |
Mini Case Study: First-Time Sushi Success in a Dorm Room
Maya, a college student living in a dorm without access to specialty kitchen tools, wanted to try making sushi for her roommates. She had no bamboo mat, limited counter space, and only basic utensils. Using a silicone baking mat she already owned for cookies, she followed a simplified version of this method. She cooked rice in a microwaveable container, used store-bought imitation crab and avocado, and rolled her maki on the silicone mat placed over a cutting board.
Her first roll was slightly uneven, but after adjusting the rice thickness and reducing filling volume, her second attempt was tight and clean. She sliced it with a steak knife, wiping it between cuts, and served it with soy sauce and pickled ginger from a local grocery. Her roommates were impressed—and Maya now makes sushi monthly, adapting fillings based on seasonal produce.
“Improvisation is part of the joy of cooking. When you understand the principles, tools become secondary.” — Chef Rafael Kim, Culinary Educator
Checklist: Rolling Sushi Without a Mat
Follow this checklist before you start rolling:
- ☐ Rinse and cook sushi rice; season with vinegar mix
- ☐ Prepare fillings: cut into thin, uniform strips
- ☐ Lay out rolling surface (parchment, plastic wrap, or towel)
- ☐ Position nori sheet rough-side up
- ☐ Spread rice evenly, leaving top edge bare
- ☐ Place fillings in center line—don’t overstuff
- ☐ Begin rolling from bottom, using substitute for compression
- ☐ Seal the edge with a damp finger
- ☐ Shape gently with palms
- ☐ Slice with sharp, wet knife
- ☐ Serve immediately with soy sauce and garnishes
Frequently Asked Questions
Can I use regular rice instead of sushi rice?
While possible, regular long-grain rice lacks the stickiness needed for rolling. It tends to fall apart. Short-grain Japanese rice has the ideal starch content for cohesion. If unavailable, Arborio rice is a better substitute than jasmine or basmati.
How do I prevent the nori from getting soggy?
Assemble rolls just before eating. If prepping ahead, keep components separate and assemble within 30 minutes of serving. Excess moisture in fillings (like watery cucumber) can also soften nori—pat ingredients dry before use.
Is it safe to eat raw fish at home?
Only use fish labeled “sushi-grade” or “sashimi-grade,” meaning it’s been frozen to kill parasites. Purchase from reputable seafood markets. For beginners, consider starting with cooked ingredients like crab sticks, smoked salmon, or tamagoyaki to minimize risk.
Conclusion: Start Rolling with Confidence
Rolling sushi at home without a mat is not only possible—it can be enjoyable and rewarding. By mastering rice consistency, ingredient balance, and using everyday substitutes for traditional tools, you gain flexibility and confidence in your kitchen. Each roll teaches you something new, whether it’s adjusting pressure or discovering flavor pairings you love.
You don’t need perfection on the first try. What matters is starting. Gather your ingredients, lay out that parchment paper, and roll your first maki today. With practice, you’ll develop a rhythm that turns homemade sushi into a favorite weekly ritual.


 浙公网安备
33010002000092号
浙公网安备
33010002000092号 浙B2-20120091-4
Comments
No comments yet. Why don't you start the discussion?