
Modern homes rely on stable, high-speed internet for work, streaming, gaming, and smart devices. While Wi-Fi is convenient, it can suffer from interference, dead zones, and inconsistent speeds. A wired Ethernet network using Cat 5 (or Cat 5e) cables provides a more reliable, faster, and secure connection. Installing Cat 5 cable throughout your home may seem daunting, but with careful planning and the right tools, it’s a manageable DIY project that pays off in long-term network performance.
Why Wired Beats Wireless for Critical Connections
Wi-Fi has improved dramatically, but physical Ethernet connections still outperform wireless in latency, speed consistency, and security. For applications like video conferencing, online gaming, or transferring large files between computers, a wired link eliminates packet loss and jitter. Cat 5e cables support up to 1 Gbps speeds over 100 meters, making them ideal for most residential needs—even if you're not ready to upgrade to Cat 6 just yet.
“Even in a Wi-Fi-dominated world, structured cabling remains the backbone of any high-performance home network.” — David Lin, Network Infrastructure Consultant
Planning Your Home Network Layout
Before cutting drywall or drilling holes, map out your network design. Start by identifying key locations: where your modem/router is located, which rooms need wired access (home office, entertainment center, basement lab), and where you can place a central patch panel or network switch.
A typical setup includes:
- A central network closet or utility area housing the router and switch
- Cable runs from this hub to wall outlets in target rooms
- Terminated jacks (RJ45) in wall plates for easy plug-in access
Sketch a floor plan and mark desired outlet locations. Keep cable runs under 100 meters (328 feet) to maintain signal integrity. Avoid proximity to electrical wiring—crossing power lines is acceptable if done perpendicularly, but parallel runs longer than 12 inches can introduce electromagnetic interference.
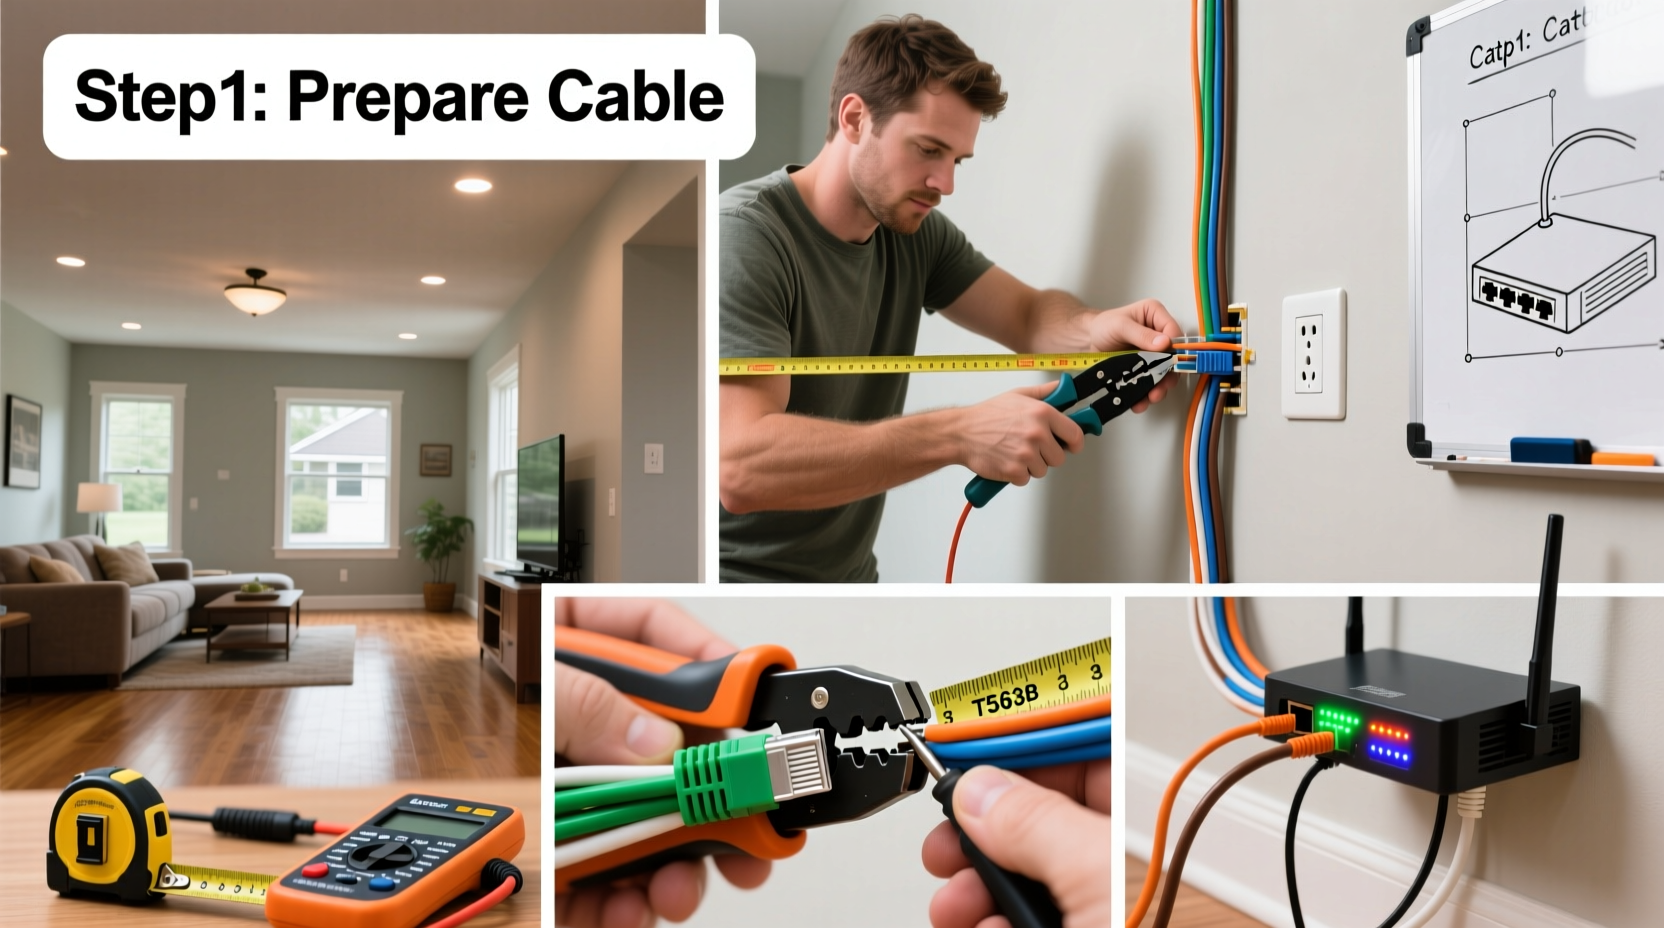
Tools and Materials Checklist
Gather these essentials before beginning:
- Category 5e or Cat 5 cable (solid core, CMR-rated for in-wall use)
- RJ45 wall jacks (keystone style, T568B wiring standard)
- Wall plates (single, double, or quad)
- Patch panel (for central termination)
- Network switch (Gigabit, managed or unmanaged)
- Cable stripper and punch-down tool
- Crimping tool and RJ45 connectors (for patch cables)
- Fish tape or flexible rod for routing through walls
- Stud finder and drill with long bit
- Label maker or masking tape for identification
- Cable tester (essential for verifying connections)
Step-by-Step Installation Process
Follow this sequence to install Cat 5 cable efficiently and correctly:
- Mark Locations: Use a stud finder to locate wall studs and mark positions for wall plates and ceiling/floor entry points. Ensure boxes will be accessible and aligned.
- Run Cable from Hub to Room: Starting at your network hub, feed the cable through the attic, basement, or crawlspace toward the target room. Use fish tape to pull cable through finished walls. Leave 12–18 inches of slack at both ends.
- Drill Access Holes: Drill 3/4-inch holes through top or bottom plates of studs to pass cable between floors. Stay at least 1.25 inches from the edge to avoid nail strikes.
- Install Wall Boxes: Mount low-voltage brackets in the wall at desired height (typically 12–18 inches above floor). Feed cable into the box, leaving enough slack to reach the jack.
- Terminate Wall Jacks: Strip the outer jacket, straighten wires, and arrange according to T568B standard (White-Orange, Orange, White-Green, Blue, White-Blue, Green, White-Brown, Brown). Use a punch-down tool to secure each wire into the keystone jack.
- Label All Cables: Label both ends immediately—use consistent numbering (e.g., “Office-1”, “Living Room-2”). This prevents confusion later.
- Terminate at Patch Panel: At the central hub, strip and punch down each cable onto the patch panel using the same T568B standard.
- Connect Switch and Test: Link patch panel ports to a Gigabit switch using short patch cables. Plug in a laptop to each wall jack and test connectivity and speed.
Do’s and Don’ts of In-Wall Cable Management
| Do’s | Don’ts |
|---|---|
| Use CMR or CMP-rated cable for in-wall installations | Never use stranded or non-plenum cable inside walls |
| Maintain minimum bend radius (1 inch for Cat 5e) | Avoid sharp kinks or crushing cables with staples |
| Separate data cables from AC power lines by at least 12 inches | Don’t run Ethernet parallel to electrical wiring |
| Test every cable with a continuity tester before closing walls | Don’t assume all connections work without verification |
| Label every cable at both ends | Don’t wait until the end to label—do it as you go |
Real-World Example: Upgrading a Two-Story Home
Consider Mark, a remote software developer living in a 2,000 sq ft two-story house. His Wi-Fi was spotty in the upstairs office and basement media room. He decided to install Cat 5e cabling to improve reliability.
He began by placing a Gigabit switch in a closet near the basement router. From there, he ran cables through the attic to the upstairs office and master bedroom, and along the baseboard under carpet to the basement TV wall. Using fish tape and a drill, he fed cables through small holes drilled behind baseboards. Each room received two wall jacks.
After terminating and labeling all ends, he tested each line with a basic cable tester. All passed. Once connected, his office PC achieved full gigabit speeds with zero packet loss—critical for daily Zoom calls and cloud development environments. The basement gaming console also saw lower ping times during online matches.
The entire project took one weekend and cost under $200 in materials. Mark now enjoys seamless performance and plans to add IP cameras using the spare ports.
Testing and Troubleshooting Tips
Never skip testing. A basic Ethernet cable tester checks for correct pinouts, shorts, and continuity. If a cable fails:
- Verify both ends follow the same wiring standard (T568B recommended)
- Check for crossed or mis-punched wires
- Ensure no conductors are cut or loose in the jack
- Re-terminate if necessary
If you get link light but no speed, check switch compatibility and ensure auto-negotiation is enabled. For intermittent issues, inspect for tight bends or damaged insulation.
Frequently Asked Questions
Can I use Cat 5 instead of Cat 5e?
Technically yes, but Cat 5 only supports up to 100 Mbps under Gigabit conditions. Cat 5e is backward compatible, widely available, and supports full Gigabit speeds. It's the smarter choice for new installations.
Is it safe to run Ethernet cables alongside electrical wires?
Only if they cross at perpendicular angles. Long parallel runs can induce noise. Maintain at least 12 inches of separation when possible. Use shielded cable (STP) only if necessary and properly grounded.
Do I need a professional electrician for this?
No—Ethernet uses low voltage (less than 5V) and is exempt from electrical codes in most areas. However, if you’re opening walls extensively or unsure about structural elements, consult a qualified contractor.
Final Steps and Future-Proofing
Once all cables are tested and functional, secure loose ends, install faceplates, and connect devices. Consider setting up VLANs or Quality of Service (QoS) rules on your router to prioritize traffic.
To future-proof, even if you install Cat 5e today, consider pulling an extra conduit or leaving space for fiber or Cat 6A upgrades. You won’t regret the foresight when 2 Gbps or 10 Gbps becomes standard.
“Running cable once is better than doing it twice. Spend a little more time planning, and your network will serve you reliably for a decade.” — Lena Torres, Residential Network Designer
Conclusion
Installing Cat 5 cable in your home is one of the most effective upgrades you can make for network stability and speed. With methodical planning, the right tools, and attention to detail, you can build a wired infrastructure that outperforms Wi-Fi and supports your digital lifestyle for years. Whether you're working from home, streaming 4K content, or managing smart devices, a well-wired house removes guesswork from connectivity.


 浙公网安备
33010002000092号
浙公网安备
33010002000092号 浙B2-20120091-4
Comments
No comments yet. Why don't you start the discussion?