
Replacing an outdated or damaged electrical outlet is one of the most practical home improvements you can make. Whether you're upgrading to tamper-resistant models, fixing a loose plug connection, or refreshing old wiring, doing it correctly ensures safety, functionality, and compliance with modern standards. While this task may seem intimidating, with the right tools, knowledge, and precautions, homeowners can complete it safely and effectively—without needing to call an electrician for every change.
The key isn’t just knowing how to swap wires from one outlet to another—it’s understanding circuit safety, identifying wiring configurations, and ensuring everything is grounded and secured properly. Mistakes can lead to shocks, short circuits, or even fire hazards. This guide walks you through each phase with precision, so you can work confidently and professionally.
Understanding Outlet Types and Your Home’s Electrical System
Before touching any wires, it's essential to know what kind of outlet you’re dealing with. Most homes use 15-amp or 20-amp receptacles rated for 120 volts. The most common types include:
- Standard duplex outlet (NEMA 5-15R): Found in nearly every room; handles general plug-in devices.
- GFCI (Ground Fault Circuit Interrupter): Required in kitchens, bathrooms, garages, and outdoor areas; cuts power during ground faults to prevent shock.
- AFCI (Arc Fault Circuit Interrupter): Often integrated into breakers but sometimes built into outlets; prevents fires caused by arcing faults.
- Smart outlets: Wi-Fi or Bluetooth-enabled models that allow remote control via smartphone apps.
Equally important is recognizing your wiring setup. Modern outlets have three wires: black (hot), white (neutral), and green or bare copper (ground). Older homes may lack grounding wires, especially in installations from before the 1960s. If you discover ungrounded cables (two-wire without ground), consult a licensed electrician before proceeding, as retrofitting grounding may be necessary for code compliance and safety.
“Never assume a circuit is dead based on the outlet not working. Always test voltage—even if the breaker is off.” — James L. Rivera, Master Electrician & NEC Consultant
Essential Tools and Safety Precautions
Safety comes first when working with electricity. Even low-voltage household circuits can deliver lethal shocks under certain conditions. Follow these critical steps before beginning any electrical work:
Required Tools and Materials:
- Voltage tester (non-contact and multimeter)
- Screwdrivers (Phillips and flathead)
- Needle-nose pliers
- Wire strippers
- New outlet (matching amperage and type)
- Wire connectors (wire nuts)
- Electrical tape
- Flashlight or headlamp (for dark boxes)
Safety Checklist Before Starting:
- Turn off the correct circuit at the main electrical panel.
- Verify power is off using a voltage tester at the outlet.
- Label the breaker to prevent accidental reactivation.
- Wear insulated gloves and stand on a dry surface.
- Work with one hand behind your back to minimize risk of current passing through the heart.
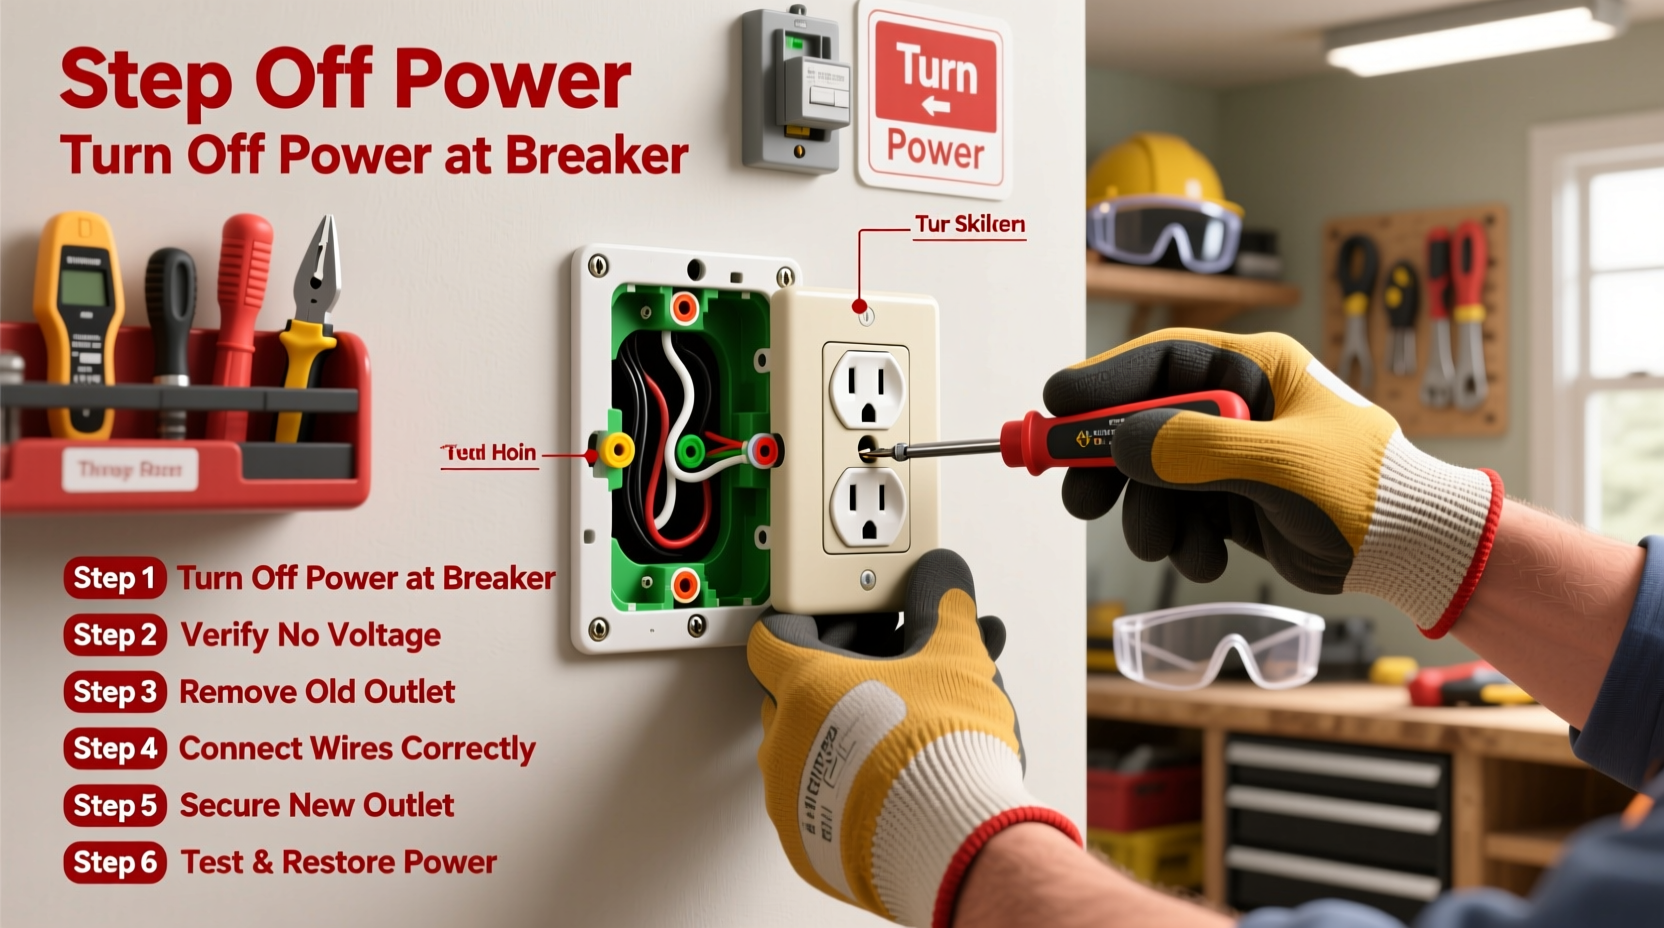
Step-by-Step Guide to Replacing an Outlet
Follow this sequence carefully to ensure a safe and professional installation:
- Shut Off Power: Locate the correct breaker for the outlet and switch it off. Double-check with a voltage tester at the outlet slots.
- Remove the Faceplate: Unscrew and gently remove the cover plate. Set aside screws for reuse.
- Unscrew the Outlet: Remove the mounting screws holding the outlet to the electrical box. Carefully pull the outlet out, keeping wires attached.
- Inspect Wiring: Check for signs of burning, melting, or frayed insulation. If damage exists, stop and consult an electrician.
- Disconnect Old Wires: Loosen terminal screws or release quick-connect tabs to free black (hot), white (neutral), and ground wires.
- Prepare New Outlet: If needed, strip about 3/4 inch of insulation from wire ends using wire strippers.
- Connect New Outlet:
- Attach black wire to brass (hot) screw terminal.
- Attach white wire to silver (neutral) screw terminal.
- Attach ground wire to green grounding screw.
- Secure Connections: Tighten all screws firmly. Wrap connections lightly with electrical tape for added insulation.
- Reinsert Outlet: Carefully push the outlet back into the box without pinching wires. Secure with mounting screws.
- Install Faceplate: Attach the new or cleaned faceplate.
- Restore Power: Turn the breaker back on.
- Test Operation: Plug in a lamp or use a receptacle tester to verify correct polarity and grounding.
Common Mistakes and How to Avoid Them
Even experienced DIYers can make errors when replacing outlets. Below are frequent issues and their solutions:
| Mistake | Risk | How to Prevent |
|---|---|---|
| Not turning off the correct breaker | Electric shock | Test every wire with a voltage tester—even if the outlet appears dead. |
| Loose wire connections | Overheating, arcing, fire hazard | Tighten terminal screws securely; tug-test wires before closing. |
| Reversing hot and neutral wires | Shock risk, device malfunction | Always connect black to brass, white to silver. |
| Ignoring GFCI labeling (\"LINE\" vs. \"LOAD\") | GFCI won’t reset or protect downstream outlets | Double-check wiring diagrams on the device. |
| Forgetting to ground the outlet | Increased shock risk, code violation | Ensure ground wire is connected to both outlet and metal box (if applicable). |
Real-World Example: Upgrading a Kitchen Outlet
Sarah, a homeowner in Portland, noticed her kitchen counter outlet sparked slightly when she plugged in her toaster. Instead of ignoring it, she decided to replace it. She turned off the breaker labeled “Kitchen Small Appliance,” verified no voltage with her tester, and removed the old standard outlet. Upon inspection, she found the neutral wire was loose and slightly discolored from heat.
She replaced it with a new tamper-resistant GFCI outlet, connecting the incoming power to the \"LINE\" terminals. After securing all connections and testing continuity, she restored power. Using a plug-in tester, she confirmed correct wiring and tripped the GFCI using the test button to ensure it functioned properly. The upgrade eliminated sparking and brought her kitchen up to current safety codes.
Frequently Asked Questions
Can I replace an outlet without turning off the power?
No. Working on a live circuit is extremely dangerous and violates electrical safety codes. Always shut off the breaker and verify the absence of voltage before starting.
What if my electrical box is too small or damaged?
If the box is cracked, loose, or doesn't provide enough space for wires and the new outlet, it should be replaced. Use a remodeling (old-work) box designed for drywall, or hire an electrician for in-wall replacements requiring access behind walls.
Do I need a permit to replace an outlet?
In most jurisdictions, simple outlet replacements don’t require a permit—as long as you’re not adding new circuits or altering wiring. However, if you're unsure, check local building codes or consult your municipality’s inspection office.
Final Thoughts and Next Steps
Changing an electrical outlet safely is a skill that empowers homeowners to maintain their living spaces efficiently and securely. By following proper procedures, using reliable tools, and respecting the inherent risks of electricity, you can perform this task like a seasoned professional. Remember, the goal isn’t just to make things work—it’s to ensure they work safely for years to come.
Start with a single, low-risk outlet in a frequently used area. Document your process, take photos before disconnecting wires, and always double-check your work. Once you’ve mastered the basics, consider expanding to switches, lighting fixtures, or even learning how to map your home’s entire circuit layout.


 浙公网安备
33010002000092号
浙公网安备
33010002000092号 浙B2-20120091-4
Comments
No comments yet. Why don't you start the discussion?