
Smoke alarms are one of the most critical safety devices in any home. Among the leading brands, Kidde produces reliable, widely used alarms that alert families to fire dangers before it’s too late. But even the best alarm is only as good as its power source. A low or dead battery renders the unit useless—and potentially life-threatening. Replacing the battery in a Kidde smoke alarm is simple, but doing it correctly ensures both functionality and safety. This guide walks you through every stage of the process with precision, backed by safety standards and real-world considerations.
Why Battery Maintenance Matters
Kidde smoke alarms typically run on either 9-volt alkaline batteries or AA cells, depending on the model. Some newer units feature sealed lithium batteries designed to last 10 years. However, for models requiring replaceable batteries, routine maintenance is non-negotiable. The National Fire Protection Association (NFPA) recommends testing smoke alarms monthly and replacing batteries at least once a year—even if the device hasn’t chirped. Waiting for the low-battery beep increases risk; by then, the alarm may already be compromised.
A single chirp every 30–40 seconds is the universal signal for low battery. Ignoring it doesn’t just cause annoyance—it creates a dangerous blind spot in home safety. Properly maintained alarms reduce fire-related fatalities by nearly 50%, according to fire safety research.
What You’ll Need Before You Begin
Safety starts with preparation. Gather these items before touching the alarm:
- Fresh, high-quality battery (correct type for your model)
- Sturdy step ladder (if ceiling-mounted)
- Clean microfiber cloth
- Pen and notepad (to record installation date)
- Flashlight (in case lighting is poor)
Ensure the replacement battery matches the specifications listed inside the alarm’s battery compartment. Using incorrect batteries can damage circuitry or reduce performance. Stick to reputable brands—cheap batteries often fail prematurely.
Step-by-Step Guide to Replacing the Battery
- Turn Off Power (If Hardwired): Many Kidde alarms are hardwired into the home’s electrical system with a battery backup. If yours has wires connected to the ceiling or wall, go to your breaker box and switch off the circuit powering the alarm. Confirm power is off by checking if the LED light on the alarm is dim or off.
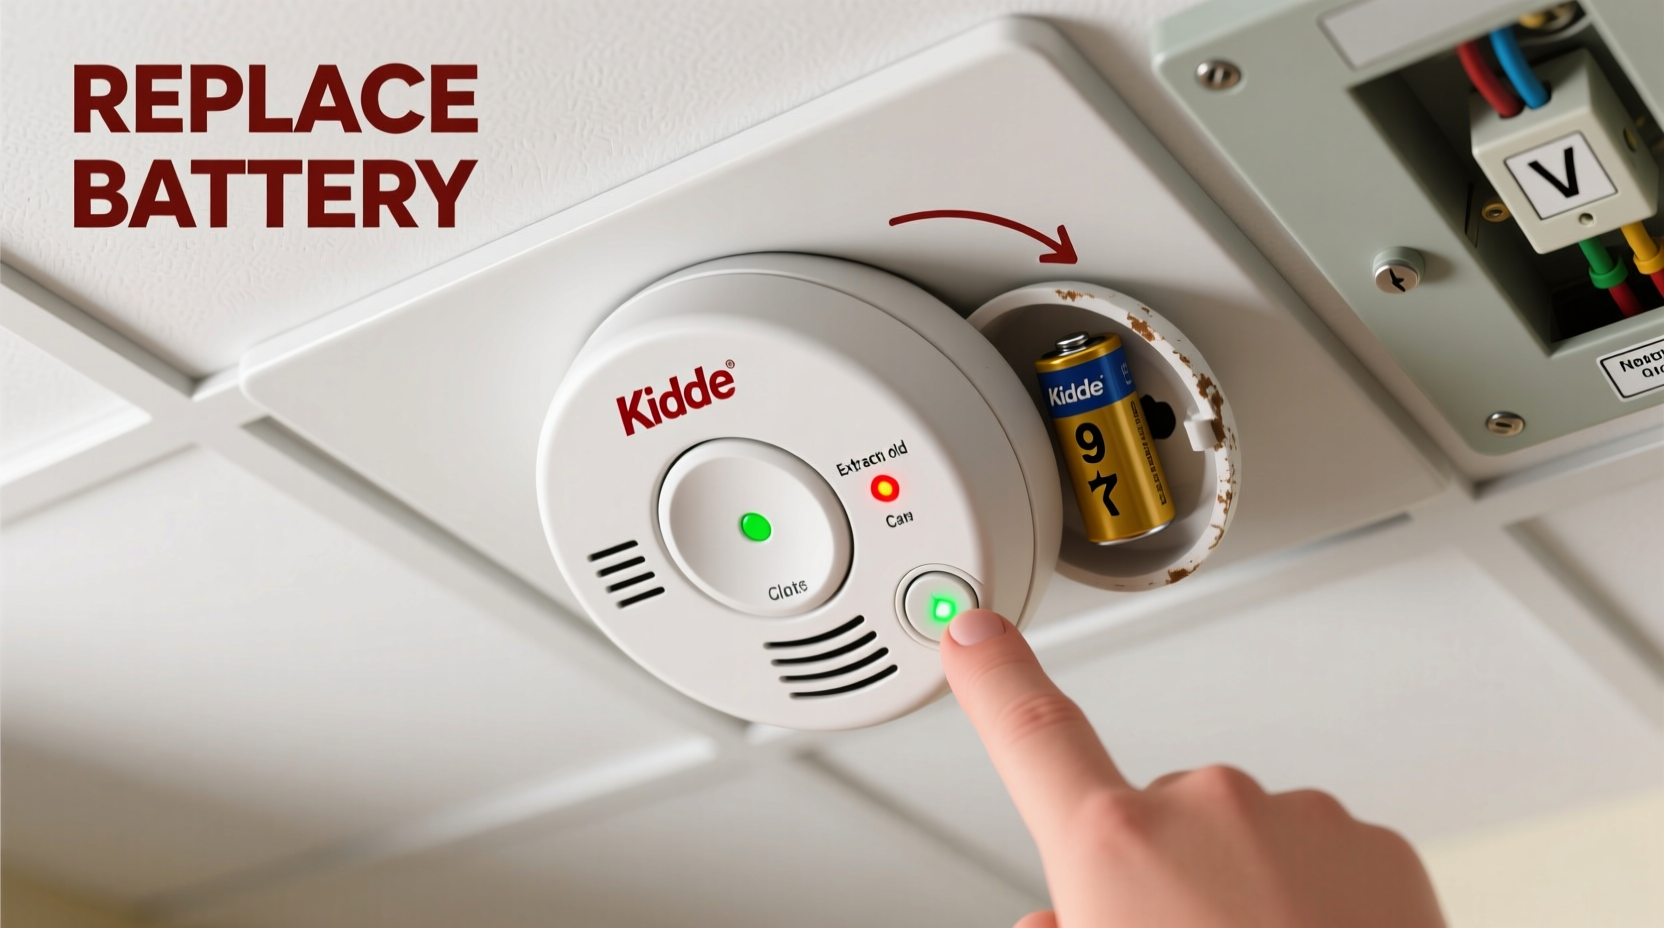
- Access the Alarm: Position your ladder securely beneath the unit. Gently twist the alarm counterclockwise to detach it from the mounting bracket. Most Kidde models use a rotating design that allows the entire unit to be lowered while still attached by wires (for hardwired versions). For battery-only models, the entire unit detaches fully.
- Locate the Battery Compartment: On the back or side of the alarm, find the battery tray or door. It’s usually marked with a battery icon. Slide or pry open the cover using your fingers or a flat-head screwdriver if necessary—do not force it.
- Remove the Old Battery: Take out the existing battery carefully. Note its orientation (+ and – ends) for correct reinstallation. Inspect for corrosion—if present, clean the terminals gently with a cotton swab dipped in vinegar or baking soda solution. Let dry completely before proceeding.
- Insert the New Battery: Place the new battery in the compartment exactly as indicated. Ensure it clicks or seats firmly. Double-check alignment to avoid connection issues.
- Reassemble and Reattach: Close the battery compartment securely. Lift the alarm back into place on the mounting bracket and twist clockwise until it locks. For hardwired units, make sure wires aren’t pinched.
- Restore Power and Test: Turn the circuit back on at the breaker panel. Press and hold the “Test” button on the alarm face for 10–15 seconds. A loud, clear siren confirms proper operation. Release the button—the alarm should stop immediately.
Do’s and Don’ts When Handling Smoke Alarms
| Do | Don’t |
|---|---|
| Use only recommended battery types (check manual or label) | Use expired or previously used batteries |
| Test the alarm after every battery change | Assume the alarm works without verification |
| Clean the exterior with a dry or slightly damp cloth | Submerge the unit in water or use chemical cleaners |
| Replace alarms every 10 years (per manufacturer guidelines) | Keep an alarm beyond its service life, even if it seems functional |
| Label each alarm with installation date on the back | Ignore persistent chirping after battery replacement—could indicate end-of-life |
Real Example: A Close Call Prevented by Routine Maintenance
In suburban Ohio, a homeowner named Maria noticed her Kidde smoke alarm chirping intermittently one Tuesday morning. Instead of dismissing it, she followed the steps outlined here to replace the battery. During reassembly, she realized the test button wasn’t triggering the alarm. She tried a second battery—same result. A quick call to customer support confirmed the unit was over 11 years old and had reached end-of-life. She replaced the entire alarm that day.
Two weeks later, a small kitchen fire started when a towel fell onto a stove burner. The new alarm sounded within seconds, allowing Maria and her children to evacuate safely. “I almost waited another month to deal with it,” she said. “That chirp saved our lives.”
“Battery replacement is essential, but so is recognizing when the entire unit needs upgrading. Smoke alarms degrade over time—even with fresh batteries.” — Captain Daniel Reeves, Public Education Officer, National Fire Safety Institute
FAQ: Common Questions About Kidde Alarm Batteries
How do I know which battery my Kidde alarm uses?
The required battery type is printed inside the battery compartment. Common types include 9V alkaline, AA, or CR123A for certain models. Always verify compatibility on the Kidde website or user manual before purchasing.
My alarm keeps chirping even with a new battery—what’s wrong?
Persistent chirping after battery replacement may indicate the alarm has reached its 10-year expiration. Modern Kidde alarms have built-in end-of-life signals that cannot be silenced. Replace the entire unit if chirping continues after confirming correct battery installation.
Can I recycle old smoke alarm batteries?
Yes. Alkaline and lithium batteries should be recycled at designated drop-off points, such as hardware stores or municipal recycling centers. Do not dispose of them in regular trash due to environmental hazards.
Final Checklist for Safe Battery Replacement
- ✅ Identify your alarm model and required battery type
- Check labels or consult the manual.
- ✅ Shut off power (if hardwired)
- Never work on live electrical connections.
- ✅ Remove and inspect the old battery
- Note corrosion or leakage signs.
- ✅ Install the correct new battery with proper polarity
- Match + and – symbols precisely.
- ✅ Reattach and secure the alarm unit
- Ensure it clicks into place.
- ✅ Restore power and test thoroughly
- Hold test button until siren activates.
- ✅ Record the date and schedule next check
- Set a reminder for 12 months ahead.
Conclusion: Protect Your Home Proactively
Changing the battery in your Kidde smoke alarm isn't just a household chore—it's a vital act of protection. With clear steps, the right tools, and disciplined habits, you ensure your family remains safeguarded against unseen threats. Fire doesn’t wait, and neither should you. Make battery maintenance part of your seasonal routine, stay alert to warning signs, and never underestimate the power of a working alarm.


 浙公网安备
33010002000092号
浙公网安备
33010002000092号 浙B2-20120091-4
Comments
No comments yet. Why don't you start the discussion?