
Fabric tissue boxes are both functional and decorative, often placed in living rooms, bedrooms, or guest bathrooms to add a touch of style while holding everyday essentials. Over time, however, these boxes accumulate dust, hand oils, sneeze residue, and accidental spills—leading to unsightly stains and potential odor buildup. Unlike disposable paper boxes, fabric versions are meant to last, but only if properly maintained. Cleaning them improperly can damage the material, fade colors, or leave behind residue that attracts more dirt. This guide provides a comprehensive, safe approach to cleaning your fabric tissue box and keeping it fresh, stain-free, and hygienic for months to come.
Why Regular Cleaning Matters
Fabric tissue boxes sit in high-traffic areas and are frequently touched. Each time someone pulls out a tissue, their hands transfer oils, lotions, and bacteria onto the fabric. Spills from nearby drinks, pet accidents, or even damp tissues can lead to moisture retention and mildew. Left uncleaned, these issues degrade the fabric’s appearance and integrity. More importantly, a dirty tissue box becomes a breeding ground for germs—especially during cold and flu season.
Regular maintenance not only preserves aesthetics but also supports hygiene. A clean fabric box enhances the overall cleanliness of your space and extends the life of the product, saving money in the long run.
Step-by-Step Guide to Safely Clean Fabric Tissue Boxes
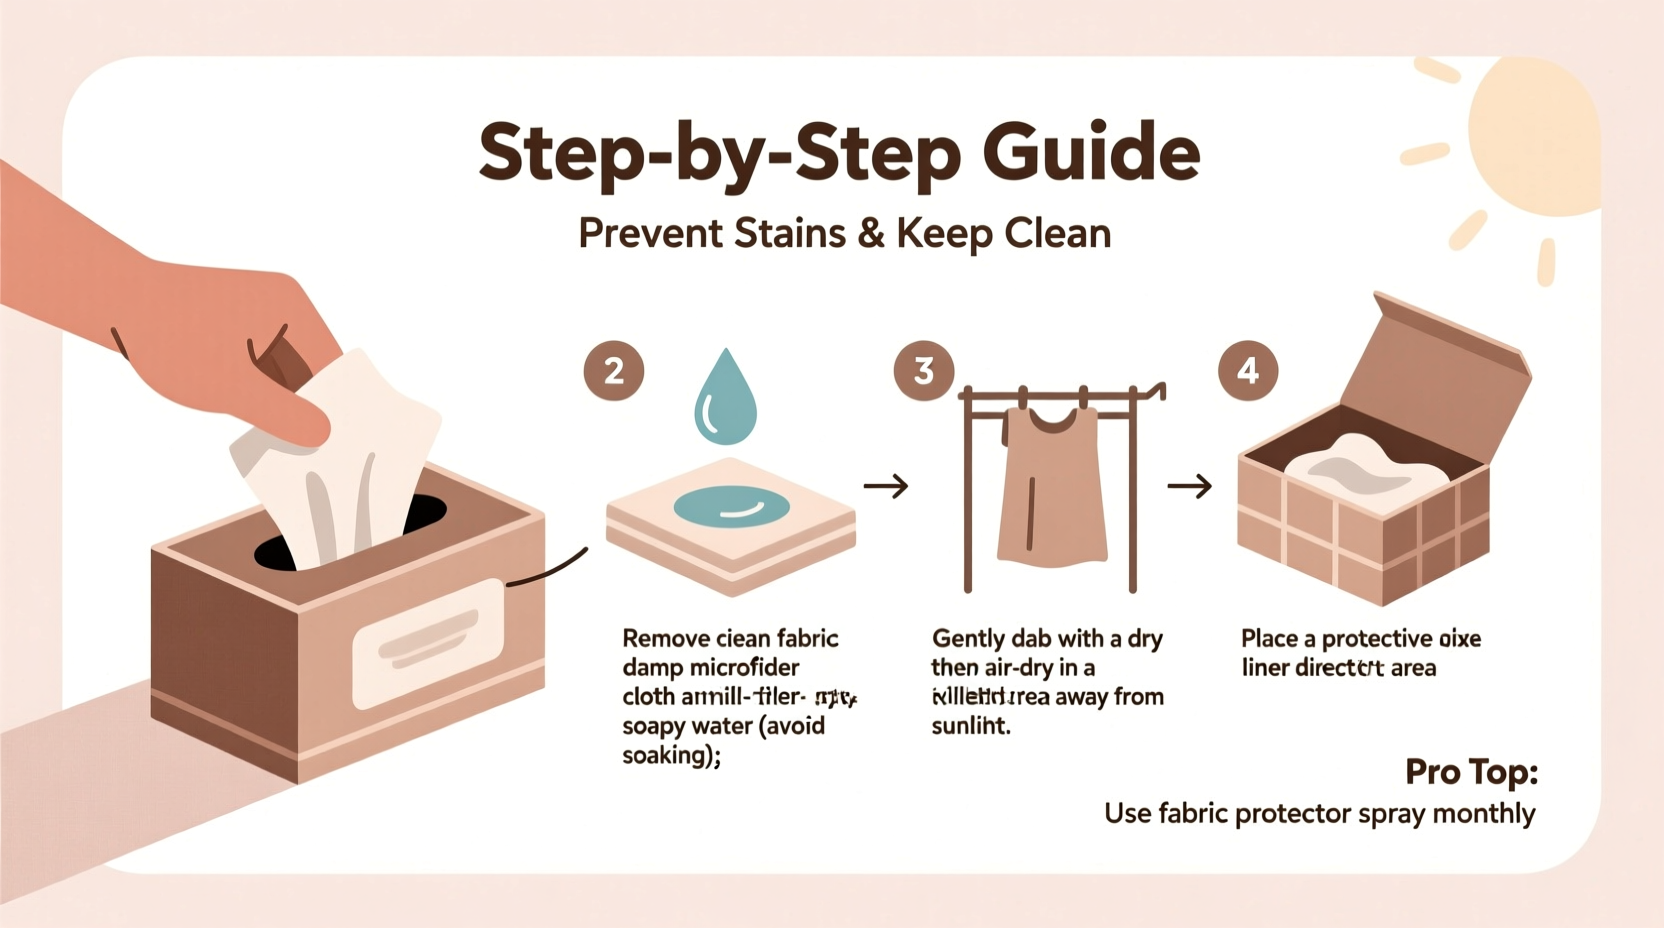
Cleaning a fabric tissue box requires attention to material type, construction, and care labels. Follow this detailed process to avoid shrinkage, color bleeding, or structural damage.
- Remove the Tissue Insert: Take out the inner cardboard tissue box completely. Dispose of any remaining tissues if they’ve been exposed to moisture or cleaning agents.
- Shake Out Loose Debris: Carry the fabric cover outdoors and shake it firmly to dislodge dust, crumbs, or pet hair. Use a soft-bristle brush or lint roller for stubborn particles.
- Check the Care Label: If present, follow the manufacturer’s instructions. Look for symbols indicating washable, dry-clean only, or spot clean only.
- Pre-Treat Stains: For visible spots (coffee, makeup, food), apply a small amount of oxygen-based stain remover or diluted dish soap directly to the area. Gently dab with a microfiber cloth—do not rub, as this can spread the stain.
- Hand Wash or Machine Wash (If Safe):
- Hand Wash: Fill a basin with lukewarm water and a mild detergent (like Woolite or baby shampoo). Submerge the fabric cover and gently agitate for 3–5 minutes. Rinse thoroughly with cool water until suds disappear.
- Machine Wash: Only if the label permits. Use a delicate cycle with cold water and mild detergent. Place the cover in a mesh laundry bag to protect seams.
- Remove Excess Water: Press gently to squeeze out water. Do not wring, as this can distort the shape. Lay flat on a clean towel, roll up to absorb moisture, then unroll and air dry.
- Air Dry Completely: Place the cover on a drying rack away from direct sunlight or heat sources. Sunlight can fade colors, and heat may cause shrinkage. Allow 12–24 hours to dry fully before reassembling.
- Reassemble: Once dry, reinsert a new tissue box. Ensure no moisture remains, as trapped dampness encourages mold.
Drying Timeline
| Method | Drying Time | Best For |
|---|---|---|
| Air drying (indoor, ventilated) | 12–24 hours | All fabric types |
| Air drying (outdoor, shaded) | 6–10 hours | Cotton, canvas |
| Tumble drying (low heat, only if labeled safe) | 30–45 minutes | Durable synthetics |
How to Prevent Future Stains and Damage
Prevention is more effective than frequent deep cleaning. Implement these habits to keep your fabric tissue box looking fresh between washes.
- Place the box away from dining areas or kitchen counters where spills are common.
- Use tissues with minimal lotion or fragrance, which can transfer to fabric over time.
- Wipe hands before pulling tissues if heavily moisturized or oily.
- Rotate multiple fabric covers if you use the same location daily—this reduces wear on one piece.
- Apply a fabric protector spray (like Scotchgard) after cleaning to create a stain-resistant barrier.
Do’s and Don’ts of Fabric Tissue Box Care
| Do’s | Don’ts |
|---|---|
| Use cold or lukewarm water for washing | Use hot water—it can set stains and shrink fabric |
| Test cleaners on an inconspicuous area first | Apply bleach or ammonia-based cleaners—they weaken fibers |
| Store in low-humidity areas when not in use | Leave wet tissues inside the box overnight |
| Vacuum lightly with upholstery attachment monthly | Machine dry unless explicitly allowed |
Real Example: How Sarah Saved Her Embroidered Tissue Box
Sarah had a beautifully embroidered linen tissue box she received as a housewarming gift. After three months, it developed a yellowish ring near the top from repeated hand contact and a small coffee splash. She almost discarded it, assuming the stain was permanent. Instead, she followed the pre-treatment method using a mix of baking soda and hydrogen peroxide paste. After letting it sit for 15 minutes and gentle hand washing, the stains lifted significantly. She air-dried it flat and applied a fabric protector. Today, the box looks nearly new and has remained stain-free for over six months with regular rotation and light wiping.
“Even delicate fabrics can be cleaned safely if you respect the fiber type and avoid aggressive scrubbing.” — Dr. Lena Peterson, Textile Conservation Specialist
Essential Cleaning Checklist
Follow this checklist each time you clean your fabric tissue box:
- □ Remove tissue insert and discard used tissues
- □ Shake out loose debris or vacuum gently
- □ Check care label for washing instructions
- □ Spot test cleaner on hidden area
- □ Pre-treat visible stains with gentle solution
- □ Hand wash or machine wash (if safe)
- □ Press out water—do not wring
- □ Air dry completely away from sun and heat
- □ Reassemble with fresh tissue box
- □ Optional: Apply fabric protector spray
Frequently Asked Questions
Can I use vinegar to clean my fabric tissue box?
Yes, but with caution. A solution of one part white vinegar to three parts water can help remove odors and mild stains. However, never use vinegar on silk or wool, as it can damage protein-based fibers. Always rinse thoroughly afterward to eliminate any lingering scent.
What if my fabric box is labeled “dry clean only”?
Respect the label. Take it to a professional cleaner and mention any stains so they can be pre-treated. Attempting home cleaning on dry-clean-only fabrics risks irreversible damage like shrinking, warping, or seam failure.
How can I freshen the box without washing it?
Lightly sprinkle baking soda over the surface, let it sit for 30 minutes, then vacuum with an upholstery attachment. You can also place the box in a sealed container with activated charcoal packets overnight to absorb odors.
Maintain Cleanliness, Preserve Beauty
A fabric tissue box is more than a container—it’s a small but meaningful part of your home’s aesthetic and hygiene. With consistent, gentle care, it can remain both functional and attractive for years. The key lies in timely cleaning, proper drying, and proactive protection. By integrating these simple steps into your routine, you ensure that this everyday item continues to complement your space without becoming a source of grime or embarrassment.


 浙公网安备
33010002000092号
浙公网安备
33010002000092号 浙B2-20120091-4
Comments
No comments yet. Why don't you start the discussion?