
Deleting an email account from your mobile phone might seem straightforward, but doing it carelessly can lead to unintended consequences—lost contacts, missed messages, or even lingering sync issues. Whether you're switching providers, cleaning up old accounts, or securing your device after a breach, the process demands attention to detail. This guide walks you through every stage of safely removing an email account from iOS and Android devices, ensuring no critical data is lost and your privacy remains intact.
Why You Shouldn’t Rush Account Deletion
Many users assume that removing an email account from their phone simply disables notifications. In reality, this action stops syncing across mail, calendar, contacts, and sometimes even notes or tasks tied to that account. If not backed up, those synced items may disappear from your device permanently—even if they still exist online.
Additionally, some services use your email as a recovery method for apps or two-factor authentication. Removing the account without verifying access elsewhere could lock you out of important platforms.
“Always treat email account removal like disconnecting a central hub—it’s linked to more than just your inbox.” — Jordan Lee, Mobile Security Analyst at SecureEdge Labs
Step-by-Step: How to Safely Delete an Email Account
Follow this structured timeline to ensure a secure and complete removal process across both major mobile operating systems.
- Back up essential data (5–10 minutes)
- Verify access to other recovery methods (3–5 minutes)
- Disable syncing before deletion (2 minutes)
- Delete the account from your phone (2–3 minutes)
- Confirm data integrity post-deletion (5 minutes)
Step 1: Back Up Essential Data
Before removing any account, preserve what matters:
- Emails: Archive important messages in folders accessible via webmail.
- Contacts: Export them to your device storage, Google account, or iCloud.
- Calendars: Ensure events are saved to another calendar service or exported as .ics files.
- Tasks/Notes: Sync or export to a cloud-based app like Apple Notes, Google Keep, or Microsoft OneNote.
Step 2: Verify Recovery Access
Ensure you have alternative ways to recover accounts linked to the email being removed:
- Update password reset emails on banking, social media, and subscription services.
- Add a secondary email or phone number for two-factor authentication where possible.
- Download authenticator apps (like Google Authenticator or Authy) if relying on time-based codes.
Step 3: Disable Syncing (Optional but Recommended)
Temporarily disable syncing for mail, contacts, and calendar associated with the account. This prevents accidental overwrites during removal.
On Android: Go to Settings > Accounts > [Your Email] > Sync Account > Toggle off individual services.
On iPhone: Settings > Mail > Accounts > [Account Name] > toggle off Contacts, Calendars, etc.
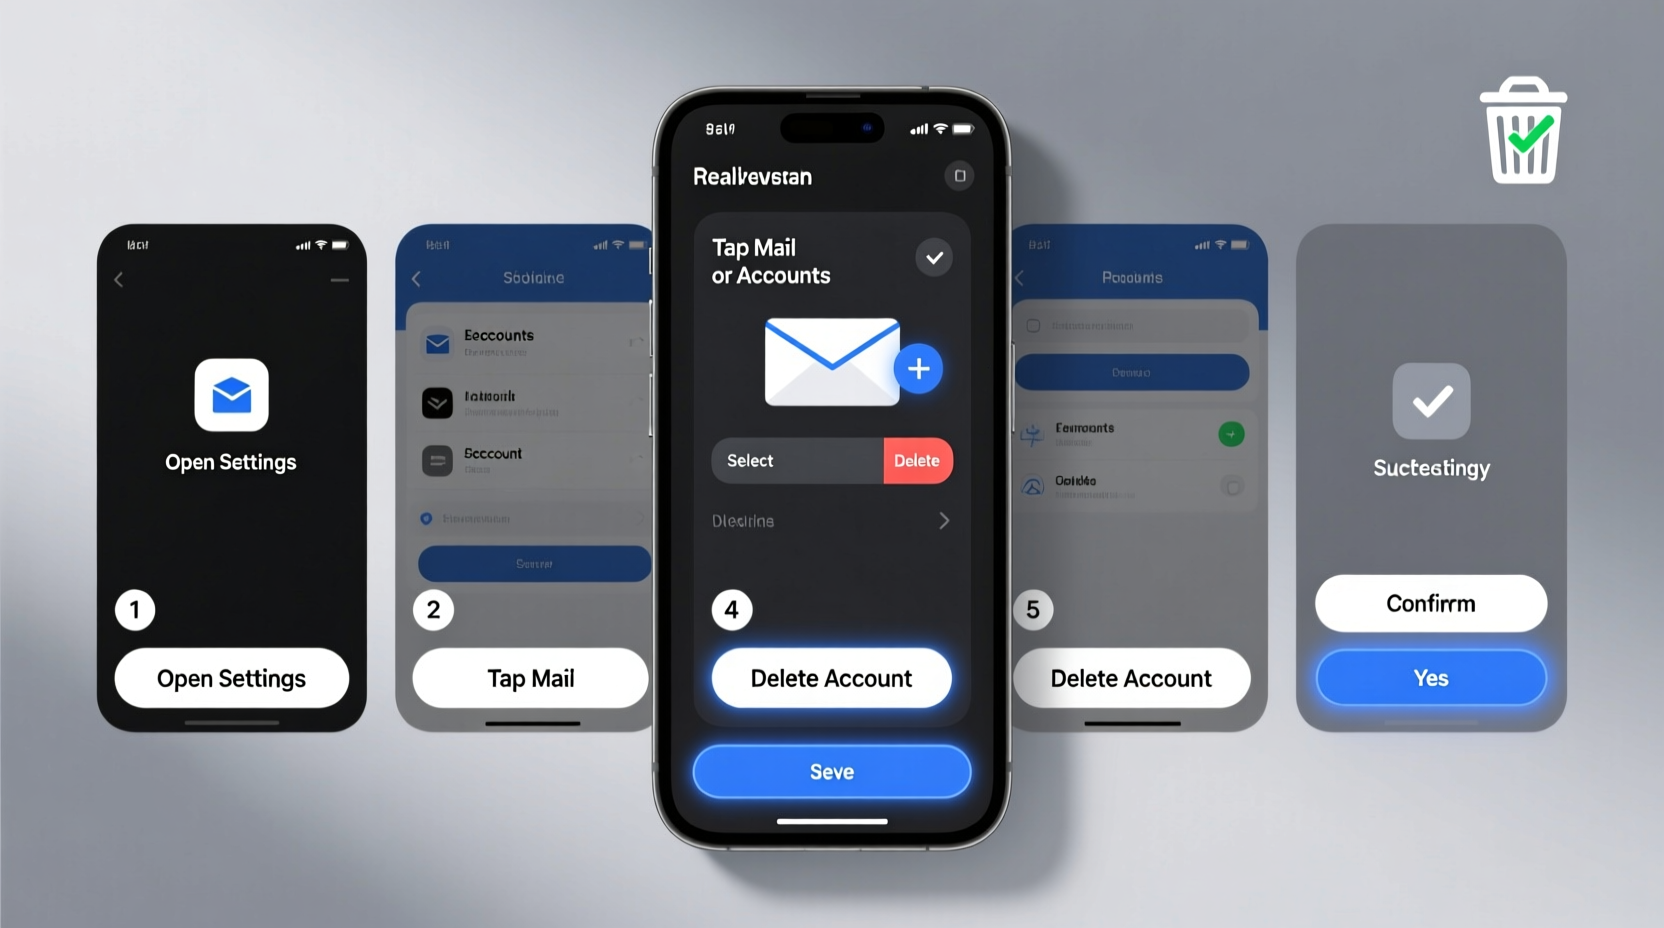
Step 4: Delete the Account from Your Phone
The actual deletion varies slightly between platforms.
For Android Devices:
- Open Settings.
- Select Accounts (may be under \"Passwords & accounts\" or similar).
- Tap the email account you want to remove.
- Tap the three-dot menu or Remove Account.
- Confirm when prompted. The account will vanish from your device.
For iPhones (iOS):
- Go to Settings.
- Scroll down and tap Mail.
- Select Accounts.
- Choose the account to delete.
- Tap Delete Account, then confirm.
Note: On newer iOS versions, deleting the account removes only the device-level connection—not the email address itself, which continues to exist unless deleted separately via the provider.
Step 5: Confirm Everything Is Intact
After deletion:
- Check your webmail to verify emails remain accessible online.
- Test logging into other services using alternate recovery options.
- Review your phone’s contact list to ensure no unintended deletions occurred.
Do’s and Don’ts When Removing an Email Account
| Do | Don’t |
|---|---|
| Back up contacts and calendars before removal | Delete the account without checking linked logins |
| Use webmail to verify data retention | Assume “deleting from phone” means closing the email service |
| Update recovery info on key accounts | Remove work or school accounts without consulting IT |
| Double-check sync settings pre-deletion | Ignore warnings about data loss during removal |
Real-World Example: Maria’s Smooth Transition
Maria had used her old university email for years—linked to shopping sites, newsletters, and even her fitness tracker. When she decided to remove it from her phone after graduation, she skipped backup steps and lost over 200 contacts.
She re-added the account temporarily, exported her contacts via Outlook.com, updated recovery emails on Amazon and PayPal, and then successfully removed the account—this time with zero data loss. Her lesson? Always prepare first.
Frequently Asked Questions
Does deleting an email account from my phone delete the inbox entirely?
No. It only removes the account from your device. Your emails, contacts, and settings remain on the provider’s servers and can still be accessed via their website (e.g., Gmail.com, Outlook.com). To fully close the account, you must do so through the email provider’s website.
Can I re-add the same email account later?
Yes. As long as the account is still active online, you can reconfigure it on your phone anytime by going to Settings > Add Account and following the setup prompts. All new emails will begin syncing again.
What happens to my emails already downloaded on the phone?
Locally stored emails may remain visible until cleared manually, but no new messages will arrive. Over time, depending on your mail app settings, older messages may auto-delete. For full cleanup, consider clearing the app cache or using a dedicated email client reset.
Critical Checklist Before You Proceed
- ✅ Backed up contacts, calendars, and important emails
- ✅ Updated recovery email/phone on critical accounts (banking, social media)
- ✅ Verified the email isn't used for two-factor authentication without backup codes
- ✅ Confirmed with employer or institution if it's a work/school account
- ✅ Signed into the email via web browser to confirm online access
- ✅ Disabled syncing for non-mail data (notes, reminders, etc.)
- ✅ Prepared to re-add the account if needed for verification purposes
Final Thoughts: Take Control of Your Digital Footprint
Removing an email account from your mobile phone isn’t just about decluttering—it’s part of maintaining digital hygiene. With cyber threats rising and personal data scattered across platforms, knowing how to cleanly sever connections is a vital skill. By backing up, verifying access, and following a clear sequence, you protect yourself from avoidable setbacks.
Your smartphone holds pieces of your digital life. Every account linked to it carries weight. Handle removals with intention, and you’ll keep your device efficient, secure, and truly yours.


 浙公网安备
33010002000092号
浙公网安备
33010002000092号 浙B2-20120091-4
Comments
No comments yet. Why don't you start the discussion?