
Replacing or installing a garbage disposal isn’t just about convenience—it’s about maintaining hygiene, preventing clogs, and protecting your plumbing system. While many homeowners call a plumber for this task, a properly guided DIY approach can save hundreds of dollars and give you lasting confidence in your home maintenance skills. With the right tools, safety precautions, and attention to detail, you can install a new garbage disposal safely and efficiently, even if you’re not a professional.
This comprehensive guide walks you through every phase: from preparation and electrical safety to final testing. Whether you're upgrading an old unit or installing one for the first time, these steps ensure a secure, leak-free, and code-compliant result.
1. Prepare Your Workspace and Gather Essential Tools
Before touching any plumbing or wiring, preparation is critical. A cluttered sink area or missing tool can turn a simple job into a frustrating mess. Start by clearing everything from under the sink. Remove cleaning supplies, storage bins, and any obstructions so you have full access to the drain pipe, mounting assembly, and power source.
Here’s what you’ll need:
- New garbage disposal unit (check compatibility with your sink and existing setup)
- Plumber’s putty or silicone sealant
- Adjustable wrench or basin wrench
- Screwdrivers (flathead and Phillips)
- Wire nuts and electrical tape
- Hacksaw or pipe cutter (if modifying drain pipes)
- Bucket or large bowl (to catch water)
- Flashlight or headlamp (for visibility under the sink)
- Gloves and safety goggles
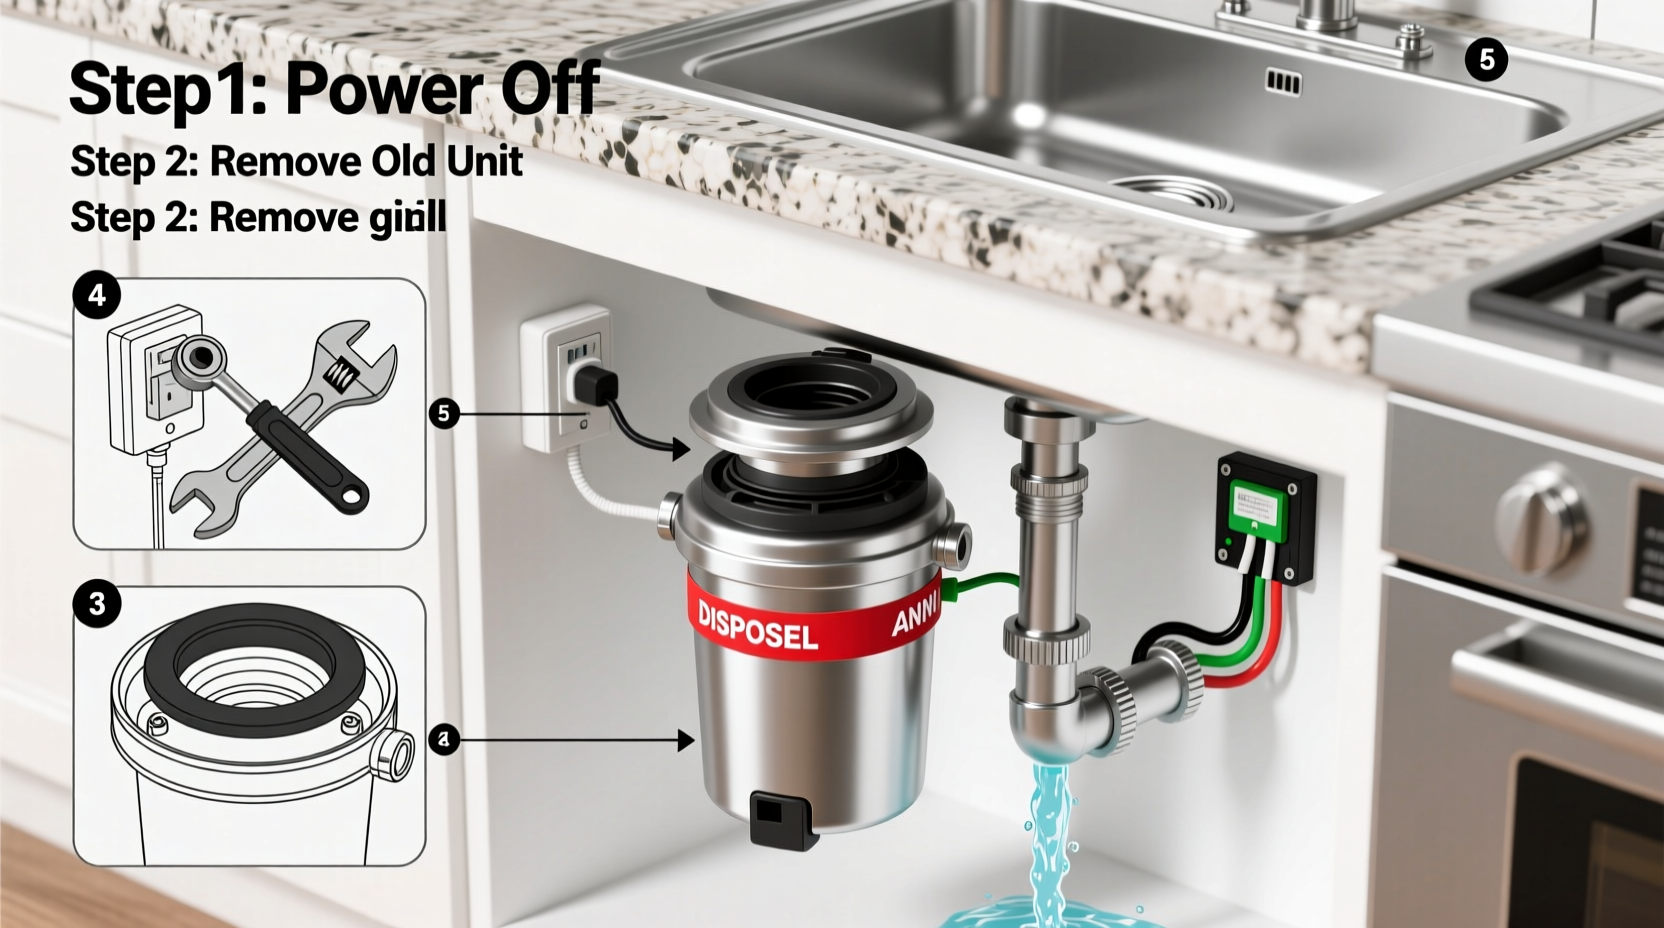
2. Shut Off Power and Water Supply Safely
Safety comes first. Garbage disposals connect to both plumbing and electrical systems, making this a dual-hazard environment. Begin by turning off the circuit breaker that powers the disposal. Do not rely solely on the wall switch—always cut power at the main panel. Use a non-contact voltage tester near the wires to confirm no electricity is flowing.
Next, shut off the water supply lines if your disposal has a dishwasher inlet connection. Even if it doesn’t, closing the main faucet prevents accidental water release during disconnection. Place a bucket under the P-trap to catch residual water when you disconnect the drainpipe.
“Electrical safety isn’t optional. One mistake with live wires under a wet sink can be fatal.” — Carlos Mendez, Master Electrician & Home Renovation Consultant
3. Remove the Old Disposal (If Applicable)
If replacing an existing unit, start by disconnecting the drainpipe from the disposal’s outlet. Loosen the slip nut with a wrench and let any trapped water drain into your bucket. Then, disconnect the dishwasher hose if connected—clamp it closed first to prevent backflow.
The disposal is mounted using a large snap ring and mounting bolts. Rotate the lower mounting ring counterclockwise to release the unit. Support the weight as you remove it; disposals can be heavy. Once detached, disconnect the electrical wires inside the junction box. Note the wire configuration (black to black, white to white, green or bare to ground) for later reference.
Clean the sink flange thoroughly. Old plumber’s putty or debris can compromise the seal of the new unit. Scrape it clean and wipe dry before proceeding.
4. Install the New Garbage Disposal: Step-by-Step
Follow this sequence carefully to ensure a secure, leak-proof installation:
- Attach the Sink Flange: Apply a ¼-inch bead of plumber’s putty around the underside of the new sink flange. Insert it into the drain hole from above and press firmly. From below, secure it with the provided snap ring and gasket.
- Mount the Disposal: Hang the disposal onto the mounting assembly. Rotate the upper mounting ring until the tabs align, then use a screwdriver to tighten the mounting screws evenly. This compresses the seal and locks the unit in place.
- Connect Drainpipe: Reattach the discharge tube to your existing drainpipe. Use a new rubber gasket and slip nut. Ensure the alignment allows for a slight downward slope to promote drainage.
- Wire the Unit: Feed the electrical cable into the disposal’s junction box. Strip the wires and connect black to black, white to white, and ground to ground using wire nuts. Wrap connections with electrical tape for added security. Never leave exposed copper.
- Attach Dishwasher Hose (if needed): Break the knock-out plug on the disposal’s side inlet. Attach the dishwasher drain hose with a clamp, ensuring a tight fit to prevent leaks.
5. Test for Leaks, Function, and Safety
Before restoring power, conduct a thorough inspection:
- Double-check all connections—plumbing and electrical.
- Ensure the disposal turns freely by hand (use the hex key in the bottom center).
- Turn the water supply back on and run water through the sink.
- Look for drips at the flange, drainpipe, and dishwasher connection.
Once confident there are no leaks, restore power at the breaker. Turn on the disposal using the wall switch. It should start smoothly without grinding or vibration. Test it with a small amount of water and some soft food scraps (like lettuce or apple peels). Avoid hard items like bones or pits during the first few uses.
| Checklist Item | Status |
|---|---|
| Power disconnected during install | ✅ |
| Flange sealed with plumber’s putty | ✅ |
| Drainpipe aligned and sloped | ✅ |
| Wires securely connected and taped | ✅ |
| No leaks after water test | ✅ |
| Disposal runs smoothly | ✅ |
Common Mistakes to Avoid
Even experienced DIYers make errors that lead to leaks, noise, or premature failure. Here’s what to watch out for:
- Mixing up wiring: Always match color to color and secure with wire nuts. Improper grounding can create shock hazards.
- Skipping the flange seal: A poor seal leads to water damage under the sink and mold growth.
- Forcing misaligned pipes: Strain on connections causes cracks over time. Use adjustable elbows if needed.
- Ignoring local codes: Some areas require a dedicated 15-amp circuit for disposals. Check your municipal regulations.
Frequently Asked Questions
Can I install a garbage disposal without a dishwasher?
Absolutely. Most disposals function independently. The dishwasher inlet is optional and only used if you plan to connect one later.
Why does my new disposal smell bad?
New units often have manufacturing residues. Run ice cubes and lemon peels through it for a minute to clean and deodorize the chamber.
How long does installation take?
For a first-time installer, allow 1.5 to 2.5 hours. Experienced DIYers can finish in under an hour.
Real-World Example: Sarah’s Kitchen Upgrade
Sarah, a homeowner in Portland, decided to replace her 12-year-old disposal that had started leaking and humming loudly. She bought a mid-range model with a ½ horsepower motor and followed this guide meticulously. After shutting off power and draining the line, she discovered the old flange was corroded. She took extra time to clean it and applied fresh plumber’s putty. During wiring, she referenced her photo of the original setup and double-checked connections. After installation, she tested with water and banana peels—no leaks, no noise. “I saved $220 on labor,” she said. “And now I know exactly how it works if something goes wrong.”
Final Checklist Before You Finish
Run through this final verification to ensure everything is safe and functional:
- ✅ Power is restored and switch operates correctly
- ✅ No water leaks at any joint
- ✅ Disposal spins freely and starts instantly
- ✅ Dishwasher drains properly (if connected)
- ✅ Mounting is secure with no wobbling
Conclusion: Take Control of Your Home Maintenance
Installing a garbage disposal isn’t magic—it’s methodical work that rewards patience and precision. By following these steps, you’ve not only upgraded your kitchen but also gained valuable skills for future repairs. There’s empowerment in knowing you can handle essential home systems safely and effectively. Don’t wait for a plumber to fix something you’re fully capable of doing yourself.


 浙公网安备
33010002000092号
浙公网安备
33010002000092号 浙B2-20120091-4
Comments
No comments yet. Why don't you start the discussion?