
Oculus controllers are essential for immersive virtual reality experiences, but like any electronic device, they require care and occasional maintenance. Over time, buttons may stick, tracking can degrade, or internal components may accumulate dust and debris. While opening your controller voids the warranty if done improperly, knowing how to do it safely—and when it’s necessary—can extend its lifespan and restore performance. This guide walks you through every step with precision, offering actionable insights to keep your controllers responsive and reliable.
When Should You Open Your Oculus Controller?
Opening your Oculus controller isn’t always required. Most issues can be resolved through software resets, recalibration, or external cleaning. However, there are specific scenarios where disassembly becomes a practical solution:
- Sticky or unresponsive buttons: Dirt, oils, or residue under the capacitive touch areas can interfere with input.
- Drifting joystick: Often caused by debris in the analog stick housing or worn-out potentiometers.
- Battery drainage issues: If charging fails despite multiple cables, inspecting internal battery connections may help.
- Persistent sync problems: Internal antenna or flex cable damage might require visual inspection.
Essential Tools and Safety Precautions
Before you begin, gather the right tools. Using improper equipment can strip screws or damage plastic housings. Here’s what you’ll need:
- Size T5 Torx screwdriver (magnetic tip recommended)
- Plastic pry tools or guitar picks
- Isopropyl alcohol (90% or higher)
- Lint-free microfiber cloths
- Cotton swabs and compressed air
- Small container for screws (to avoid losing them)
- Anti-static wrist strap (optional but advised)
“Electrostatic discharge is one of the most overlooked risks during DIY repairs. Ground yourself before touching internal components.” — Raj Mehta, Consumer Electronics Repair Technician
Avoid metal tools when prying apart the casing. The risk of scratching circuits or shorting components is high. Work on a clean, well-lit surface and take photos at each disassembly stage to aid reassembly.
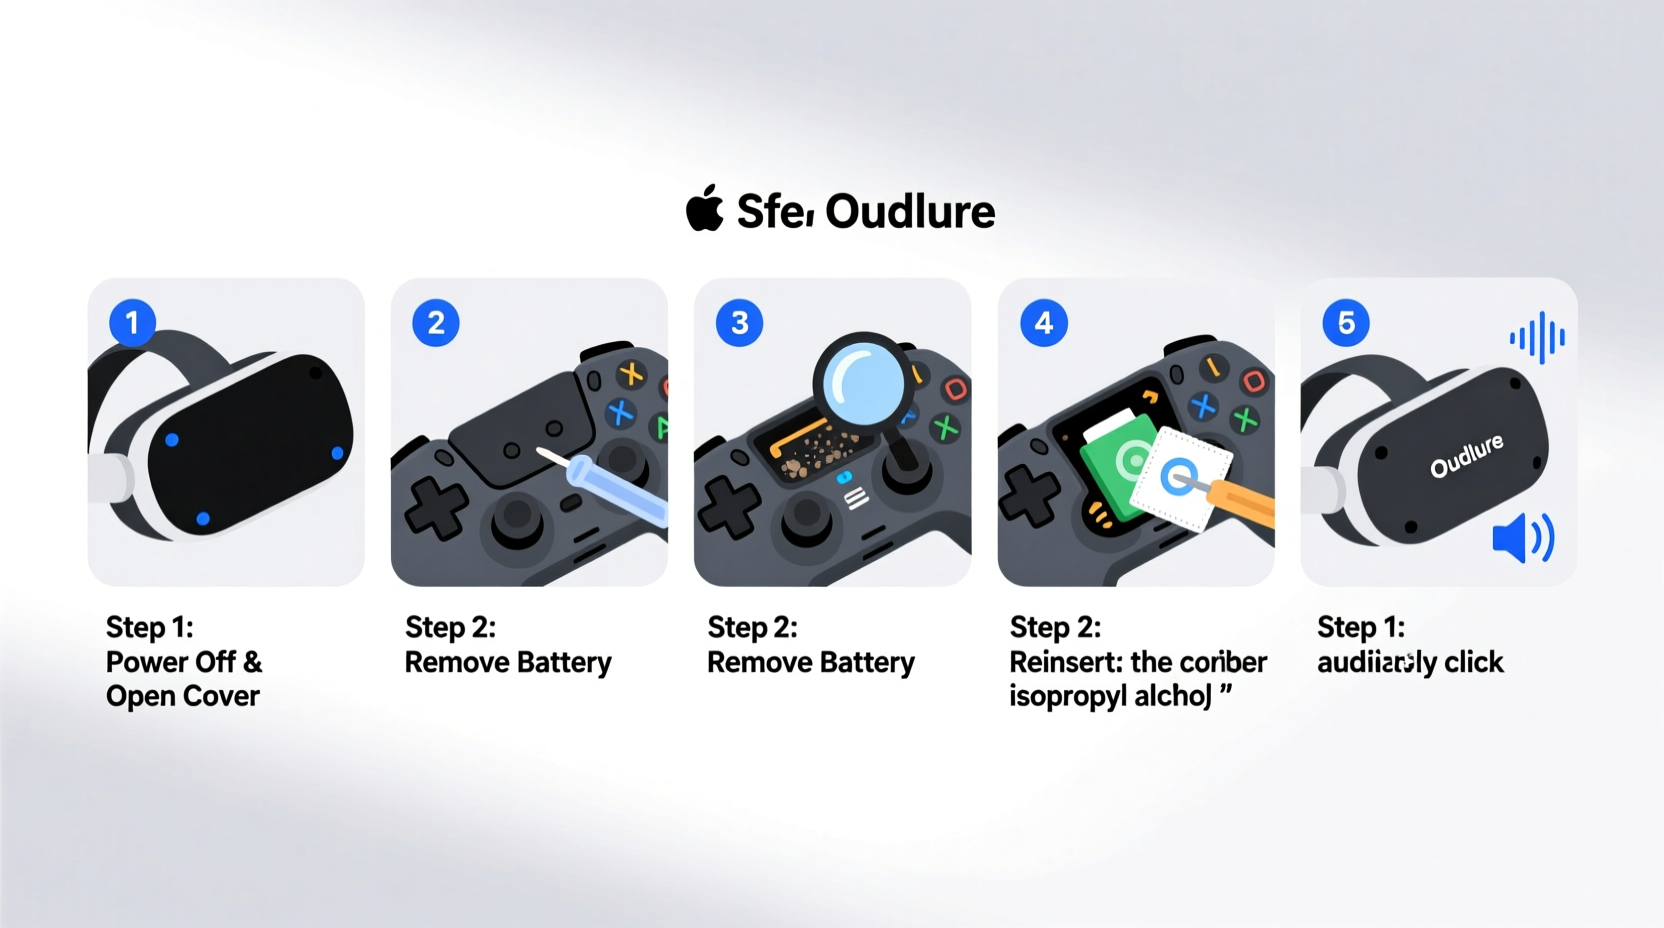
Step-by-Step Guide to Opening the Oculus Controller
This process applies to Oculus Touch controllers (used with Quest 2, Quest 3, and earlier models). Follow these steps carefully:
- Power off and disconnect: Turn off the controller and ensure it's not paired or charging.
- Remove the battery door: Slide it down and set aside. Take out the AA battery.
- Locate the screws: Two T5 Torx screws are hidden under the rubber grip near the bottom. Use a pick to gently lift the rubber flap.
- Unscrew and store: Remove both screws and place them in a labeled container.
- Separate the halves: Starting at the trigger area, use a plastic tool to gently pry the front and back casings apart. Work around the perimeter—there are multiple snap clips.
- Lift the front shell: Once all clips are released, carefully lift the front half, exposing the circuit board and joystick assembly.
- Inspect connections: Do not detach any ribbons unless necessary. Look for corrosion, loose connectors, or visible debris.
Maintenance and Cleaning Procedures
Once opened, focus on targeted cleaning. Avoid spraying liquids directly onto components.
Cleaning the Joystick Module
The analog stick is prone to drift due to dust accumulation. Dampen a cotton swab with isopropyl alcohol and gently rotate it around the base while moving the stick in circular motions. Let it dry completely before reassembly.
Button and Capacitive Sensor Care
Dirt under the menu, B, and A buttons can cause ghost inputs. Use a dry swab to remove particles. For deeper cleaning, lightly moisten the swab and wipe around button edges—never underneath unless desoldered.
Internal Dust Removal
Use compressed air to blow away dust from the motherboard, speaker, and vibration motor. Hold the can upright and use short bursts to prevent moisture buildup.
| Component | Cleaning Method | Avoid |
|---|---|---|
| Joystick | Alcohol-dampened swab, circular motion | Excessive pressure, water-based cleaners |
| Buttons | Dry or slightly damp swab around edges | Submerging, sharp objects |
| Circuit Board | Compressed air, soft brush | Touching contacts with bare fingers |
| Trigger Mechanism | Blow air into crevice, check for obstructions | Forcing movement if stuck |
Reassembly and Testing
After cleaning, reverse the disassembly steps:
- Ensure all parts are dry—wait at least 20 minutes after using alcohol.
- Align the two casing halves and press along the edges until all clips engage.
- Screw in the two T5 screws securely but don’t over-tighten.
- Replace the rubber grip flap to cover the screw holes.
- Insert a fresh battery and slide on the battery door.
- Pair the controller with your headset and test all inputs: buttons, joystick, trigger, and haptics.
If issues persist, consider replacing specific modules. Replacement joysticks and button pads are available from third-party vendors and can be soldered in with proper skill.
Mini Case Study: Recovering a Drifting Controller
Mark, a VR fitness enthusiast, noticed his left controller’s joystick drifted upward during Beat Saber sessions. He tried recalibrating in settings and cleaning the exterior, but the issue remained. After consulting forums, he decided to open the controller. Upon inspection, he found fine dust embedded around the joystick base. Using isopropyl alcohol and a swab, he cleaned the module and let it dry overnight. After reassembly, the drift disappeared, and the controller responded accurately. Mark extended his device’s life by over a year without needing a replacement.
Preventive Maintenance Checklist
To minimize future issues, follow this monthly maintenance routine:
- Wipe down controllers with a dry microfiber cloth after each use.
- Store in a closed case away from humidity and direct sunlight.
- Check battery compartment for leakage every 6 weeks.
- Recalibrate controllers via Oculus app settings.
- Update firmware regularly to ensure optimal performance.
- Vacuum the charging port gently with compressed air.
Frequently Asked Questions
Will opening my Oculus controller void the warranty?
Yes, removing screws or breaking tamper-evident seals typically voids the manufacturer warranty. Only proceed if the device is out of warranty or the repair cost exceeds replacement value.
Can I wash the controller with water?
No. Water exposure can damage internal electronics. Use only isopropyl alcohol on a cloth or swab for spot cleaning. Never submerge any part.
How often should I deep clean my controllers?
Every 3–6 months depending on usage. Heavy users (e.g., VR gym or training applications) should inspect internals annually.
Final Thoughts
Maintaining your Oculus controllers goes beyond surface wipes. Understanding their construction empowers you to address common hardware issues before they ruin your VR experience. With careful handling, the right tools, and attention to detail, you can safely open, clean, and restore your controllers to peak condition. Proper care not only improves responsiveness but also delays the need for costly replacements.


 浙公网安备
33010002000092号
浙公网安备
33010002000092号 浙B2-20120091-4
Comments
No comments yet. Why don't you start the discussion?