
Swatch watches are known for their vibrant designs, affordability, and Swiss precision. While they're built to last, there may come a time when you need to access the inner workings—whether to replace a battery, inspect for moisture, or simply satisfy curiosity. Unlike many luxury timepieces, Swatch watches often feature case backs that can be opened at home—but only if done correctly. A single misstep can damage the casing, gaskets, or movement. This guide provides a clear, safe method to open your Swatch watch without compromising its integrity.
Why You Might Need to Open Your Swatch Watch
There are several legitimate reasons to open a Swatch watch at home. The most common is battery replacement. While some models are marketed as having long-life batteries, most will require a change every 2–4 years. Other reasons include checking for condensation inside the crystal, cleaning minor dust buildup, or replacing worn case gaskets to maintain water resistance.
It's important to note that Swatch recommends professional servicing for warranty-covered or water-resistant models. However, for vintage or out-of-warranty pieces, a careful DIY approach is both practical and cost-effective.
Tools You’ll Need
Opening a Swatch watch doesn’t require expensive equipment, but using the right tools is essential to avoid slipping, scratching, or damaging the case. Here’s what you should gather before beginning:
- Case back opener (watch case wrench) – Specifically designed for notched case backs.
- Precision screwdriver set – For models with screw-down case backs.
- Non-magnetic tweezers – Useful for handling small components.
- Soft microfiber cloth – To protect the watch face and work surface.
- Magnifying glass or loupe – Helps inspect seals and internal parts.
- Rubber mat or watch holder – Keeps the watch stable during work.
Avoid using pliers, knives, or improvised tools. These increase the risk of irreversible damage.
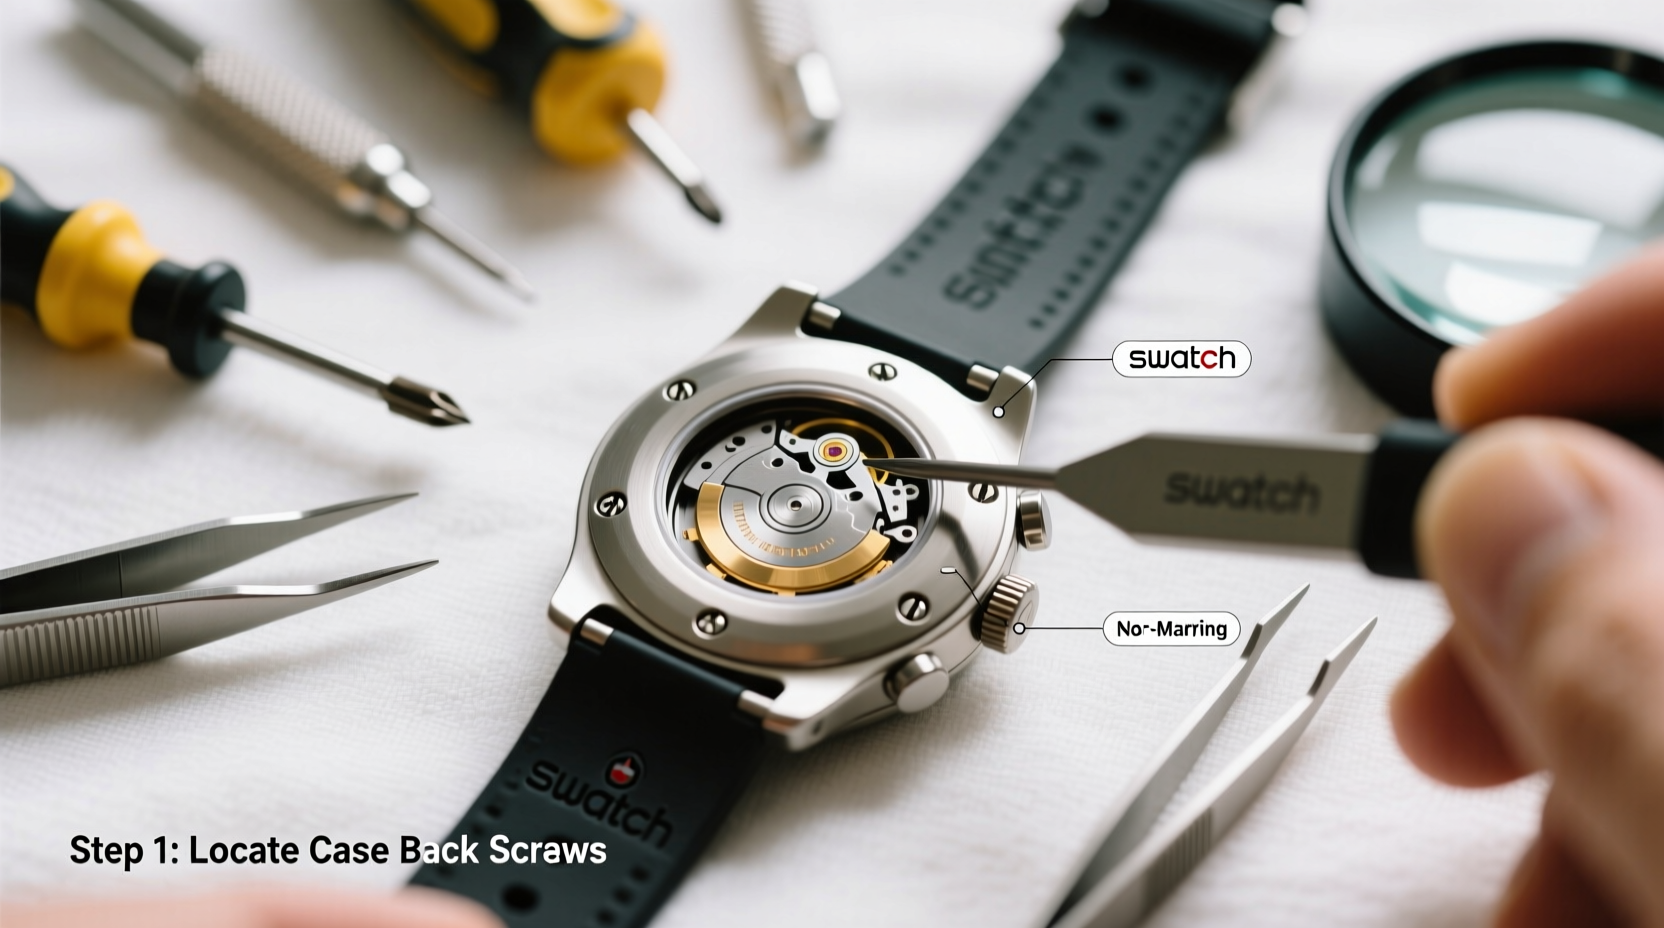
Step-by-Step Guide to Opening Your Swatch Watch
Follow these steps carefully. Patience is key—rushing increases the chance of error.
- Prepare your workspace. Choose a clean, well-lit area free of dust and moisture. Lay down a soft cloth or rubber mat to prevent sliding or scratching.
- Identify your case back type. Most Swatch watches use one of two styles: notched (requiring a case wrench) or screw-down (with small notches or grooves). Examine the edge closely under magnification.
- Secure the watch. Place it face-down on the cloth. If using a watch holder, ensure it grips gently around the mid-case, not the crown or crystal.
- Select the correct tool. For notched backs, choose a case wrench with pins that fit snugly into the indentations. For screw-down types, use a high-quality case knife or specialized key.
- Apply gentle, even pressure. Insert the pins or blade securely. Turn counterclockwise with slow, steady force. Do not jerk or twist abruptly—if resistance is high, double-check alignment.
- Remove the case back. Once loose, lift it off carefully. Set it aside in a designated spot to avoid losing it.
- Inspect internal components. Look for signs of moisture, corrosion, or debris. Check the condition of the rubber gasket—if cracked or brittle, consider replacing it.
“Even simple tasks like battery replacement require respect for the watch’s engineering. One slip can turn a $100 repair into a $300 loss.” — Daniel Meier, Certified Watchmaker, Swiss Time Institute
Do’s and Don’ts When Opening Your Swatch Watch
| Do’s | Don’ts |
|---|---|
| Work on a clean, static-free surface | Use excessive force to loosen the case back |
| Label and organize small parts | Touch the movement with bare fingers (oils can cause damage) |
| Check the gasket for wear and replace if needed | Expose the movement to dust or liquids |
| Reassemble carefully and test water resistance afterward | Ignore manufacturer warnings on water-resistant models |
Real Example: Recovering a Foggy Vintage Swatch
Sophie, a collector from Lyon, noticed her 1995 Swatch Chronograph had developed fog under the crystal after being left near a humidifier. Instead of sending it to a service center—risking high fees for a vintage model—she decided to investigate. Using a case wrench she purchased online, she carefully opened the stainless steel back. Inside, she found a damp gasket and minor condensation on the movement. She dried the interior with a non-contact air blower, replaced the degraded rubber seal, and reassembled the watch. After a simple water resistance test (submerging it in a glass of water), she confirmed no leaks. The total cost? Under €15. The lesson: with the right knowledge, minor issues don’t require professional help.
When Not to Open Your Swatch Watch
While many Swatch models can be opened safely, some situations call for professional assistance:
- Water-resistant or diver models: These have precise tolerances and special gaskets that must be torqued correctly.
- Watches under warranty: DIY repairs typically void the manufacturer’s warranty.
- Snap-on case backs: Some older or special edition Swatches use snap-on backs that require specific tools and technique.
- If you lack confidence: It’s better to wait than risk damaging a sentimental or collectible piece.
In such cases, contact an authorized Swatch service center. They have calibrated tools and genuine replacement parts.
Frequently Asked Questions
Can I open any Swatch watch at home?
No—not all models are designed for user access. While many standard quartz Swatches have notched or screw-down backs suitable for home opening, models labeled “water-resistant,” “diver,” or “chronograph” often require specialized tools and expertise. Always verify your model type before proceeding.
What if the case back won’t budge?
Do not force it. Double-check that you’re turning in the correct direction (always counterclockwise for removal). Ensure your tool fits precisely—using the wrong size can strip the notches. If still stuck, the watch may have thread locker applied at the factory, which requires controlled heat or professional intervention.
How do I know if my Swatch is water-resistant after reassembly?
The only accurate way to test water resistance is with a pressure tester, available at watchmakers’ shops. At home, you can perform a basic check by submerging the watch in a glass of water for a few minutes. If bubbles appear or moisture enters, the seal is compromised. However, this method isn’t foolproof and shouldn’t replace professional testing for critical use.
Final Checklist Before You Begin
- Confirm your Swatch model has a serviceable case back.
- Gather the correct tools—especially a properly sized case wrench.
- Clean the exterior of the watch to prevent dirt from entering.
- Work in a dust-free, well-lit environment.
- Handle internal components with non-magnetic tweezers or gloves.
- Inspect and replace the case gasket if worn.
- Reassemble tightly but without over-torquing.
- Test functionality and water resistance cautiously.
Conclusion
Opening your Swatch watch at home is entirely possible—with the right tools, knowledge, and care. By following this guide, you preserve your watch’s longevity and save money on minor maintenance. Whether you’re replacing a battery, removing moisture, or simply exploring the mechanics of your favorite timepiece, doing it correctly ensures your Swatch keeps ticking for years to come.


 浙公网安备
33010002000092号
浙公网安备
33010002000092号 浙B2-20120091-4
Comments
No comments yet. Why don't you start the discussion?