
Maintaining your home’s windows is essential for energy efficiency, indoor comfort, and long-term structural integrity. Over time, dirt, debris, and wear can hinder smooth operation, especially in sliding or double-hung windows. One of the most effective ways to perform deep cleaning or necessary repairs is to carefully remove the window sash from its track. Done correctly, this process is safe and straightforward. Done incorrectly, it can result in broken glass, damaged frames, or personal injury. This comprehensive guide walks you through each phase of removing a window from its track with precision, safety, and confidence.
Why Remove a Window from Its Track?
There are several compelling reasons to remove a window sash:
- Deep cleaning: Tracks accumulate dust, grime, and insect residue that are difficult to reach while the window is in place.
- Hardware inspection: You can examine rollers, balances, locks, and tilt latches up close.
- Repair or replacement: Damaged seals, cracked glass, or worn-out components can be addressed more effectively off-track.
- Improved operation: Misaligned or sticking windows often benefit from realignment after removal and reinstallation.
Tools and Materials You’ll Need
Gathering the right tools beforehand ensures a smooth process. Here’s what to prepare:
| Tool/Material | Purpose |
|---|---|
| Screwdriver (Phillips and flathead) | Remove trim, clips, or adjustment screws |
| Utility knife | Cut through paint or caulk sealing the sash |
| Vacuum with crevice tool | Clean debris from tracks and jambs |
| Rubber mallet | Gently loosen stuck sashes |
| Gloves and safety glasses | Protect hands and eyes from sharp edges |
| Notepad and camera | Document screw placements and spring setups |
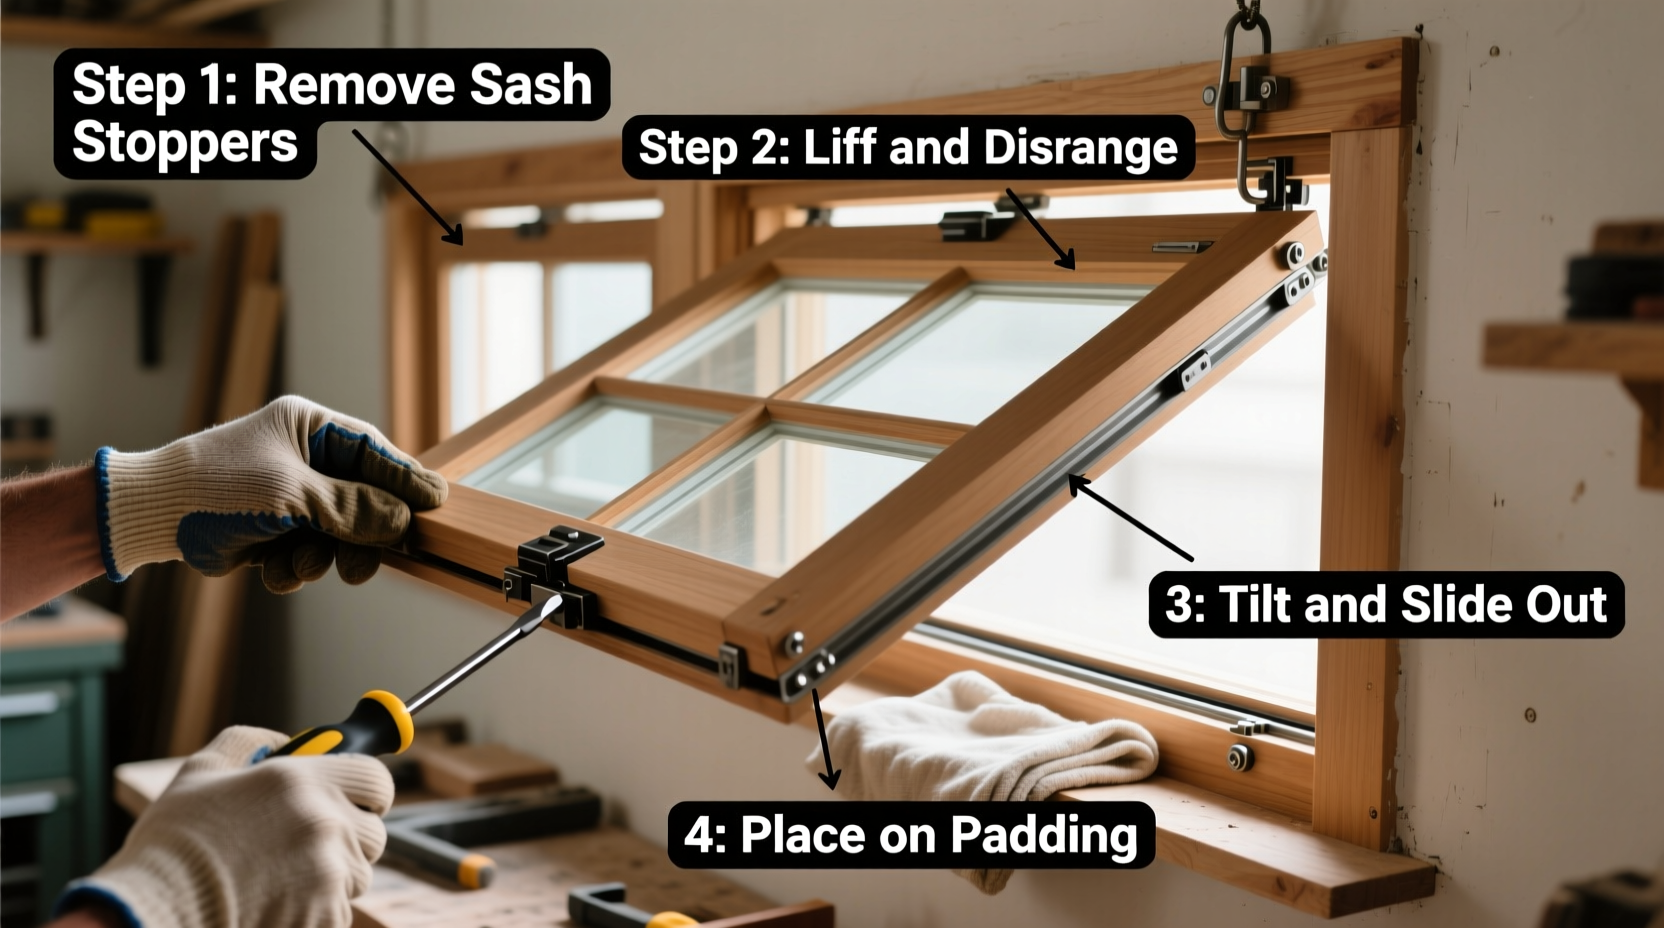
Step-by-Step Guide to Removing a Window Sash
The exact method varies slightly depending on whether you have a double-hung, single-hung, or sliding window. The following steps focus on a standard double-hung vinyl or wood window, which is common in most homes.
- Prepare the work area: Clear furniture away from the window. Lay down a drop cloth or towel to protect flooring and catch small parts.
- Inspect the window mechanism: Look for tilt-latch mechanisms, locking tabs, or access holes near the top and bottom of the sash. Most modern windows are designed to tilt inward for removal.
- Unlock and open the window: Release any locks and raise the lower sash about 3–6 inches.
- Engage the tilt latches: On either side of the sash, locate the tilt-release buttons or levers. Press or slide them inward to free the sash from the jamb liners.
- Tilt the sash inward: Gently pull the bottom of the sash toward you while allowing the top to pivot into the room. Angle it carefully to avoid hitting walls or furniture.
- Lift the sash out: Once fully tilted, lift upward slightly to clear the pivot shoes or rollers from their tracks. Set the sash aside on a soft surface, preferably foam-padded or carpeted.
- Repeat for the upper sash (if applicable): Lower the upper sash and repeat the same tilting procedure. Some models require pushing the sash side-to-side to disengage.
Common Challenges and How to Overcome Them
Even experienced homeowners encounter obstacles when removing windows. Here’s how to handle frequent issues:
- Stuck sash: Apply a silicone-based lubricant to the jamb liners and gently tap the sash frame with a rubber mallet. Never force it—this can crack glass or break internal cords.
- Missing tilt latches: Older windows may not have built-in release mechanisms. In such cases, you may need to partially disassemble the jamb liner or remove interior stops to extract the sash.
- Frayed balance cords: If you notice fraying or broken springs inside the jamb, consider replacing the entire balance system before reinstalling.
“Improper removal is the leading cause of premature window failure. Take your time—windows are engineered for serviceability, but only when handled correctly.” — Marcus Tran, Residential Window Systems Technician
Mini Case Study: Restoring a 15-Year-Old Vinyl Window
A homeowner in Portland, Oregon, struggled with a second-floor bedroom window that wouldn’t stay open. After inspecting it, they noticed the lower sash drooped when raised. Following this guide, they removed the sash and discovered both spiral balances had detached from their brackets. By documenting the setup with photos, ordering matching replacements online, and reinstalling the sash, the window operated smoothly again—all for under $30 and less than an hour of labor. The key was patience during removal and careful reattachment of the new balances.
Do’s and Don’ts When Removing Windows
| Do’s | Don’ts |
|---|---|
| Wear gloves and eye protection | Use excessive force to dislodge parts |
| Take photos before disassembly | Set glass directly on hard floors |
| Clean tracks thoroughly while sash is out | Ignore signs of rot or moisture damage |
| Label components if multiple sashes are removed | Leave the opening unsecured for long periods |
Reinstallation Checklist
After performing maintenance, use this checklist to ensure proper reassembly:
- ✔ Clean and dry the track completely
- ✔ Inspect and lubricate rollers or balance shoes
- ✔ Align the sash properly before inserting into the track
- ✔ Engage the tilt latches or locking pins securely
- ✔ Test smooth operation—open, close, and lock the window
- ✔ Check for air leaks or drafts after reinstallation
Frequently Asked Questions
Can I remove a window without breaking the seal or damaging the glass?
Yes—modern windows are designed for removal without compromising the sealed unit. The glass itself is typically sealed at the factory and should not be separated from the sash unless replacement is needed. Focus on freeing the frame from the track, not dismantling the glass pane.
How often should I remove and clean my windows?
For optimal performance, remove and clean window sashes every 2–3 years. High-dust environments or coastal areas may require annual attention due to salt and sand buildup in tracks.
What if my window doesn’t have tilt latches?
Older or specialty windows may lack tilt mechanisms. In these cases, you may need to remove interior stop molding using a pry bar and utility knife. This allows the sash to slide sideways out of the frame. Reinstall the stops afterward with finish nails and touch-up paint.
Final Thoughts and Next Steps
Removing a window from its track is a manageable DIY task when approached with care and the right knowledge. Not only does it restore functionality, but it also extends the lifespan of your windows and improves your home’s energy efficiency. With basic tools, a methodical approach, and attention to detail, you can complete this maintenance job safely and effectively—saving money on professional services and gaining valuable insight into your home’s systems.


 浙公网安备
33010002000092号
浙公网安备
33010002000092号 浙B2-20120091-4
Comments
No comments yet. Why don't you start the discussion?