
The AC contactor is a critical component in your HVAC system, acting as a high-voltage switch that controls power to the compressor and condenser fan motor. When it fails or degrades, cooling performance drops dramatically—leading to inconsistent temperatures, increased energy bills, and even compressor damage. Testing the contactor regularly ensures your system runs efficiently and avoids costly breakdowns. However, because it handles 240 volts, improper handling can result in serious injury. This guide provides a detailed, safe process for inspecting and testing an AC contactor, empowering homeowners and technicians alike with actionable knowledge.
Understanding the AC Contactor’s Role
An AC contactor is an electromagnetic relay that closes a circuit when energized by the thermostat signal (typically 24V). When the thermostat calls for cooling, the low-voltage coil pulls in the contacts, allowing 240V to flow to the outdoor unit’s compressor and fan. Over time, repeated arcing, dirt buildup, or overheating can cause pitting, welding, or failure to engage—all of which disrupt system operation.
Common signs of a failing contactor include:
- Hesitant startup or clicking without system engagement
- Frequent tripping of breakers
- Burning smell near the outdoor unit
- Visible pitting or discoloration on contact surfaces
- Inconsistent cooling despite thermostat settings
Before attempting any test, understand that this involves working with lethal voltages. Only proceed if you’re comfortable with electrical systems and follow all safety protocols.
Essential Tools and Safety Precautions
To safely test a contactor, gather the following tools:
- Multimeter (digital, capable of measuring resistance and voltage)
- Insulated screwdrivers and pliers
- Voltage tester (non-contact preferred for initial check)
- Safety gloves and goggles rated for electrical work
- Flashlight for visibility inside the unit
Safety must be your top priority. High-voltage components can retain charge even after power is disconnected. Follow these precautions:
- Shut off power at both the indoor disconnect switch and the main electrical panel.
- Wait 5–10 minutes after shutdown to allow capacitors to discharge.
- Use a non-contact voltage tester to confirm no live current is present.
- Wear insulated gloves and eye protection throughout the process.
- Never bypass interlocks or remove safety covers while powered.
“Testing live components without proper training increases risk of arc flash or electrocution. If unsure, call a licensed HVAC technician.” — James Rolen, Master Electrician & HVAC Systems Instructor
Step-by-Step Guide to Testing the AC Contactor
This methodical approach ensures accurate diagnosis while minimizing risk.
- Power Down the System
Turn off the HVAC system at the thermostat, then shut off the disconnect switch near the outdoor unit. Go to your main electrical panel and flip the double-pole breaker labeled “AC” or “Condenser.” Confirm it’s off using a non-contact voltage tester near the wires leading into the contactor. - Remove the Access Panel
Unscrew or unclip the outer cover of the condenser unit. Set screws aside carefully. Use a flashlight to inspect the interior for obvious signs of damage—burn marks, melted insulation, or rodent nests. - Inspect the Contactor Visually
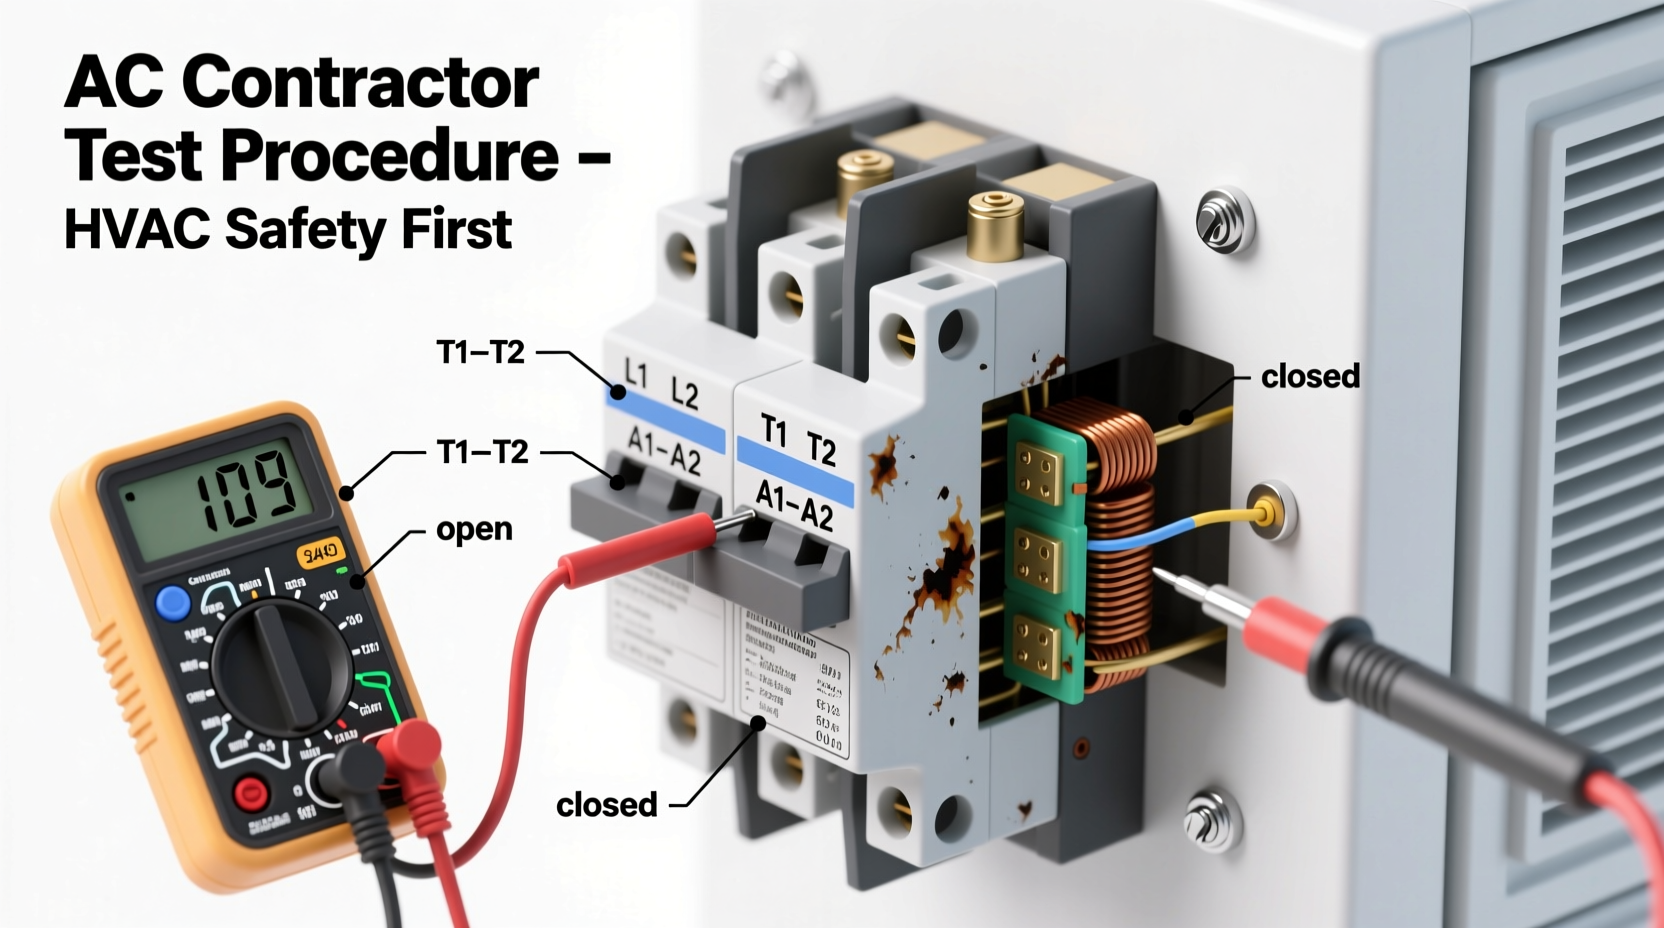
Locate the contactor—it’s typically a square or rectangular component with multiple wire connections and large terminals labeled L1, L2 (line), and T1, T2 (load). Look for:- Pitting, corrosion, or carbon buildup on contact points
- Welded contacts (contacts stuck together)
- Charring or melting around the coil or housing
- Loose or frayed wiring
- Test Coil Resistance (Ohms)
Set your multimeter to ohms (Ω). Disconnect the two small control wires from the coil terminals (usually labeled A1 and A2). Place one probe on each terminal. A healthy coil should read between 10 and 30 ohms.- No reading (OL): Open coil—replace contactor.
- Near zero ohms: Shorted coil—replace immediately.
- Check Continuity Across Contacts
With the control wires still disconnected, test continuity between L1–T1 and L2–T2. The meter should show no continuity (open circuit) when the contactor is at rest. If it shows continuity, the contacts are welded shut—a dangerous condition requiring replacement. - Reconnect and Simulate Call for Cooling
Restore low-voltage power only (leave 240V off). Turn the thermostat to “Cool” and set below ambient temperature. You should hear a distinct click as the contactor engages. If not, the coil may be faulty or control voltage insufficient. - Measure Control Voltage
Reconnect the control wires. Switch multimeter to AC voltage. Place probes on A1 and A2 while the thermostat is calling for cooling. You should read approximately 24V. Less than 21V indicates a control circuit issue (e.g., transformer problem or wiring fault). - Final Power Test (Optional – Advanced)
Only if trained: Restore full power and measure voltage across L1–T1 and L2–T2 when the contactor is engaged. You should see nearly equal input and output voltage (within 5V). A significant drop indicates high resistance due to worn contacts.
Do’s and Don’ts When Handling Contactors
| Do’s | Don’ts |
|---|---|
| Always disconnect power before inspection | Never assume the system is dead without testing |
| Label wires before disconnecting | Don’t touch terminals with bare hands |
| Clean contacts gently with a contact file or emery cloth | Avoid sandpaper—it leaves conductive residue |
| Replace contactors showing physical damage | Don’t reuse a contactor with pitted or burned surfaces |
| Verify correct amperage and voltage rating when replacing | Don’t install a contactor with lower ampacity than original |
Real-World Example: Diagnosing a No-Cooling Complaint
A homeowner reported their air conditioner was running but not cooling. The indoor blower operated normally, and the outdoor fan started briefly before stopping. Upon inspection, the technician noticed a faint buzzing sound from the condenser. After powering down and verifying no voltage, he removed the contactor cover and found heavily pitted contacts and a swollen coil casing. Ohmmeter testing revealed an open coil (OL reading). Despite receiving 24V from the control board, the contactor failed to close. The root cause was moisture ingress due to a damaged seal, leading to internal corrosion. Replacing the contactor restored full function. This case highlights how early testing prevents cascading failures—had the issue gone unchecked, the compressor could have been damaged by repeated short-cycling.
Frequently Asked Questions
How often should I test or replace my AC contactor?
There’s no fixed timeline, but most contactors last 5–10 years under normal conditions. Test annually during preventive maintenance. Replace if you notice sticking, pitting, or inconsistent engagement—even if it still works intermittently.
Can I clean a dirty contactor instead of replacing it?
Light surface oxidation can sometimes be cleaned with a contact cleaner and burnishing tool. However, deep pitting, charring, or coil damage cannot be repaired. Cleaning is a temporary fix at best; replacement is safer and more reliable.
What happens if I run my AC with a faulty contactor?
A degraded contactor causes voltage drop, leading to hard starting, overheating, and eventual compressor failure. It also increases fire risk due to arcing. Never operate the system long-term with a known contactor issue.
Ensure Long-Term HVAC Reliability
The AC contactor is a small part with a massive impact on system performance. Regular testing not only extends the life of your HVAC equipment but also enhances safety and efficiency. By following this guide, you gain the confidence to identify early warning signs and take proactive steps. Whether you're a DIY-savvy homeowner or a junior technician, mastering contactor diagnostics puts you ahead of costly repairs and emergency service calls.


 浙公网安备
33010002000092号
浙公网安备
33010002000092号 浙B2-20120091-4
Comments
No comments yet. Why don't you start the discussion?