
A well-seasoned cast iron skillet is one of the most valuable tools in any kitchen. When properly cared for, it develops a naturally non-stick surface that improves with use. Unlike synthetic coatings, this finish is built from layers of polymerized oil—durable, safe, and entirely free of chemicals. Yet many home cooks struggle with sticky food, rust, or flaking surfaces because they haven’t mastered the art of seasoning. The good news? With the right approach, anyone can create a slick, long-lasting finish that rivals professional cookware.
Seasoning isn’t a one-time task—it’s a process of building up a protective layer through heat and oil. Done correctly, it transforms porous iron into a smooth cooking surface that resists rust and releases food effortlessly. This guide walks you through every phase: from choosing the right oil to maintaining your skillet after each use. Whether you’ve just bought your first cast iron pan or are reviving an old family heirloom, these steps will deliver reliable results.
Why Seasoning Matters
Cast iron is made of porous metal. Without protection, it reacts with moisture and acidic foods, leading to rust and metallic flavors. Seasoning fills those pores with a hardened layer of oil that bonds to the metal at a molecular level. This layer does more than prevent corrosion—it creates a slick cooking surface that improves over time.
The science behind seasoning involves polymerization: when oil is heated past its smoke point, its molecules break down and re-form into a tough, plastic-like coating. This transformation only occurs under high, consistent heat. That’s why oven seasoning is often more effective than stovetop methods—it provides even, sustained temperatures necessary for complete polymerization.
“Proper seasoning turns cast iron from reactive metal into a performance surface. It’s not just about non-stick—it’s about longevity and flavor integrity.” — Dr. Alan Zhang, Materials Scientist & Culinary Equipment Consultant
Choosing the Right Oil for Seasoning
Not all oils work equally well for seasoning. The best options have a high smoke point and a high concentration of polyunsaturated fats, which polymerize more effectively. Here’s a comparison of common choices:
| Oil Type | Smoke Point (°F) | Polymerization Potential | Recommended? |
|---|---|---|---|
| Flaxseed Oil | 225–330 | High | Yes (but brittle over time) |
| Grapeseed Oil | 420 | High | Yes |
| Canola Oil | 400 | Moderate-High | Yes |
| Vegetable Oil | 400–450 | Moderate | Yes |
| Corn Oil | 450 | Moderate | Limited use |
| Olive Oil | 375 | Low | No |
| Butter | 302 | Very Low | No |
While flaxseed oil has gained popularity for creating a hard initial layer, some users report flaking after repeated heating cycles due to brittleness. For long-term durability, grapeseed or refined canola oil offers a balanced combination of high smoke point and stable polymerization.
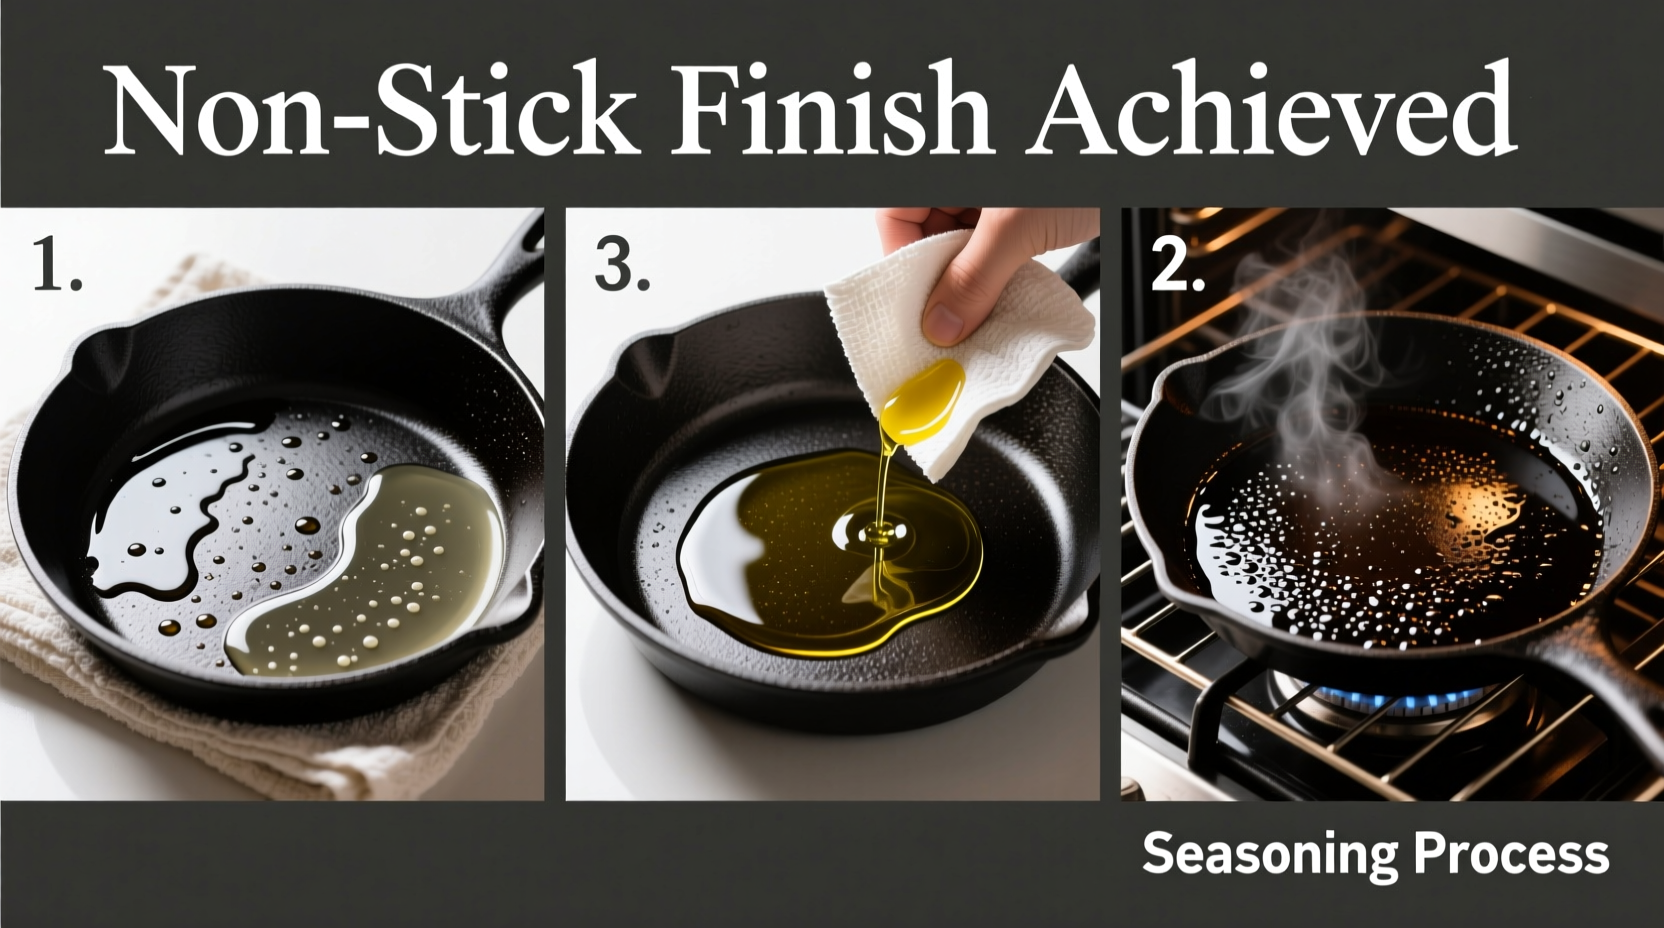
Step-by-Step Guide to Oven Seasoning
Oven seasoning is the most reliable method for establishing a strong base layer. Follow this timeline to build a resilient, non-stick surface:
- Clean the skillet thoroughly. If new, wash with warm water and mild soap to remove factory wax. If rusty or greasy, scrub with steel wool or a stiff brush. Rinse and dry completely.
- Preheat oven to 450°F (230°C). Place rack in the center. Line the lower rack with aluminum foil to catch drips.
- Apply a thin layer of oil. Using a paper towel and tongs, rub a high-smoke-point oil (like grapeseed or canola) over the entire surface—inside, outside, handle, and bottom. Then, take a clean towel and wipe it off almost entirely. The pan should look nearly dry. Too much oil leads to sticky residue.
- Bake upside down for 1 hour. Place the skillet on the center rack with the cooking surface facing down. This prevents pooling and ensures even curing.
- Cool in the oven. Turn off the heat and let the pan cool inside for at least 2 hours. Rapid cooling can cause micro-cracking in the seasoning.
- Repeat 2–3 times. Each layer builds durability. Wait until the pan is completely cool before applying the next coat.
This process creates a foundation. Over time, regular cooking—especially with fats like bacon grease or butter—will continue to enhance the finish.
Stovetop Touch-Ups
After each wash or if food starts sticking, a quick stovetop re-seasoning helps maintain performance:
- Heat the skillet over medium heat for 3–5 minutes.
- Add ½ teaspoon of oil and swirl to coat.
- Cook for 5–10 minutes, then let cool.
This daily reinforcement keeps the surface active and protected without requiring full oven cycles.
Maintenance Checklist for Long-Term Success
Seasoning isn’t a set-it-and-forget-it process. Ongoing care determines how well your skillet performs. Follow this checklist after every use:
- Let the pan cool slightly before cleaning.
- Scrape out food residue with a wooden or silicone spatula.
- Rinse with hot water—avoid soap unless absolutely necessary.
- Use a brush or chainmail scrubber for stuck bits; never steel wool on a well-seasoned pan.
- Dry immediately and thoroughly over low heat on the stove.
- Apply a light smear of oil while still warm.
- Store in a dry place—never stack other pans inside unless lined with cloth.
Consistency matters more than perfection. A small amount of oil after each use does more for longevity than occasional deep seasoning.
Common Mistakes to Avoid
Even experienced cooks make errors that compromise their seasoning. Here are the most frequent pitfalls—and how to avoid them:
| Mistake | Consequence | Solution |
|---|---|---|
| Using too much oil during seasoning | Sticky, gummy residue | Wipe the pan nearly dry after oiling |
| Washing with harsh soap regularly | Strips protective layer | Use only when needed; rinse well |
| Soaking or air-drying | Rust formation | Dry immediately on the stove |
| Cooking acidic foods too soon | Breaks down new seasoning | Wait until 3–4 seasoning layers are built |
| Stacking pans without protection | Scratches and chips | Use paper towels or felt liners |
Real Example: Reviving a Family Heirloom
Sarah inherited her grandmother’s 1940s cast iron skillet. It was covered in rust and had a patchy black residue. Instead of discarding it, she followed the restoration process: she scrubbed it with vinegar and steel wool, rinsed, dried, and applied three rounds of oven seasoning with canola oil. After each cycle, she noticed the surface becoming smoother and darker. Within a week of regular use—cooking eggs, searing chicken, and making cornbread—the pan developed a glossy sheen. Now, scrambled eggs slide right out without added butter. “It feels better than non-stick,” she says. “And I know exactly what’s on the surface—just oil and time.”
Frequently Asked Questions
Can I use soap on my cast iron skillet?
Yes, but sparingly. Modern dish soaps are mild and won’t destroy a well-established seasoning. However, avoid aggressive detergents or soaking. For routine cleaning, hot water and a brush are usually enough.
Why is my seasoning flaking?
Flaking often results from applying too much oil during seasoning, using oils prone to brittleness (like flaxseed), or rapid temperature changes. To fix it, strip the pan with steel wool, re-clean, and re-season with thin layers of canola or grapeseed oil.
How do I know if my skillet is well-seasoned?
A properly seasoned skillet has a deep, even black sheen—not shiny like Teflon, but smooth to the touch. It should release food easily, especially eggs, without excessive sticking. Light smoking during preheating is normal; heavy smoke means excess oil remains.
Conclusion: Build Confidence One Layer at a Time
Creating a non-stick finish on a cast iron skillet isn’t magic—it’s method. By understanding the chemistry of oil and heat, choosing the right materials, and committing to simple maintenance, you transform raw iron into a lifelong kitchen companion. The process rewards patience: each layer you build becomes more resilient, each meal contributes to its evolution.
Don’t fear mistakes. Even stripped or rusted skillets can be restored. What matters is consistency. Start today with a single seasoning cycle, follow the checklist, and cook something simple like pancakes or fried eggs to test the surface. Over time, your skillet will become uniquely yours—darkened by use, seasoned by experience, and unmatched in performance.


 浙公网安备
33010002000092号
浙公网安备
33010002000092号 浙B2-20120091-4
Comments
No comments yet. Why don't you start the discussion?