
Chain phone cases have surged in popularity for their blend of fashion and function. They offer hands-free convenience, reduce the risk of drops, and elevate your iPhone’s aesthetic. However, improper installation can lead to loose fittings, damaged hardware, or even loss of your device. A secure setup is essential—not just for style, but for safety and longevity. This comprehensive guide walks you through every stage of installing a chain phone case correctly, ensuring your iPhone stays protected while you stay stylish.
Understanding Chain Phone Case Components
Before installation, it’s crucial to recognize the parts that make up a typical chain phone case. Most models consist of three primary components: the case itself, the attachment mechanism (usually a metal loop or anchor point), and the detachable chain strap. Some designs integrate the chain directly into the case, while others use modular connectors like carabiners or screw-on rings.
The quality of materials varies significantly between brands. High-end cases use reinforced polycarbonate or TPU (thermoplastic polyurethane) for shock absorption, paired with stainless steel or brass chains that resist corrosion and wear. Cheaper alternatives may use plastic loops or thin metal links prone to snapping under stress.
“Durability starts with construction. Always inspect the integrity of both the case’s anchor point and the chain’s clasp before use.” — Jordan Lee, Mobile Accessory Engineer
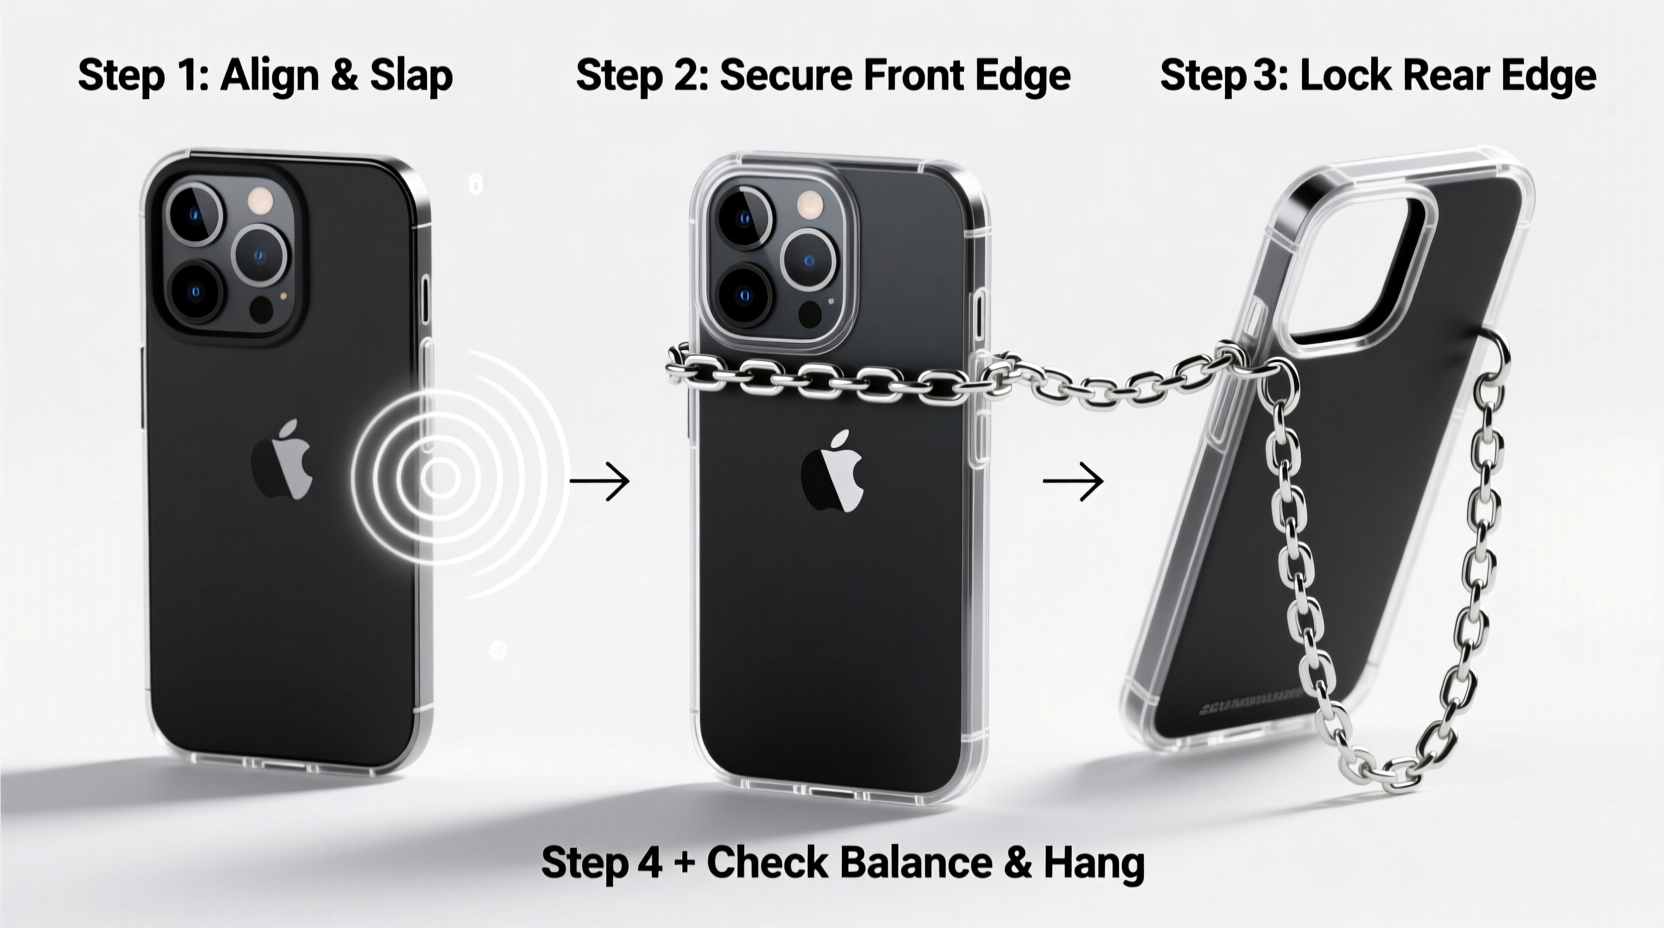
Step-by-Step Installation Process
Installing a chain phone case properly ensures long-term reliability and comfort. Follow this detailed sequence to get it right the first time.
- Verify Compatibility: Confirm the case is designed for your iPhone model. Cases for iPhone 14 won’t fit an iPhone 15 due to camera cutout and button placement differences.
- Inspect the Case Interior: Check for debris, misaligned ports, or warped edges. Clean the inside with a microfiber cloth if needed.
- Align Your iPhone Correctly: Position the top of your iPhone (where the power button is) with the corresponding side of the case. Gently press down starting from one corner to avoid cracking.
- Secure All Edges: Ensure the case snaps fully around the frame. Test speaker, charging port, and button accessibility after installation.
- Attach the Chain: If using a separate strap, connect it to the built-in loop or ring. For screw-on attachments, tighten gently with a mini tool—do not over-torque.
- Test Weight Distribution: Hold the phone by the chain for 30 seconds to confirm the connection feels stable and doesn’t strain the case.
Repeat these steps whenever switching cases or reattaching chains after cleaning. Consistency prevents gradual loosening caused by repeated stress.
Do’s and Don’ts When Installing Chain Cases
Avoid common pitfalls that compromise security and usability. The table below outlines key behaviors to adopt—or avoid—for optimal performance.
| Do’s | Don’ts |
|---|---|
| Use a case with a reinforced metal anchor point | Use adhesive loops or flimsy plastic connectors |
| Check chain length—ideal range is 24–36 inches for crossbody carry | Choose overly long chains that drag on the ground |
| Tighten screw-on connectors gently with proper tools | Force connections without alignment |
| Detach the chain when placing the phone in tight pockets or bags | Leave the chain attached during wireless charging or sleep tracking |
| Regularly inspect the chain for kinks, rust, or weak links | Ignore signs of wear until failure occurs |
Real-World Example: How Improper Installation Led to Device Loss
Sophia, a freelance photographer in Brooklyn, purchased a trendy gold-tone chain case online for her iPhone 15 Pro. Excited to use it at an outdoor market shoot, she skipped reading the instructions and forced her phone into a slightly tight-fitting case. The chain was attached via a small plastic loop glued to the back.
Within two hours, while adjusting her bag strap, the phone swung outward—and the loop snapped cleanly off. Her iPhone fell onto concrete, cracking the screen and damaging the rear camera. An $80 accessory cost her over $400 in repairs.
This scenario underscores the importance of verifying material quality and following correct installation procedures. A few extra minutes spent aligning and testing could have prevented significant financial and functional loss.
Maintenance and Long-Term Care Tips
Once installed, ongoing care preserves both functionality and appearance. Sweat, friction, and environmental exposure degrade materials over time. Here’s how to maintain your chain case:
- Clean monthly: Wipe the case with a damp cloth and mild soap. Dry thoroughly before reassembly.
- Lubricate metal joints: Apply a tiny drop of silicone-based lubricant to stiff chain links every few months.
- Store separately: When not in use, keep the case and chain in a soft pouch to prevent scratches and tangling.
- Rotate usage: Alternate between multiple cases to reduce wear on any single attachment point.
For iPhones with MagSafe compatibility, ensure the chain case doesn’t interfere with magnetic alignment. Some third-party cases block MagSafe signals or cause overheating during wireless charging. Look for MagSafe-certified chain cases if you rely on this feature.
Frequently Asked Questions
Can I install a chain on any phone case?
No—not all cases support chains. Only use cases specifically designed with anchor points or compatible add-ons. Retrofitting chains onto standard cases often requires modifications that void warranties and weaken structural integrity.
Is it safe to wear a chain case all day?
Yes, provided the chain is securely fastened and the weight is evenly distributed. Avoid wearing it during high-impact activities like running or gym workouts, where swinging motion increases detachment risk. Use discretion based on your environment.
What should I do if the chain breaks?
Immediately stop using the broken piece. Replace it with a manufacturer-approved part or purchase a new chain rated for at least 10 pounds of tensile strength. Never attempt to repair broken metal links with glue or tape.
Final Checklist Before Use
Before heading out with your newly installed chain case, run through this quick verification list:
- ✅ iPhone fits snugly with no gaps or pressure points
- ✅ All buttons and ports are fully accessible
- ✅ Chain is firmly attached to a reinforced anchor point
- ✅ Clasp locks securely and opens smoothly
- ✅ No visible damage to chain links or weld points
- ✅ Length allows comfortable carry without dragging
Conclusion: Style Meets Security
A chain phone case blends practicality with personal expression—but only when installed with precision and care. From selecting durable materials to performing routine checks, each step contributes to a safer, more enjoyable experience. Whether you're navigating city streets, attending events, or simply want to keep your hands free, a well-installed chain case enhances your daily routine without compromising your device’s safety.


 浙公网安备
33010002000092号
浙公网安备
33010002000092号 浙B2-20120091-4
Comments
No comments yet. Why don't you start the discussion?