
Setting up an email account on your iPhone doesn’t have to be complicated. Whether you're switching from Android, replacing a lost device, or simply adding a new work or personal email, the process is intuitive once you know the steps. With iOS support for major providers like Gmail, Outlook, Yahoo, and IMAP/POP3 custom accounts, you can consolidate all your messages in one place. This guide walks you through every stage—from initial setup to troubleshooting common issues—so you can stay connected without frustration.
Supported Email Services on iPhone
The iPhone’s built-in Mail app supports a wide range of email providers out of the box. When you begin adding an account, iOS automatically recognizes popular services and configures settings for you. These include:
- Gmail (Google Workspace included)
- Yahoo Mail
- Outlook.com / Hotmail / Live.com / MSN
- iCloud Mail
- AOL
For less common providers—including corporate or school email systems—you can manually configure IMAP or POP settings. Apple does not support Exchange ActiveSync on older iOS versions unless configured via Microsoft’s dedicated app, but modern setups typically use modern authentication protocols seamlessly.
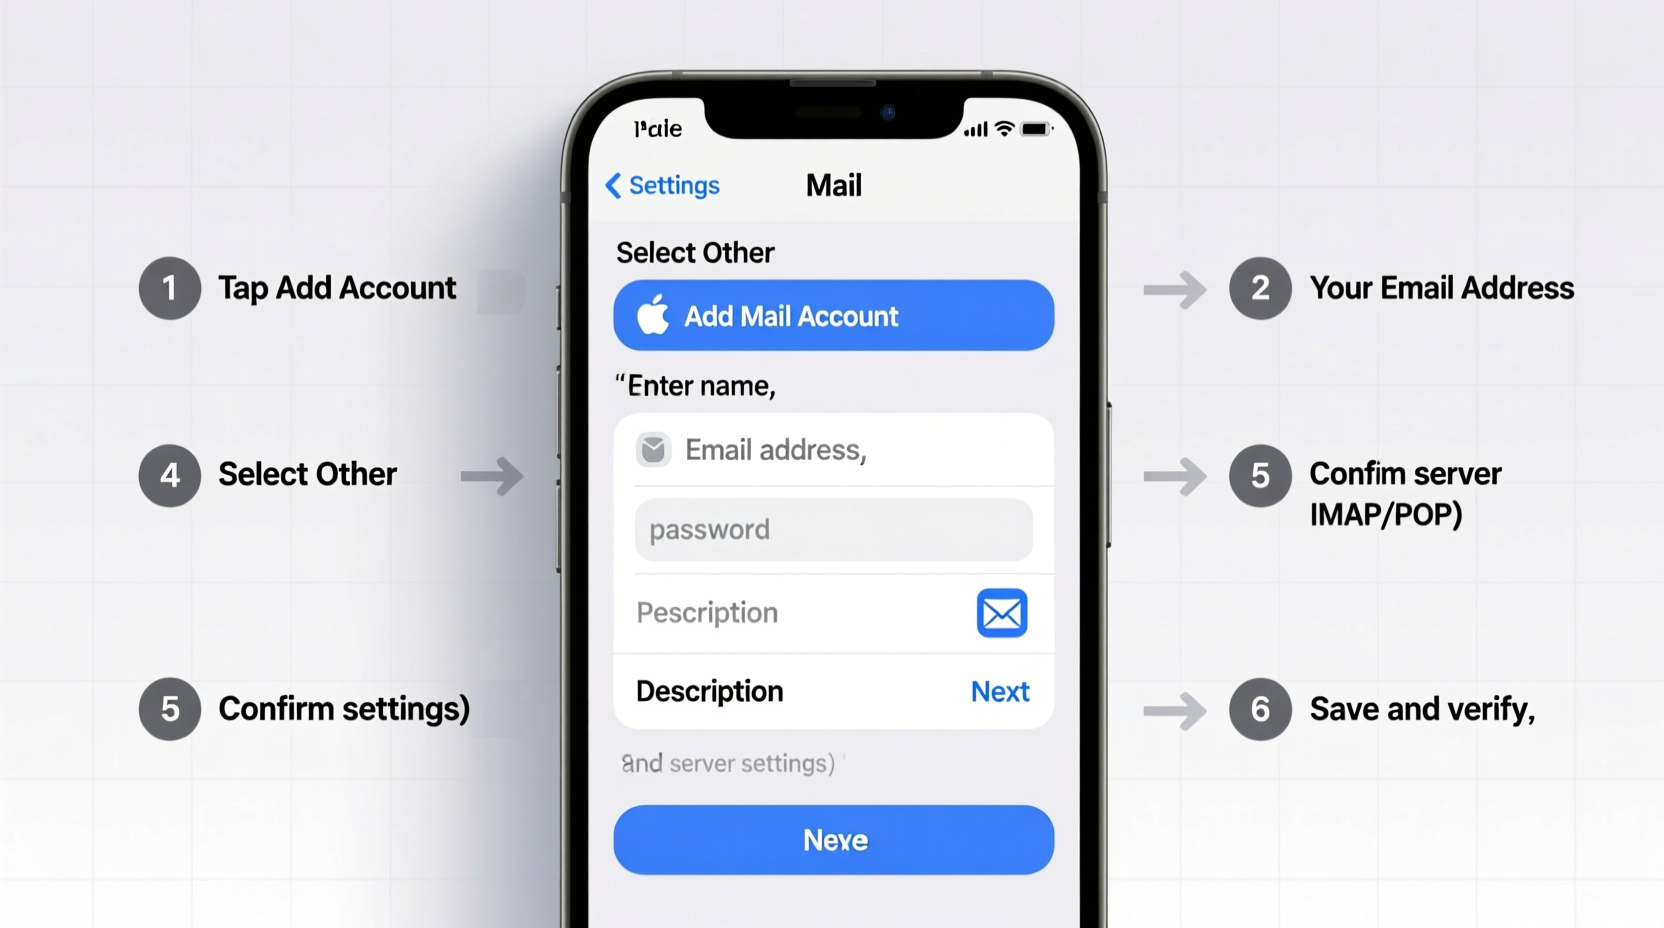
How to Add an Email Account: Step-by-Step Setup
Follow this universal process to add most major email accounts directly through the iPhone Settings app.
- Open the Settings app on your iPhone.
- Scroll down and tap Mail.
- Select Accounts, then tap Add Account.
- Choose your email provider from the list (e.g., Google, Yahoo, Outlook).
- Enter your full email address and tap Next.
- Enter your password when prompted.
- Allow the iPhone to verify your credentials with the server.
- Select which data to sync—Mail, Contacts, Calendars, Notes, and Reminders.
- Tap Save. Your inbox will begin syncing immediately.
Once saved, open the Mail app to view your folders, send a test message, and ensure everything appears correctly. The entire process usually takes under two minutes for supported providers.
Manual Setup for Custom or Corporate Email Accounts
If your email provider isn’t listed (such as a company domain or private hosting service), select Other at the bottom of the account types screen. You’ll need to enter incoming and outgoing mail server details manually.
Here's what you'll typically require:
| Field | Description | Example Value |
|---|---|---|
| Incoming Mail Server (IMAP) | Server address for retrieving emails | imap.yourdomain.com |
| Outgoing Mail Server (SMTP) | Server used to send emails | smtp.yourdomain.com |
| Username | Your full email address | you@yourdomain.com |
| Password | Your email account password or app-specific key | •••••••• |
| Port & Security | Usually IMAP port 993 (SSL), SMTP port 587 (TLS) | Ask your provider |
Contact your IT department or hosting provider if these details are unknown. Incorrect server settings are the most common cause of failed manual configurations.
“We see dozens of support tickets each week where users mistype their SMTP port or forget to enable SSL. Double-checking these values resolves 80% of setup failures.” — Raj Mehta, Senior Support Engineer at CloudInbox Hosting
Troubleshooting Common Issues After Setup
Even after successful configuration, some users encounter syncing delays, authentication errors, or missing messages. Here’s how to fix them quickly.
Email Not Syncing?
- Go to Settings > General > Background App Refresh and ensure it’s enabled for Mail.
- Check that your internet connection is stable.
- Force-close and reopen the Mail app.
- Restart your iPhone if messages remain stuck.
“Cannot Verify Server Certificate” Error
This often appears with self-signed certificates on private servers. While technically possible to bypass, doing so compromises security. Instead, contact your administrator to install a trusted SSL certificate.
Password Rejected Despite Being Correct
If your email uses two-factor authentication (2FA), regular passwords won’t work. Generate an app-specific password:
- Gmail: Visit myaccount.google.com/apppasswords
- Yahoo: Use Account Security Key under \"App passwords\"
- Outlook/Hotmail: Enable \"Modern Authentication\" and generate keys via Microsoft account settings
Optimizing Your iPhone Email Experience
Adding the account is just the beginning. Fine-tune your experience for better productivity and fewer distractions.
Customize Notifications
Navigate to Settings > Mail > Notifications. Choose whether to receive alerts for every message or only flagged ones. Consider using Summary Notifications (iOS 15+) to batch non-urgent emails and reduce interruptions.
Enable Swipe Actions
Under Settings > Mail > Swipe Left/Right, assign quick actions like Archive, Delete, Mark as Read, or Flag. This saves time when managing large volumes of mail daily.
Use Multiple Inboxes (iOS 16+)
If you manage several accounts, create a custom view showing only unread messages across all inboxes. Go to Mail > Mailboxes > Edit Smart Mailboxes and set filters accordingly.
Set Up Signatures and Default Account
To avoid sending replies from the wrong address:
- Go to Settings > Mail > Signature and choose per-account signatures or a unified one.
- Under Default Account, pick which identity is used when composing new messages.
Frequently Asked Questions
Can I use my work email without installing additional apps?
Yes, if your organization uses standard IMAP or modern Exchange protocols. However, many businesses now require Microsoft Outlook or VMware Boxer apps for compliance and security. Check with your IT team before attempting native setup.
Why are my sent emails not appearing in the Sent folder?
This happens when the SMTP server doesn’t copy messages back to the server. Ensure your Sent mailbox is mapped correctly: Open Mail, go to your Sent folder, tap Edit, then change the account’s Sent Mailbox location to the correct server path.
Will setting up my email on iPhone delete messages from the server?
No. Using IMAP (the default for most providers) keeps messages synchronized across devices. Only POP configurations may download and remove messages, but iPhones rarely default to POP unless manually specified.
Email Setup Checklist
Before finishing your configuration, run through this final checklist to ensure everything works smoothly:
- ✅ Entered correct email address and password
- ✅ Enabled necessary sync options (Mail, Calendar, etc.)
- ✅ Verified that both incoming and outgoing servers are working
- ✅ Configured app-specific password if 2FA is active
- ✅ Tested sending and receiving a message
- ✅ Adjusted notification preferences
- ✅ Set up signature and default reply account
Conclusion: Stay Connected Without the Stress
Setting up any email account on your iPhone is straightforward when you follow the right steps. From major providers like Gmail and Outlook to custom business domains, iOS offers flexible tools to keep your communication seamless. By understanding the basics of server settings, leveraging app-specific passwords, and optimizing post-setup features like swipe gestures and notifications, you gain full control over how you interact with your inbox.


 浙公网安备
33010002000092号
浙公网安备
33010002000092号 浙B2-20120091-4
Comments
No comments yet. Why don't you start the discussion?