
As gaming becomes an increasingly integrated part of daily life, parents need reliable tools to manage their children’s screen time, game content, and online interactions. The Nintendo Switch offers a robust parental control system through its dedicated smartphone app, giving caregivers the ability to set limits, monitor activity, and ensure a safe gaming environment. Unlike built-in console settings, Nintendo’s approach uses a companion app that connects securely to the console via the internet. This guide walks you through every essential step—clearly and efficiently—to configure parental controls with confidence.
Why Parental Controls Matter on Nintendo Switch
The Nintendo Switch appeals to players of all ages, from preschoolers enjoying *Mario Kart* to teens diving into expansive RPGs. While Nintendo maintains a generally family-friendly library, some games include mild violence, online chat features, or extended play sessions that can interfere with sleep or schoolwork. Without oversight, unrestricted access may lead to excessive screen time or exposure to inappropriate content—even in games rated for older audiences.
Nintendo’s parental controls are designed to help families balance fun with responsibility. You can restrict gameplay duration, filter out mature titles, disable online communication, and receive real-time reports on what your child is playing. These tools don’t eliminate gaming—they enhance it by creating structure and peace of mind.
“Digital parenting isn’t about restriction—it’s about guidance. Setting boundaries on devices like the Switch helps kids develop healthy habits early.” — Dr. Lisa Mann, Child Development Specialist
What You’ll Need Before Getting Started
Before diving into setup, gather the following:
- A Nintendo Account (for the parent/guardian)
- The Nintendo Switch console used by the child
- A compatible smartphone (iOS or Android) with internet access
- The free Nintendo Switch Parental Controls app installed
- Approximately 10–15 minutes of uninterrupted time
Note: The child does not need their own Nintendo Account for basic monitoring, but one is required if they use online features or cloud saves. As the parent, you’ll link your account to act as the administrator.
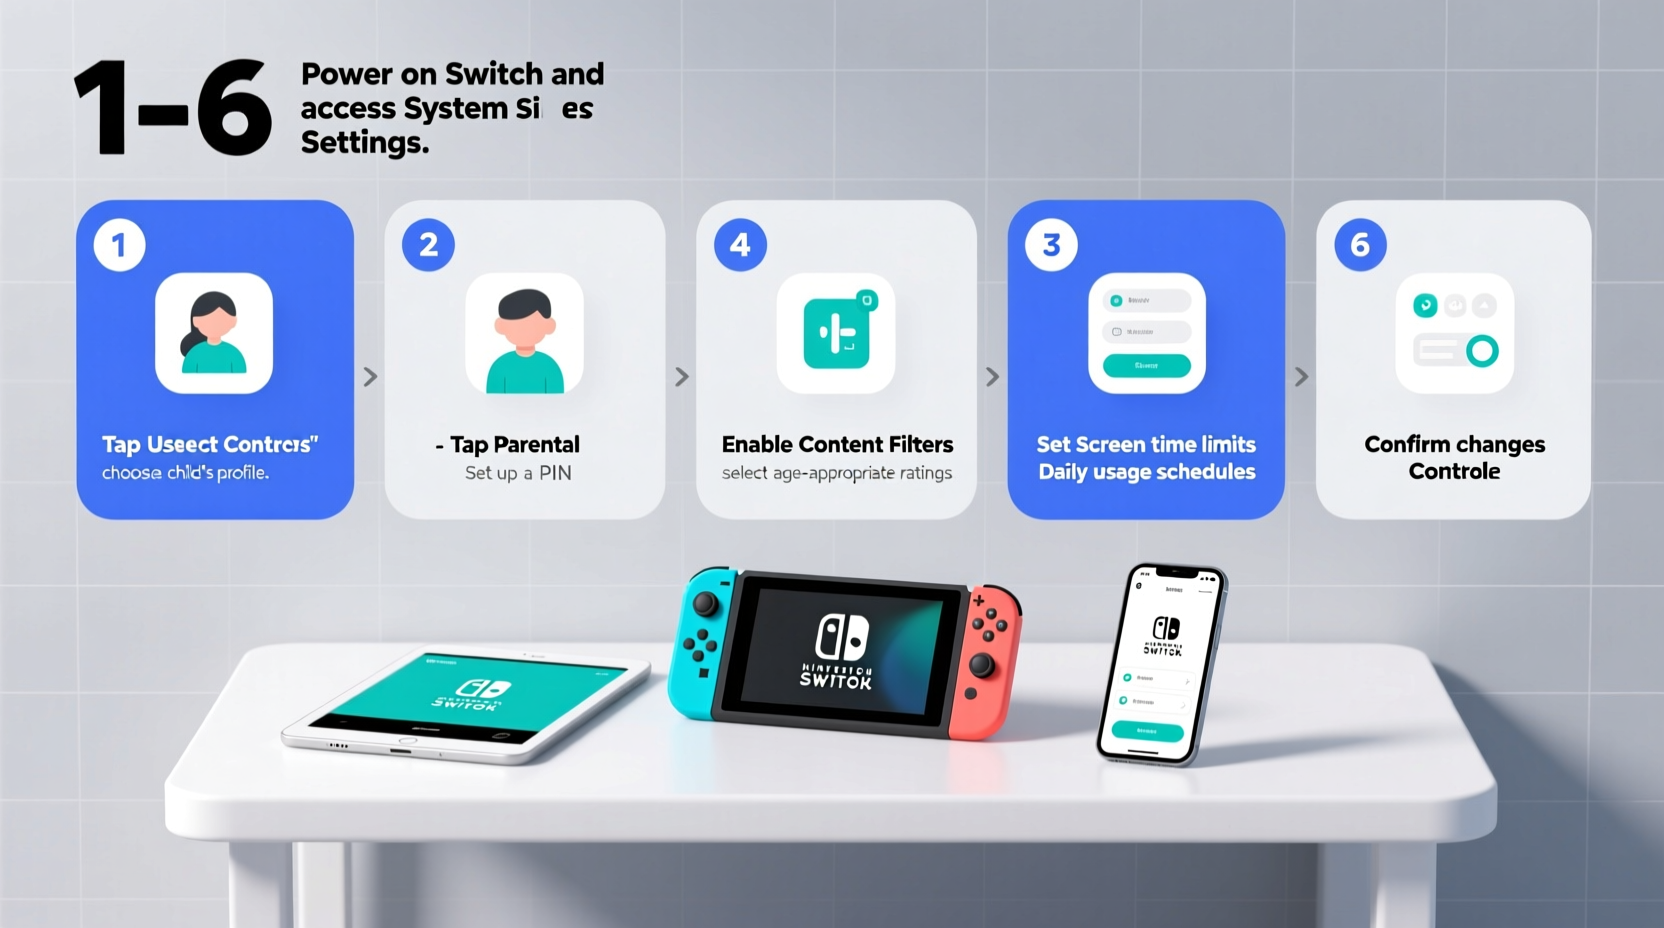
Step-by-Step Setup Process
Follow this sequence to fully activate and customize parental controls on your child’s Nintendo Switch.
- Create or sign in to a Nintendo Account on your smartphone using the email you want to associate with parental oversight.
- Download the “Nintendo Switch Parental Controls” app from the Apple App Store or Google Play Store.
- Open the app and tap “Register Your Console.”
- On the Nintendo Switch console, go to System Settings → Parental Controls → Start Registration. A QR code will appear on-screen.
- Use your phone’s camera within the app to scan the QR code displayed on the TV or handheld screen.
- Confirm the connection on both devices. Once linked, the app gains remote access to adjust settings.
- Select the user profile you wish to supervise (e.g., your child’s profile on the Switch).
- Begin customizing restrictions directly from the app under the “Controls” tab.
This pairing process only needs to be done once. After registration, you can manage controls anytime—even when away from home—as long as the console connects to the internet at least once every 24 hours.
Customizing Game & Time Limits
One of the most valuable features is the ability to set daily playtime limits. This prevents marathon gaming sessions and encourages balanced routines.
Setting Daily Playtime Limits
In the app, navigate to “Playtime Limit.” Choose a daily maximum (e.g., 2 hours). When time expires, the console sends a warning five minutes before shutdown. The session ends unless you approve extra time remotely via the app.
Managing Game Restrictions by Age Rating
Under “Restricted Games,” enable filtering based on ESRB or PEGI ratings. For example:
- Allow games rated E (Everyone) and E10+
- Block titles rated T (Teen) or M (Mature)
You can also block specific games manually, even if they fall within the allowed rating range. This is useful for games with heavy themes or complex online ecosystems.
| ESRB Rating | Description | Recommended For Ages |
|---|---|---|
| E (Everyone) | Minimal cartoon violence, mild language | 6+ |
| E10+ (Everyone 10+) | Fantasy violence, comic mischief | 10+ |
| T (Teen) | Violence, suggestive themes, crude humor | 13+ |
| M (Mature) | Intense violence, blood, partial nudity | 17+ |
If a child tries to launch a blocked game, they’ll see a lock icon and a message stating the game is restricted by parental controls.
Controlling Online Interactions and Spending
Beyond time and content, two critical areas require attention: online safety and unauthorized purchases.
Disabling Voice and Text Chat
Nintendo Switch allows voice chat in games like *Animal Crossing: New Horizons* and *Splatoon 3*. To prevent unsupervised communication:
- Go to “Communications” in the Parental Controls app
- Select “Restrict Communication Features”
- Toggle off voice and text chat capabilities
This doesn’t stop multiplayer gameplay—but it disables direct messaging between users, reducing risks of exposure to strangers or cyberbullying.
Preventing In-Game Purchases
To avoid surprise charges from in-game shops or DLC:
- Set a purchase PIN in the Switch’s System Settings → Parental Controls → Change Settings
- Ensure “Require PIN for Purchases” is enabled
- Keep the PIN confidential and never share it with your child
Note: The PIN method works independently of the app and must be configured on the console itself. Combine this with spending alerts in the app for full coverage.
Monitoring Activity and Receiving Alerts
The Parental Controls app provides detailed usage reports. Under the “Activity Log” section, you’ll see:
- Which games were played each day
- Total playtime per session
- When the console was used (start and end times)
You can view data for the past week at a glance. Tap any entry for deeper insight. These logs help identify patterns—like late-night gaming or sudden interest in high-rated titles—so you can address concerns proactively.
Additionally, push notifications can alert you when:
- Playtime limit is reached
- A restricted game is attempted
- A purchase is initiated (if PIN is entered incorrectly)
These real-time updates mean you don’t have to constantly check the app to stay informed.
Mini Case Study: The Thompson Family’s Experience
The Thompsons, a family of four in Portland, introduced a Nintendo Switch to their 9-year-old son, Leo, during winter break. Initially, he played up to four hours a day, often skipping homework. After discovering the parental controls app, they set a 1.5-hour daily limit and blocked online chat in *Super Smash Bros. Ultimate*. They also reviewed the activity log weekly and discussed favorite games together.
Within three weeks, Leo’s school performance improved, and his parents reported fewer arguments about screen time. “It wasn’t about taking the fun away,” said Sarah Thompson. “It was about helping him learn balance. The app made it easy to enforce rules without being the ‘bad guy’ every night.”
Common Mistakes to Avoid
Even tech-savvy parents can make errors during setup. Here are frequent pitfalls and how to avoid them:
- Using a shared family phone: If multiple people access the device, someone might accidentally disable controls. Use a private phone for administration.
- Forgetting internet requirements: The console must connect daily; otherwise, controls become inactive. Ensure stable Wi-Fi.
- Not updating the app: Older versions may lack security patches or new features. Enable auto-updates.
- Setting overly strict limits: Sudden reductions in playtime can cause frustration. Gradually decrease hours if needed.
Parental Controls Checklist
Use this checklist to confirm your setup is complete and secure:
- ✅ Created a parent Nintendo Account with verified email
- ✅ Installed the Nintendo Switch Parental Controls app
- ✅ Scanned QR code to pair phone and console
- ✅ Set daily playtime limit (e.g., 1–2 hours)
- ✅ Enabled game rating restrictions (e.g., block T and M-rated titles)
- ✅ Disabled voice/text chat in online games
- ✅ Set a purchase PIN on the console
- ✅ Reviewed first activity report after 24 hours of use
- ✅ Enabled push notifications for key events
Frequently Asked Questions
Can I change parental controls without the app?
No. All major settings—including time limits, game restrictions, and communication controls—must be adjusted through the Nintendo Switch Parental Controls app. Minor settings like purchase PINs can be managed directly on the console.
What happens if the Switch doesn’t connect to the internet for more than a day?
If the console remains offline for over 24 hours, parental controls will temporarily deactivate. Gameplay continues without restrictions until the next successful connection. To prevent this, ensure the device joins Wi-Fi automatically or consider enabling sleep mode with internet connectivity in System Settings.
Can I supervise multiple Switch consoles with one app?
Yes. The app supports linking to multiple consoles, and you can manage each separately. Simply repeat the QR code registration process for each device. Each child’s profile should be on a distinct console or user account for accurate tracking.
Final Thoughts and Next Steps
Setting up parental controls on the Nintendo Switch isn’t just about limiting access—it’s about fostering responsible digital behavior. With the right configuration, your child can enjoy the creativity, challenge, and joy of gaming within safe boundaries. The process takes less than 15 minutes, and the long-term benefits in peace of mind and family harmony are significant.
Don’t wait for screen time conflicts to arise. Take action today: download the app, pair your console, and begin shaping a healthier gaming environment. And if you’ve already set up controls, revisit them monthly to adjust as your child grows and their interests evolve.


 浙公网安备
33010002000092号
浙公网安备
33010002000092号 浙B2-20120091-4
Comments
No comments yet. Why don't you start the discussion?