
Installing a Chamberlain garage door opener can significantly improve home convenience, security, and daily efficiency. When properly set up, these openers deliver years of quiet, reliable performance. However, incorrect installation or calibration can lead to safety hazards, mechanical stress, or premature wear. This comprehensive guide walks through every phase—from unboxing to final testing—ensuring your Chamberlain opener functions optimally from day one.
Understanding Your Chamberlain Opener Model
Chamberlain manufactures a wide range of garage door openers, including belt-drive, chain-drive, and screw-drive models. Each type offers distinct benefits in terms of noise level, durability, and cost. Before beginning installation, identify your model number (typically found on the back or side of the motor unit) and consult the user manual for specifications such as horsepower, rail length, and compatibility with smart home systems like MyQ.
Belt-drive models are ideal for homes with living spaces above the garage due to their near-silent operation. Chain-drive units offer rugged reliability at a lower price point but generate more vibration and sound. Screw-drive openers require less maintenance but may not perform as well in extreme temperatures.
Pre-Installation Checklist and Safety Precautions
Safety is paramount when working with heavy machinery and electrical components. Garage door springs are under high tension and should never be adjusted without professional training. The opener itself weighs 25–35 pounds and must be securely mounted to prevent accidents.
“Improper mounting or misaligned safety sensors are the top causes of garage door malfunctions,” says Robert Langley, certified home automation technician with over 15 years of experience. “Take time during setup—it pays off in long-term reliability.”
Tools and Materials Needed
- Chamberlain garage door opener kit (includes rail, motor unit, wall button, remote controls)
- Adjustable wrench, socket set, drill with screwdriver bits
- Stepladder (6–8 feet), stud finder, level
- Wire cutters/strippers, electrical tape
- Safety glasses and gloves
Preparation Steps
- Disconnect power to any existing opener.
- Manually test the garage door for balance and smooth movement.
- Clear the work area beneath the ceiling center point where the opener will mount.
- Verify headroom clearance—most Chamberlain models require at least 6.5 inches above the torsion spring or header.
Step-by-Step Installation Process
1. Mount the Header Bracket
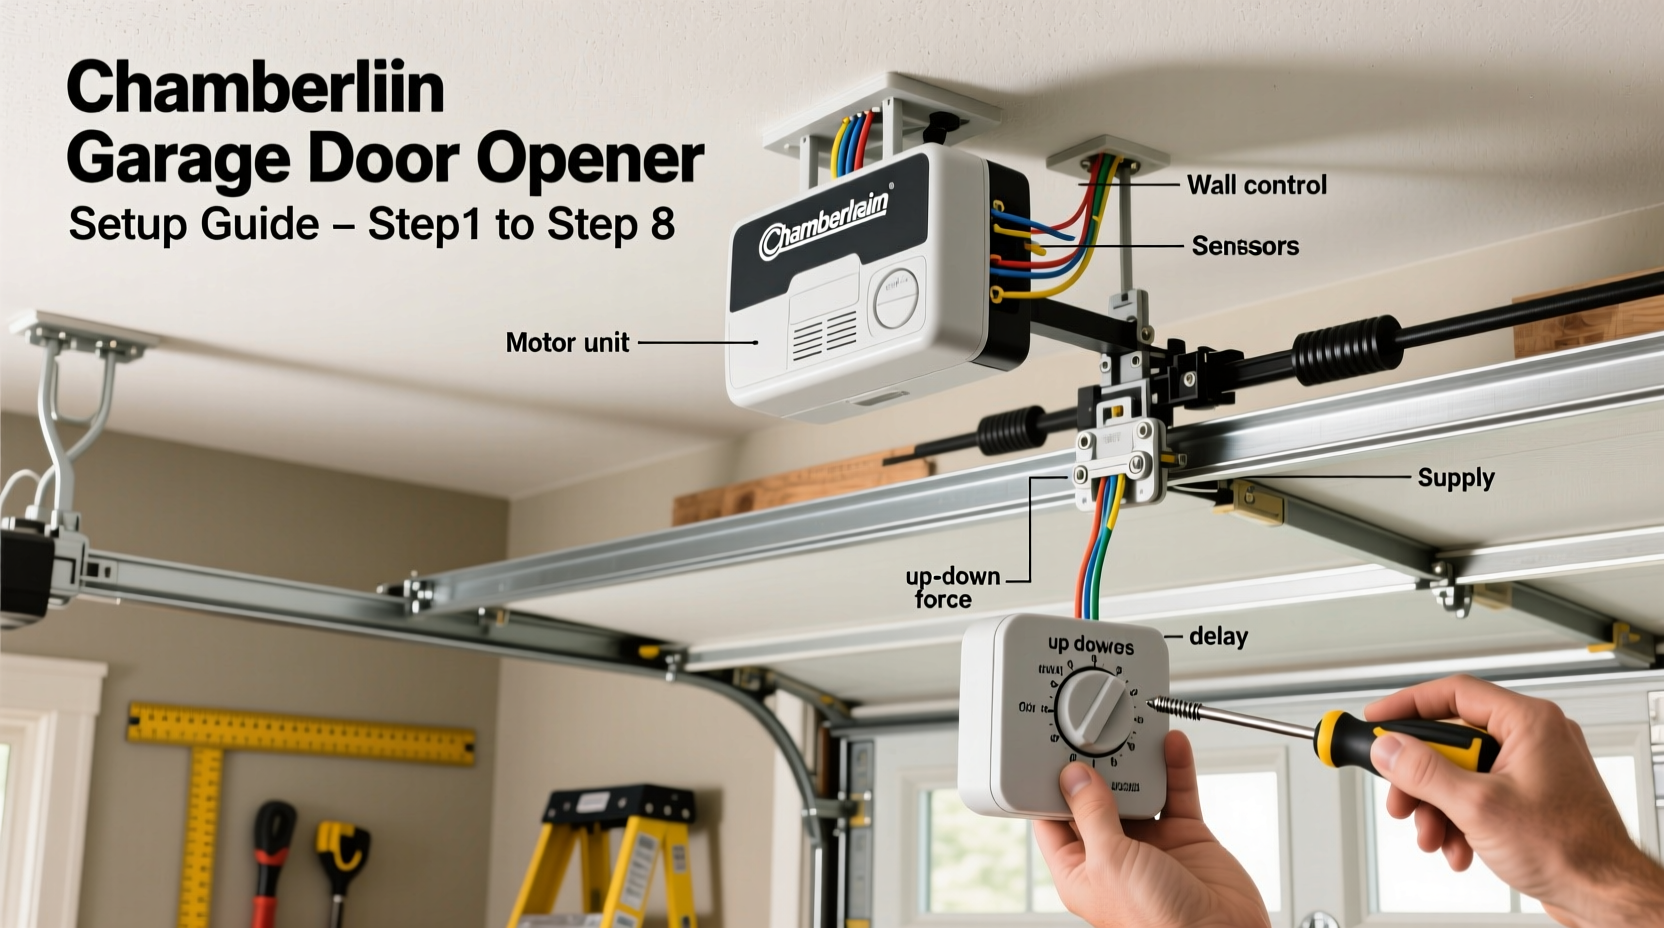
Locate the center of the garage door opening using a tape measure. Use a stud finder to identify ceiling joists. Attach the header bracket to the header board above the door using lag screws, ensuring it’s perfectly level. This bracket supports the front end of the rail assembly.
2. Assemble and Install the Rail
Connect the segmented rail according to your garage depth (standard kits fit doors up to 7 or 8 feet; extensions are available). Slide the trolley into the front of the rail and secure the rear end to the motor unit. Lift the motor unit and attach the rail to the header bracket. Anchor the motor to two ceiling joists using the included mounting brackets and bolts.
3. Connect Power and Wiring
Run the power cord to a grounded outlet. Avoid extension cords. Connect the control wires from the wall station to the terminals on the motor unit. Strip about 1/2 inch of insulation and twist connections tightly, securing them with wire nuts. Route wires along the ceiling using clips to prevent snagging.
4. Install Safety Sensors
Mount the infrared sensors on either side of the garage door, 6 inches above the floor. Align the LED indicators so they face each other directly. Misalignment prevents the door from closing. Secure wiring with brackets and connect to the motor unit using the low-voltage sensor terminals.
5. Attach the Arm and Trolley
Connect the metal arm from the door’s top section to the trolley on the rail. Use the provided clevis pin and cotter pin for a secure joint. Adjust the arm angle so it slopes slightly upward toward the motor unit. Over-tightening or incorrect angles cause binding and strain.
6. Program Remote Controls and Wall Station
Press and release the “Learn” button on the motor unit (usually located near the antenna). Within 30 seconds, press the button on each remote until the motor unit light blinks or clicks. For the wall station, simply plug it into the designated port—no programming needed.
Calibration and Final Testing
Proper calibration ensures safe reversal, correct travel limits, and quiet operation. Use the adjustment knobs or digital menu (depending on model) to fine-tune settings.
| Setting | Recommended Adjustment | Testing Method |
|---|---|---|
| Up Travel Limit | Door opens fully, stops just before hitting ceiling | Observe full cycle; adjust if door reverses prematurely |
| Down Travel Limit | Door closes flush with floor without excessive pressure | Place a piece of wood on the ground; door should reverse upon contact |
| Force Sensitivity | Set to minimum required to close smoothly | Test with obstruction—door must reverse within 2 seconds |
Perform a full operational test: open and close the door five times using the wall button, remote, and—if equipped—smartphone app. Listen for grinding, jerking, or uneven motion. Address issues immediately.
Real-World Example: A Smooth Upgrade in Suburban Ohio
When Mark Thompson upgraded his 1998 chain-driven Craftsman opener to a Chamberlain B9760MYQ belt-drive model, he followed this guide meticulously. He discovered his old door was unbalanced, causing strain on the new motor. After adjusting the spring tension with a professional’s help and correctly aligning the sensors, the system operated silently and reliably. “I didn’t realize how much noise my old opener made until I heard the whisper-quiet difference,” he said. “Taking three extra hours to calibrate everything saved me a service call.”
Maintenance Tips for Long-Term Performance
Even the best-installed opener requires periodic care. Seasonal maintenance prevents breakdowns and extends lifespan.
- Every 3 months: Lubricate the rail, chain/belt, and rollers with a silicone-based grease (avoid oil-based products).
- Biannually: Inspect hardware tightness, especially mounting bolts and arm connections.
- Annually: Recheck travel limits and force settings, particularly after temperature extremes.
- Ongoing: Clean sensor lenses with a soft cloth to prevent dust interference.
Frequently Asked Questions
Why does my garage door reverse before touching the floor?
This usually indicates misaligned safety sensors or excessive downward force limit. Check for obstructions in the sensor path and realign if necessary. Also verify that the force setting isn't too low.
Can I install a Chamberlain opener myself without prior experience?
Yes, most homeowners can complete the installation with basic tools and careful attention to instructions. However, if your garage has unusual dimensions, heavy doors, or non-standard spring systems, consider professional assistance for safety.
How do I connect my opener to Wi-Fi and use the MyQ app?
Download the MyQ app, create an account, and follow the in-app setup wizard. You’ll need a Wi-Fi bridge (included with newer models or sold separately). Ensure your router is within 50 feet of the opener for stable connectivity.
Conclusion: Enjoy Seamless Access and Peace of Mind
A correctly installed Chamberlain garage door opener enhances home security, convenience, and value. By following precise steps for mounting, wiring, calibration, and ongoing care, you ensure years of trouble-free operation. Whether you’re arriving home late at night or monitoring access remotely, your investment in proper setup delivers lasting rewards. Take the time now to do it right—your future self will appreciate the effort.


 浙公网安备
33010002000092号
浙公网安备
33010002000092号 浙B2-20120091-4
Comments
No comments yet. Why don't you start the discussion?