
Setting up an iCloud email account is one of the most seamless ways to stay connected across Apple devices. With features like automatic syncing, robust security, and integration with Mail, Calendar, Notes, and more, iCloud provides a unified experience for personal and professional use. Whether you're using an iPhone, iPad, Mac, or even a Windows PC through a browser, creating your @icloud.com email address is straightforward — if you know the right steps.
This guide walks you through every stage of the process, from eligibility requirements to troubleshooting common issues. By the end, you’ll have a fully functional iCloud email account ready to use across all your devices.
What You Need Before Getting Started
Before diving into setup, ensure your device meets Apple’s basic requirements:
- An Apple ID (or the ability to create one)
- iOS 10.3 or later (for iPhone/iPad), macOS Sierra or later (for Mac), or access to iCloud.com via modern web browser
- Stable internet connection
- Two-factor authentication enabled (highly recommended for security)
If you don’t already have an Apple ID, you can create one during the iCloud setup process. However, be aware that each Apple ID must be tied to a valid phone number and recovery method for verification purposes.
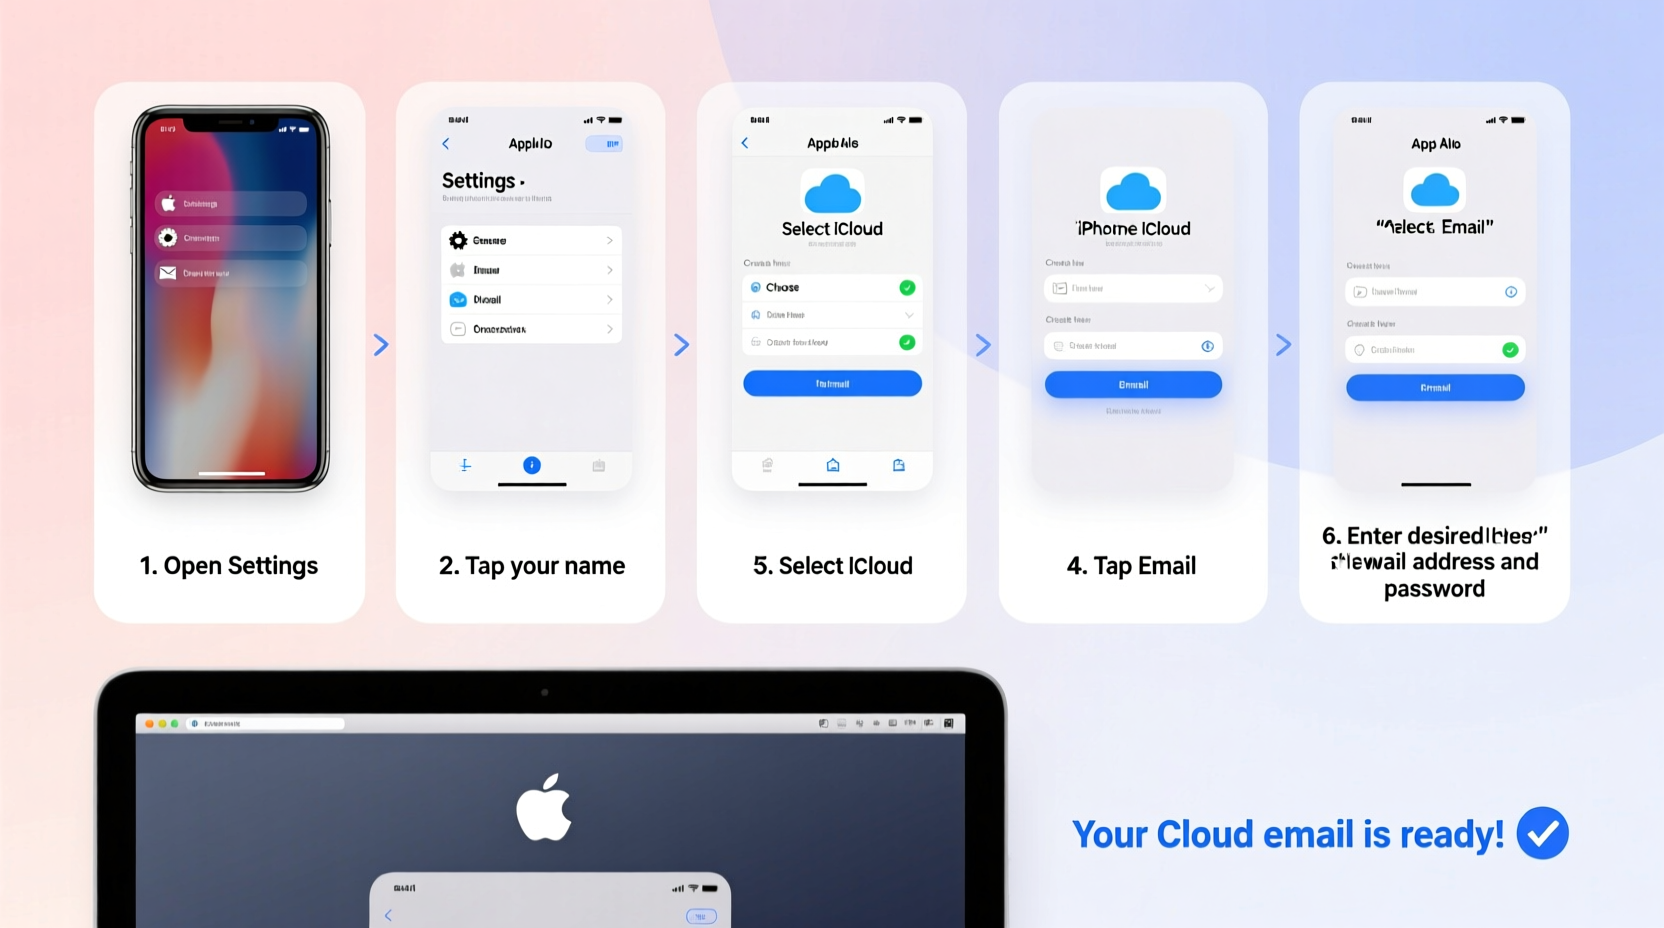
Step-by-Step Setup on iPhone or iPad
- Open the Settings app on your device.
- Tap your name at the top of the screen. If you’re not signed in, select “Sign in to [Device].”
- Enter your Apple ID and password. If you don’t have one, tap “Don’t have an Apple ID or forgot it?” and choose “Create Apple ID.”
- Follow the prompts to enter your name, birth date, and a phone number for verification.
- When asked how you’d like to receive iCloud services, make sure Mail is toggled on.
- After signing in, go back to Settings > [Your Name] > iCloud.
- Toggle on Mail. This activates your @icloud.com email address automatically.
- Wait a few moments for activation. Then open the Mail app to see your new inbox.
Your iCloud email will now sync across all devices signed into the same Apple ID. Any emails sent to yourname@icloud.com will appear instantly in the Mail app.
Creating an iCloud Email on a Mac
The process on macOS is nearly identical but accessed through System Settings:
- Click the Apple menu () and select System Settings.
- Click your name at the top left to access your Apple ID settings.
- If you’re not signed in, enter your Apple ID credentials or create a new one.
- Navigate to iCloud in the sidebar.
- Find the Mail option and toggle it on.
- A prompt may appear asking if you want to merge existing data. Choose based on your preference.
- Open the Mail app from your Dock or Applications folder.
- Your iCloud inbox will load within seconds.
You can customize your default sending address under Mail > Preferences > Accounts > iCloud > Email Address.
Accessing iCloud Email via Web Browser
You don’t need an Apple device to use iCloud mail. Visit iCloud.com from any computer:
- Go to icloud.com/mail in your browser (Safari, Chrome, or Edge recommended).
- Sign in with your Apple ID and password.
- Complete two-factor authentication if prompted.
- Once logged in, the web version of iCloud Mail opens with your inbox.
- To send an email, click the compose button, enter recipient details, and type your message.
The web interface supports attachments up to 20MB, full search functionality, and folder organization — just like the native apps.
| Platform | Setup Time | Email Activation | Best For |
|---|---|---|---|
| iPhone/iPad | 3–5 minutes | Automatic upon enabling iCloud Mail | Mobile users who rely on push notifications |
| Mac | 4–6 minutes | Immediate after toggle | Productivity-focused workflows |
| Web Browser | 2–3 minutes | Instant upon login | Non-Apple device users or public computers |
Tips for Managing Your New iCloud Email Account
Now that your account is active, follow these best practices to maximize its utility:
- Set up email forwarding: Go to iCloud.com > Mail > Settings > Forwarding to redirect incoming messages to another inbox.
- Create aliases: While you can't create additional @icloud.com addresses directly, you can use Hide My Email (via iCloud+) to generate private relayed addresses.
- Enable filters: Organize incoming mail using rules based on sender, subject, or keywords.
- Back up important emails: Though iCloud backs up your data, exporting critical messages as .eml files adds redundancy.
Common Issues and How to Fix Them
Even with careful setup, problems can arise. Here are frequent hurdles and their solutions:
- “iCloud Mail not appearing after toggle”: Restart the device and check your internet connection. Ensure your Apple ID subscription includes iCloud+ or standard iCloud storage.
- Can’t sign in on iCloud.com: Verify your Apple ID isn’t locked due to too many failed attempts. Use iforgot.apple.com to reset your password.
- Emails not syncing across devices: Confirm that iCloud Drive and Mail are enabled on all devices. Also, check Date & Time settings — incorrect time zones disrupt syncing.
“iCloud’s ecosystem strength lies in its consistency. Once configured correctly, users experience near-instantaneous updates across platforms.” — David Lin, Senior Apple Support Consultant
Mini Case Study: Sarah’s Smooth Transition to iCloud
Sarah, a freelance graphic designer, used a legacy Gmail account for years but wanted better integration with her MacBook and iPhone. She decided to switch to iCloud for unified calendar, file, and email management.
She followed the iPhone setup steps, activated iCloud Mail, and gradually migrated key contacts and filters. Within a week, she was routing client inquiries through her new myname@icloud.com address. Not only did her workflow become faster, but she also reduced clutter thanks to built-in spam filtering and seamless Handoff between devices.
Today, Sarah uses iCloud as her primary communication hub — proving that even long-time non-Apple email users can transition smoothly.
FAQ
Can I change my iCloud email address once it’s created?
No — your @icloud.com address is permanently linked to your Apple ID. To get a different username, you’d need to create a new Apple ID, which means losing access to previous purchases and data unless transferred manually.
Is there a cost for using iCloud email?
No. The base iCloud email service, including 5GB of free storage, is included with every Apple ID. Additional storage plans start at $0.99/month for 50GB and include enhanced features like custom email domains (with iCloud+).
Can I use my iCloud email with third-party apps like Outlook?
Yes. You can configure iCloud Mail in Outlook, Thunderbird, or mobile clients using IMAP. You’ll need to generate an app-specific password in your Apple ID settings for authentication.
Checklist: Setting Up Your iCloud Email Successfully
- ✅ Have a working Apple ID or plan to create one
- ✅ Ensure your device runs a supported OS version
- ✅ Turn on two-factor authentication
- ✅ Enable iCloud Mail in settings
- ✅ Test sending and receiving a test email
- ✅ Set up recovery options (trusted phone number, rescue email)
- ✅ Explore advanced features like Mail Drop and VIP filters
Conclusion
Creating an iCloud email account is more than just getting a new address — it’s about unlocking a cohesive digital environment designed for efficiency and privacy. From instant syncing to tight integration with Apple’s ecosystem, the benefits extend far beyond simple email exchange.
With this guide, you now have everything needed to set up, manage, and optimize your iCloud email across devices. Take the next step today: activate your account, send your first message, and experience how effortlessly technology can simplify communication.


 浙公网安备
33010002000092号
浙公网安备
33010002000092号 浙B2-20120091-4
Comments
No comments yet. Why don't you start the discussion?