
Growing nectarines from seed is a rewarding project that connects you directly to the source of your food. While it takes patience—typically three to five years before fruiting—it offers a unique opportunity to observe plant development from its earliest stages. Unlike grafted trees, which are clones of parent plants, seed-grown nectarines may produce fruit slightly different from the original, adding an element of surprise. With proper care and attention to environmental conditions, even gardeners in non-traditional climates can cultivate healthy, productive trees indoors or in containers.
Understanding Nectarine Seeds and Viability
Nectarine seeds come from the pit of the fruit, technically known as the stone. These pits contain the embryo that, under the right conditions, can develop into a new tree. However, not all seeds are viable. The success rate depends on several factors: freshness, maturity of the parent fruit, and storage conditions.
Freshly extracted seeds from ripe, organic nectarines have the highest germination potential. Avoid using seeds from overly ripe, fermented, or refrigerated fruit for extended periods, as this reduces viability. It’s also important to note that hybrid varieties may produce offspring with unpredictable traits—this isn’t a flaw, but part of the natural variation in open-pollinated species.
“Growing fruit trees from seed teaches more than just horticulture—it fosters patience and observation. Each tree tells a story of adaptation.” — Dr. Lila Nguyen, Horticulturist and Urban Agriculture Researcher
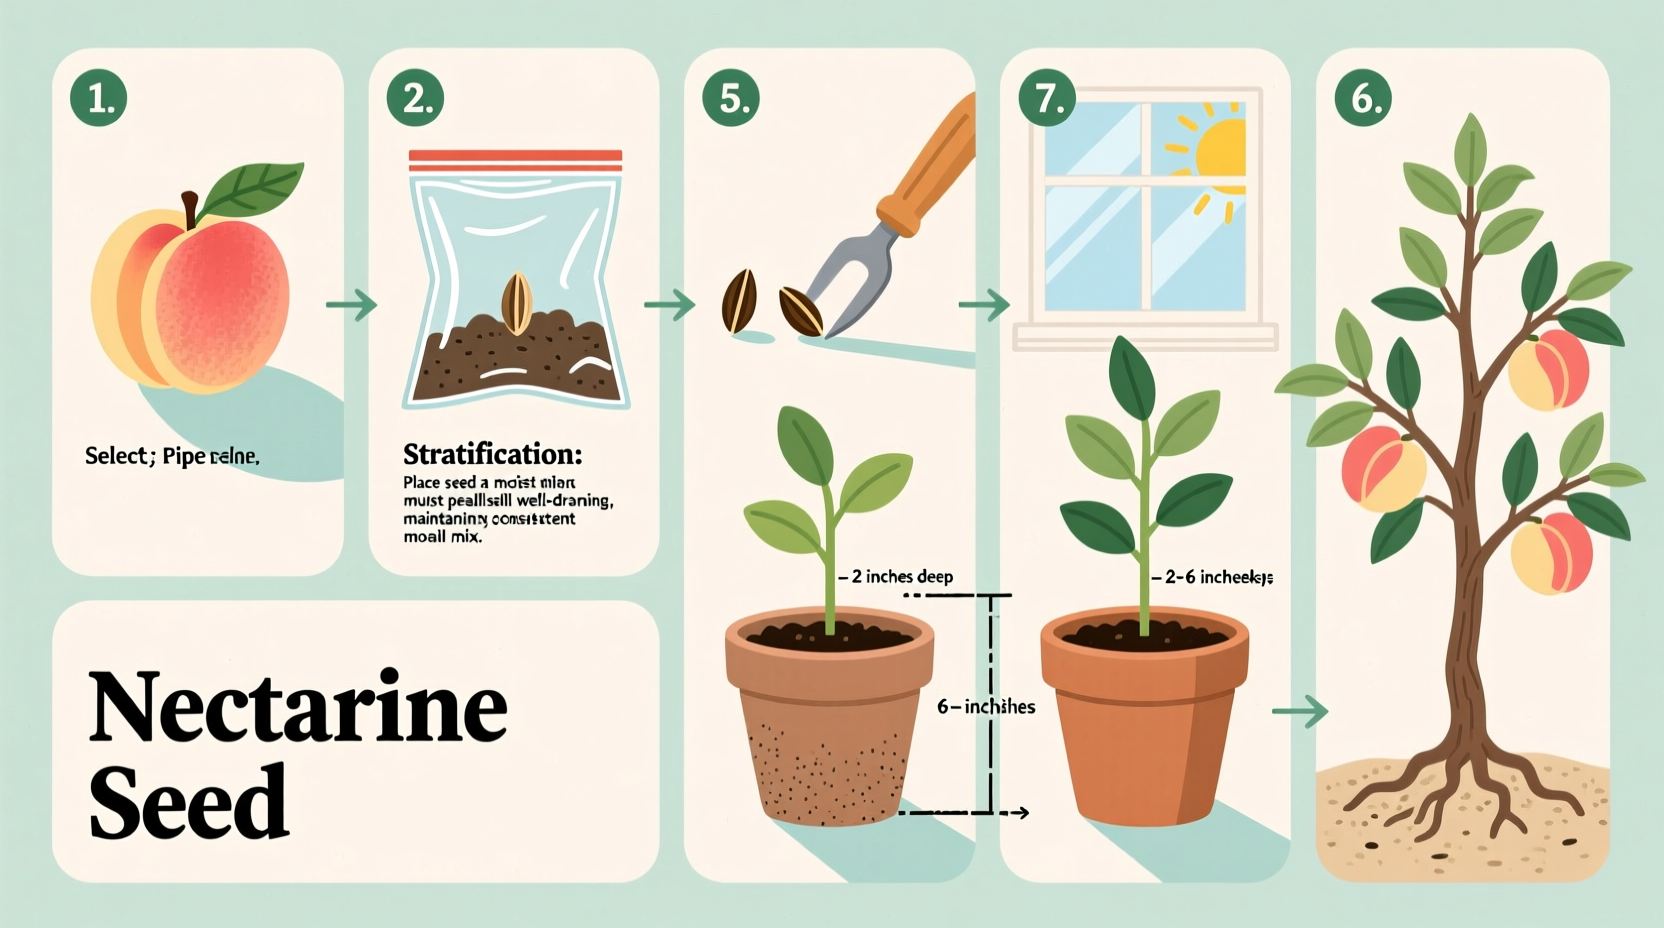
Step-by-Step Germination Process
Germinating a nectarine seed requires mimicking winter conditions through a process called cold stratification. This breaks the seed’s dormancy and prepares it for sprouting.
- Extract and clean the seed: Remove the pit from a ripe nectarine. Use a soft brush or cloth to scrub off any remaining fruit residue. Allow the pit to air-dry for 24–48 hours.
- Crack the shell (optional): Some growers gently crack the hard outer shell with a nutcracker to expose the inner kernel, which can speed up germination. Be careful not to damage the seed inside.
- Prepare for stratification: Wrap the seed in a slightly damp paper towel or place it in a container filled with moist peat moss or vermiculite. Seal it in a plastic bag to retain moisture.
- Refrigerate for 8–12 weeks: Store the sealed container in the refrigerator (not freezer) at 34–40°F (1–4°C). Check weekly for mold or drying; re-moisten if necessary.
- Watch for sprouting: After 6–10 weeks, check for root emergence. Once a small white root appears, it’s time to plant.
Planting and Early Care
Once the seed has sprouted, transplant it carefully into a pot with well-draining soil. Use a mix of potting soil, perlite, and compost for optimal aeration and nutrient balance.
- Choose a 6–8 inch pot with drainage holes.
- Plant the sprouted seed about 1 inch deep, with the root pointing downward.
- Water lightly after planting and keep the soil consistently moist but not soggy.
- Place in a warm, sunny location—ideally a south-facing window or under grow lights.
In the first few months, maintain temperatures between 65–75°F (18–24°C). Seedlings require at least 6–8 hours of direct light daily. Rotate the pot regularly to prevent leaning toward the light source.
| Stage | Light Needs | Water Frequency | Temperature Range |
|---|---|---|---|
| Germination (stratification) | None (refrigerated) | Keep medium moist | 34–40°F (1–4°C) |
| Seedling (0–3 months) | 6–8 hrs sunlight or grow light | Every 2–3 days | 65–75°F (18–24°C) |
| Young Tree (3–12 months) | Full sun (8+ hrs) | When top inch dries | 60–85°F (15–29°C) |
Transplanting and Long-Term Growth
After the seedling develops several sets of true leaves and reaches about 6–8 inches tall, it’s ready for repotting. Move it to a larger container (10–12 inches) or, if outdoor conditions permit, begin preparing for garden planting.
If growing in a container long-term, choose a dwarf variety or prune roots every 2–3 years to manage size. For outdoor planting, wait until all frost danger has passed and nighttime temperatures remain above 50°F (10°C).
Select a site with full sun and well-drained soil. Nectarines thrive in slightly acidic to neutral pH (6.0–7.0). Dig a hole twice as wide as the root ball and plant at the same depth as in the pot. Water deeply after planting and apply a 2–3 inch layer of mulch to retain moisture and suppress weeds—keeping mulch a few inches away from the trunk to prevent rot.
Maintenance Through the Seasons
Nectarine trees need consistent care throughout the year:
- Spring: Fertilize with a balanced 10-10-10 formula as new growth begins. Monitor for pests like aphids or scale.
- Summer: Water deeply 1–2 times per week, depending on climate. Thin developing fruit when they reach marble size to prevent branch breakage and improve quality.
- Fall: Reduce watering as growth slows. Rake fallen leaves to minimize disease carryover.
- Winter: Prune during dormancy to shape the tree and remove dead or crossing branches. Open-center pruning is ideal for nectarines to promote airflow and sunlight penetration.
Common Challenges and How to Overcome Them
While rewarding, growing nectarines from seed presents several challenges. Understanding these early increases your chances of success.
- Poor germination
- Dry seeds or insufficient stratification time are common causes. Always use fresh pits and ensure consistent moisture during cold treatment.
- Leggy seedlings
- Insufficient light leads to weak, stretched growth. Use supplemental grow lights if natural sunlight is limited.
- Pest infestations
- Aphids, spider mites, and borers can affect young trees. Introduce beneficial insects like ladybugs or use insecticidal soap as needed.
- Lack of fruiting
- Seed-grown trees take longer to mature. Also ensure pollination—nectarines are self-fertile, but indoor trees may need hand-pollination using a small brush.
Mini Case Study: Urban Balcony Nectarine Success
In Portland, Oregon, amateur gardener Marcus Lee grew a nectarine tree entirely on his third-floor balcony. Starting with a pit from a farmers’ market fruit, he followed cold stratification and planted the sprout in a 12-inch container. He moved the pot outdoors in summer and back indoors near a sunroom window in winter. By year four, the tree reached seven feet tall and produced its first crop of small but sweet nectarines. Marcus attributes success to consistent pruning, seasonal fertilization, and using a humidity tray during dry winter months.
Essential Growing Checklist
- Obtain a fresh, organic nectarine pit
- Clean and dry the seed thoroughly
- Stratify in moist medium for 8–12 weeks in the fridge
- Plant sprouted seed 1 inch deep in well-draining soil
- Provide 6–8 hours of daily light and consistent warmth
- Repot as the tree grows, eventually moving to a permanent location
- Prune annually during dormancy
- Thin fruit in summer for better yield
- Protect from extreme cold and pests
- Persist beyond the first few years—fruiting typically begins at 3–5 years
Frequently Asked Questions
Will a nectarine grown from seed produce the same fruit as the parent?
Not necessarily. Because nectarines are often hybrids, seeds may result in trees with different flavor, size, or texture. This variability is part of the adventure, though it means results aren't guaranteed.
Can I grow a nectarine tree indoors year-round?
Yes, especially in containers. Choose a dwarf variety if possible, and ensure access to strong light—either from a sun-drenched window or full-spectrum grow lights. Indoor trees may need manual pollination during flowering.
How long does it take for a seed-grown nectarine tree to bear fruit?
Typically 3 to 5 years. Grafted trees fruit sooner, but seed-grown trees offer genetic diversity and personal satisfaction. Patience and consistent care are essential.
Conclusion: Start Your Nectarine Journey Today
Growing nectarines from seed is more than a gardening task—it's a long-term relationship with a living organism. From the quiet months of stratification to the joy of harvesting your first homegrown fruit, each stage builds knowledge and connection. Whether you're cultivating on a windowsill or in a backyard orchard, the process enriches your understanding of plant life cycles and sustainable living.


 浙公网安备
33010002000092号
浙公网安备
33010002000092号 浙B2-20120091-4
Comments
No comments yet. Why don't you start the discussion?