
Moving from Android to iPhone is a significant shift, especially when it comes to personal data like photos. These digital memories—family gatherings, travel adventures, everyday moments—are irreplaceable. The transition doesn’t have to be stressful, though. With the right tools and approach, you can transfer your entire photo library safely and efficiently. This guide walks you through every practical method available, explains their pros and cons, and helps you choose the best path based on your needs, timeline, and technical comfort level.
Why Transferring Photos Isn’t Always Straightforward
Unlike switching between devices within the same ecosystem, moving from Android (Google’s operating system) to iOS (Apple’s platform) involves crossing a technological boundary. Apple and Google use different file systems, cloud services, and synchronization protocols. While both platforms support standard image formats like JPEG and PNG, the way they organize, back up, and display photos varies significantly.
For example, Android often stores photos directly in folders such as DCIM or Pictures, while iPhones rely heavily on iCloud Photos for organization and syncing across devices. Without proper planning, users risk incomplete transfers, duplicated files, or even permanent loss of high-resolution originals.
“Cross-platform transitions require more than just copying files. Metadata preservation, album structure, and resolution fidelity are critical factors most people overlook.” — David Lin, Mobile Data Migration Specialist
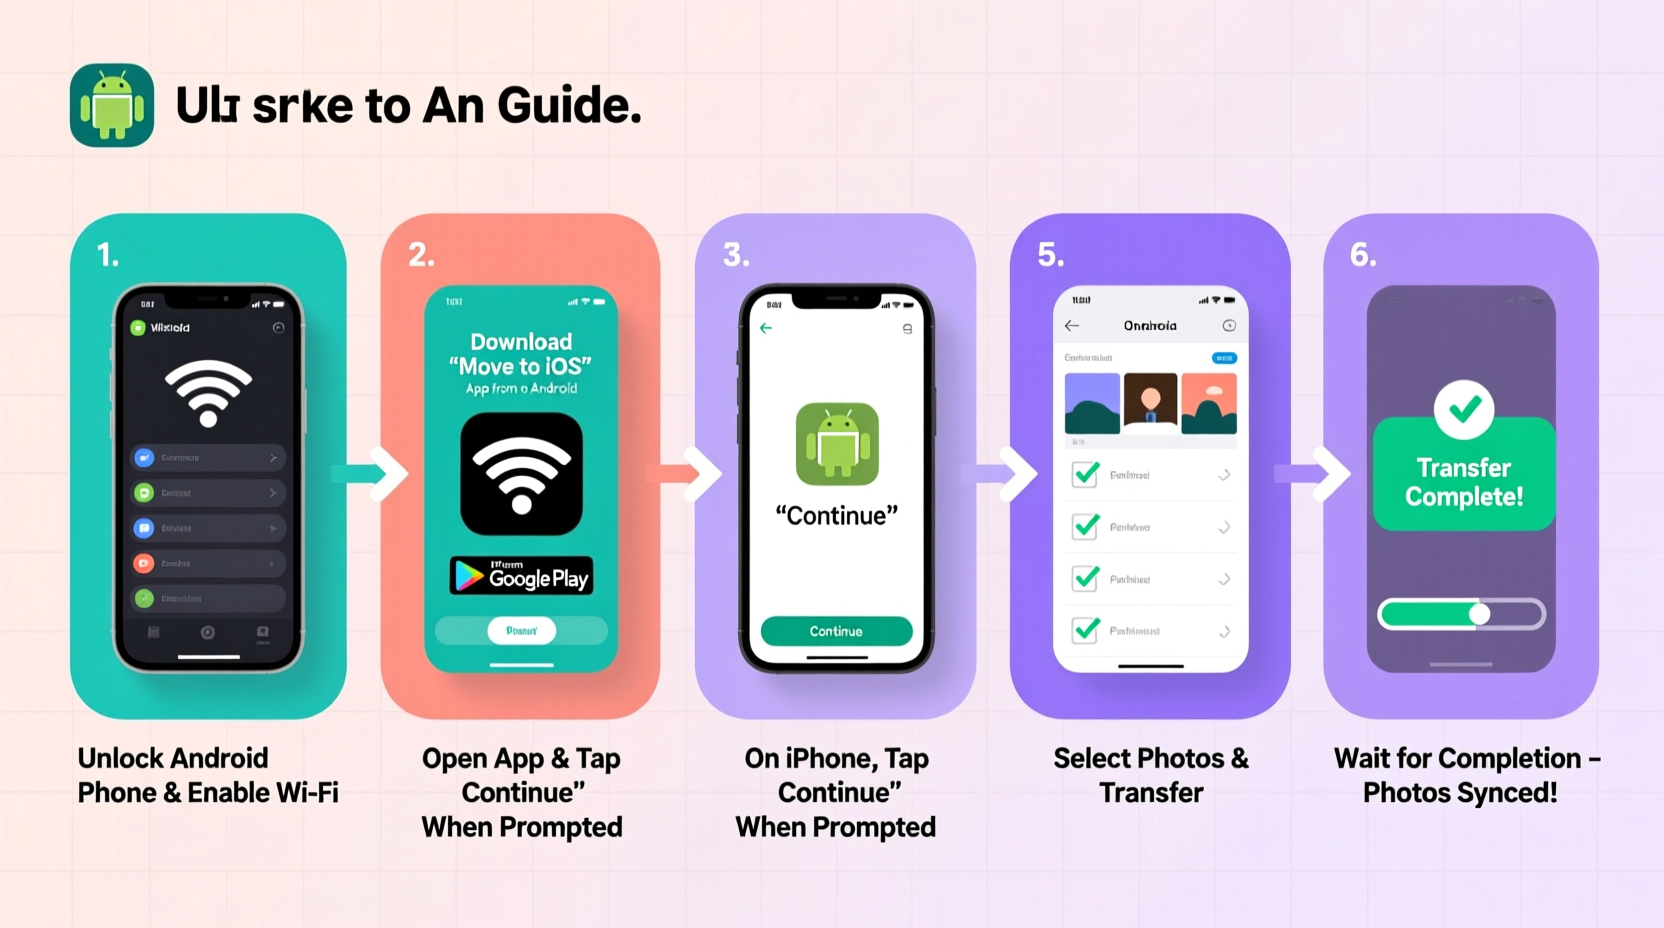
Method 1: Use Apple’s Move to iOS App (Best for New iPhone Setup)
The simplest and most official way to transfer photos during initial iPhone setup is using Apple’s free “Move to iOS” app. Designed specifically for Android-to-iPhone migrations, this tool handles contacts, messages, photos, videos, and more over a private Wi-Fi connection.
Step-by-Step Timeline Using Move to iOS
- Ensure both devices are charged to at least 50% and connected to power if possible.
- On your Android phone, download “Move to iOS” from the Google Play Store.
- Begin setting up your new iPhone until you reach the “Apps & Data” screen.
- Select “Move Data from Android.”
- Open the Move to iOS app on your Android device and tap “Continue.”
- Tap “Agree” on all terms, then enter the 6–10 digit code displayed on your iPhone.
- Choose the content types to transfer—select “Photos” and any other desired data.
- Wait for the transfer to complete. Do not close the app or lock either device.
- Finish iPhone setup. Your selected photos will appear in the Photos app.
This method works only during initial iPhone setup. If you’ve already completed setup, you’ll need to erase the iPhone and restart the process to use Move to iOS—a time-consuming but effective option for comprehensive transfers.
Method 2: Transfer via Google Photos Backup
If you’ve been backing up your Android photos to Google Photos, this method offers flexibility and reliability. It allows transfer anytime—even after iPhone setup—and preserves original quality if backed up accordingly.
Steps to Migrate Using Google Photos
- On your Android phone, open the Google Photos app.
- Ensure all photos are backed up by checking Settings > Backup & Sync.
- Verify backup status under “Free up space” or “Review recent backups.” <4>Install Google Photos on your iPhone from the App Store.
- Sign in with the same Google account used on Android.
- Allow access to your iPhone’s photo library when prompted.
- Navigate to the “Library” tab, then select “Backup” > “Restore to Device.”
- Choose the number of photos to download or restore albums selectively.
- Wait for downloads to finish. Restored photos will appear in the iPhone’s native Photos app.
Note: Only photos backed up before switching devices will be accessible. If you took new photos after starting iPhone use, ensure Google Photos is set to auto-backup going forward.
| Factor | Move to iOS | Google Photos Method |
|---|---|---|
| Timing Required | During initial iPhone setup only | Anytime |
| Data Types Supported | Photos, videos, contacts, messages | Photos and videos only |
| Wi-Fi Needed? | Yes (private network) | Highly recommended |
| Original Quality Preserved | Yes | Depends on backup settings |
| Internet Required | No (uses direct Wi-Fi connection) | Yes (cloud-based) |
Method 3: Manual Transfer via Computer (Most Control, Slower)
For users who prefer full control over which photos are transferred—or those dealing with large libraries exceeding cloud storage limits—manual transfer using a computer is ideal. This method avoids compression and gives you precise selection capabilities.
Checklist: Preparing for Manual Transfer
- Charge both Android phone and computer.
- Use a high-quality USB cable (preferably original).
- Ensure sufficient free space on your computer (equal to photo library size).
- Install latest version of iTunes (for older macOS/Windows) or use Finder (macOS Catalina+).
- Decide whether to transfer all photos or curate specific ones.
Transfer Steps (Windows/macOS)
- Connect your Android phone to the computer via USB.
- On Android, when prompted, select “File Transfer” (MTP mode).
- Open the device folder on your computer (usually appears as a portable device).
- Navigate to DCIM > Camera (or similar photo directories).
- Select all desired photos/videos and copy them to a folder on your computer.
- Safely eject the Android phone.
- Connect your iPhone to the same computer.
- Open Finder (macOS) or iTunes (older systems), select your iPhone, go to “Photos.”
- Check “Sync Photos” and choose the folder where you saved Android photos.
- Select subfolders to include, then click “Apply” or “Sync.”
After syncing, photos appear in the iPhone’s Photos app under Albums > From My Mac/PC. This method preserves EXIF data (date, location, camera info) and avoids re-compression.
Real Example: Maria’s Smooth Transition
Maria had used her Samsung Galaxy S10 for four years, accumulating over 7,000 photos. When she upgraded to an iPhone 14, she initially tried Move to iOS but failed because she’d already set up her iPhone. Instead, she turned to Google Photos.
She first verified that all photos were backed up in “Original Quality” mode. Then, on her new iPhone, she installed Google Photos, signed in, and restored her entire library overnight via Wi-Fi. Within 12 hours, every photo—including screenshots, memes, and vacation albums—was available locally on her iPhone and automatically imported into the native Photos app.
By relying on a consistent backup habit, Maria avoided data loss and completed the transfer without needing a computer or resetting her device.
Common Pitfalls and How to Avoid Them
Even with careful planning, users often encounter issues during transfer. Here’s what to watch out for:
- Duplicate Photos: Syncing multiple times or using overlapping methods (e.g., Move to iOS + Google Photos) can create duplicates. Stick to one primary method.
- Quality Loss: Google Photos defaults to “Storage Saver” (compressed quality). Ensure “Original Quality” was enabled on Android to prevent downgraded images.
- Missing Videos: Some transfer tools exclude long-form or non-standard video formats. Verify video inclusion post-transfer.
- Album Structure Not Preserved: Neither Move to iOS nor Google Photos perfectly replicates custom Android albums. You may need to recreate albums manually on iPhone.
- Insufficient Storage: Large photo libraries may exceed free iCloud or device capacity. Check available space beforehand.
Frequently Asked Questions
Can I transfer photos after setting up my iPhone?
Yes. While Move to iOS only works during initial setup, you can use Google Photos, iCloud.com, or manual computer transfers at any time.
Will my photo timestamps stay accurate?
In most cases, yes—especially with Google Photos and manual transfers. However, some third-party apps may alter metadata. Always verify dates on a sample of transferred photos.
What if my Android won’t connect to my computer?
Try a different USB cable, restart both devices, or enable Developer Options on Android to toggle USB debugging. Also, ensure MTP mode is selected when connecting.
Final Tips for a Seamless Photo Migration
Before beginning any transfer, take inventory of your photo collection. Delete blurry shots, duplicates, or unwanted screenshots to reduce transfer time and storage usage. Label important albums or events on your Android so you can easily locate them later.
If you’re transferring thousands of photos, consider doing it in batches. This minimizes the risk of interruptions due to battery drain or connectivity drops. For critical memories—like wedding albums or baby’s first year—perform a dual backup: one to iCloud and another to an external hard drive.
“The key to stress-free migration isn’t speed—it’s verification. Always double-check that every photo arrived intact before recycling your old device.” — Jordan Peacock, Digital Archivist
Conclusion: Preserve Your Memories with Confidence
Transferring photos from an old Android to a new iPhone doesn’t have to be daunting. Whether you use Apple’s Move to iOS app during setup, leverage Google Photos for anytime access, or opt for hands-on control via computer, each method offers a reliable pathway to safeguard your visual history. The most important step is acting intentionally: back up early, verify completeness, and protect your originals.


 浙公网安备
33010002000092号
浙公网安备
33010002000092号 浙B2-20120091-4
Comments
No comments yet. Why don't you start the discussion?