
The National Provider Identifier (NPI) is a critical component of modern healthcare administration in the United States. Assigned by the Centers for Medicare & Medicaid Services (CMS), this 10-digit number uniquely identifies healthcare providers in all HIPAA-standard transactions. Whether you’ve changed your practice address, added a new specialty, or updated your contact details, keeping your NPI information current is not optional—it’s required by law. Inaccurate or outdated data can delay claims processing, affect credentialing, and even trigger compliance audits.
Despite its importance, many providers struggle with the process of updating their NPI records. The system can seem bureaucratic, and minor errors can lead to rejections or prolonged processing times. This guide walks through each stage of updating your NPI information efficiently and correctly—ensuring accuracy, minimizing delays, and maintaining professional credibility.
Why Timely NPI Updates Matter
Your NPI isn’t just an administrative formality; it’s tied directly to billing, insurance enrollment, hospital privileges, and electronic health record systems. When your NPI data becomes outdated, it creates friction across multiple platforms:
- Claims may be denied due to mismatched provider details.
- Insurance networks might suspend your participation status.
- Patient referrals could be delayed if contact information is incorrect.
- Credentialing applications may be rejected during verification.
The National Plan and Provider Enumeration System (NPPES) requires that providers review and update their information at least every 30 days under the “30-Day Rule.” While updates aren't needed daily, any change in legal name, practice location, taxonomy code, or organizational structure must be reported within 30 calendar days.
“Maintaining accurate NPI data is a cornerstone of regulatory compliance and operational efficiency in healthcare.” — Dr. Linda Chen, Senior Advisor, CMS Provider Enrollment
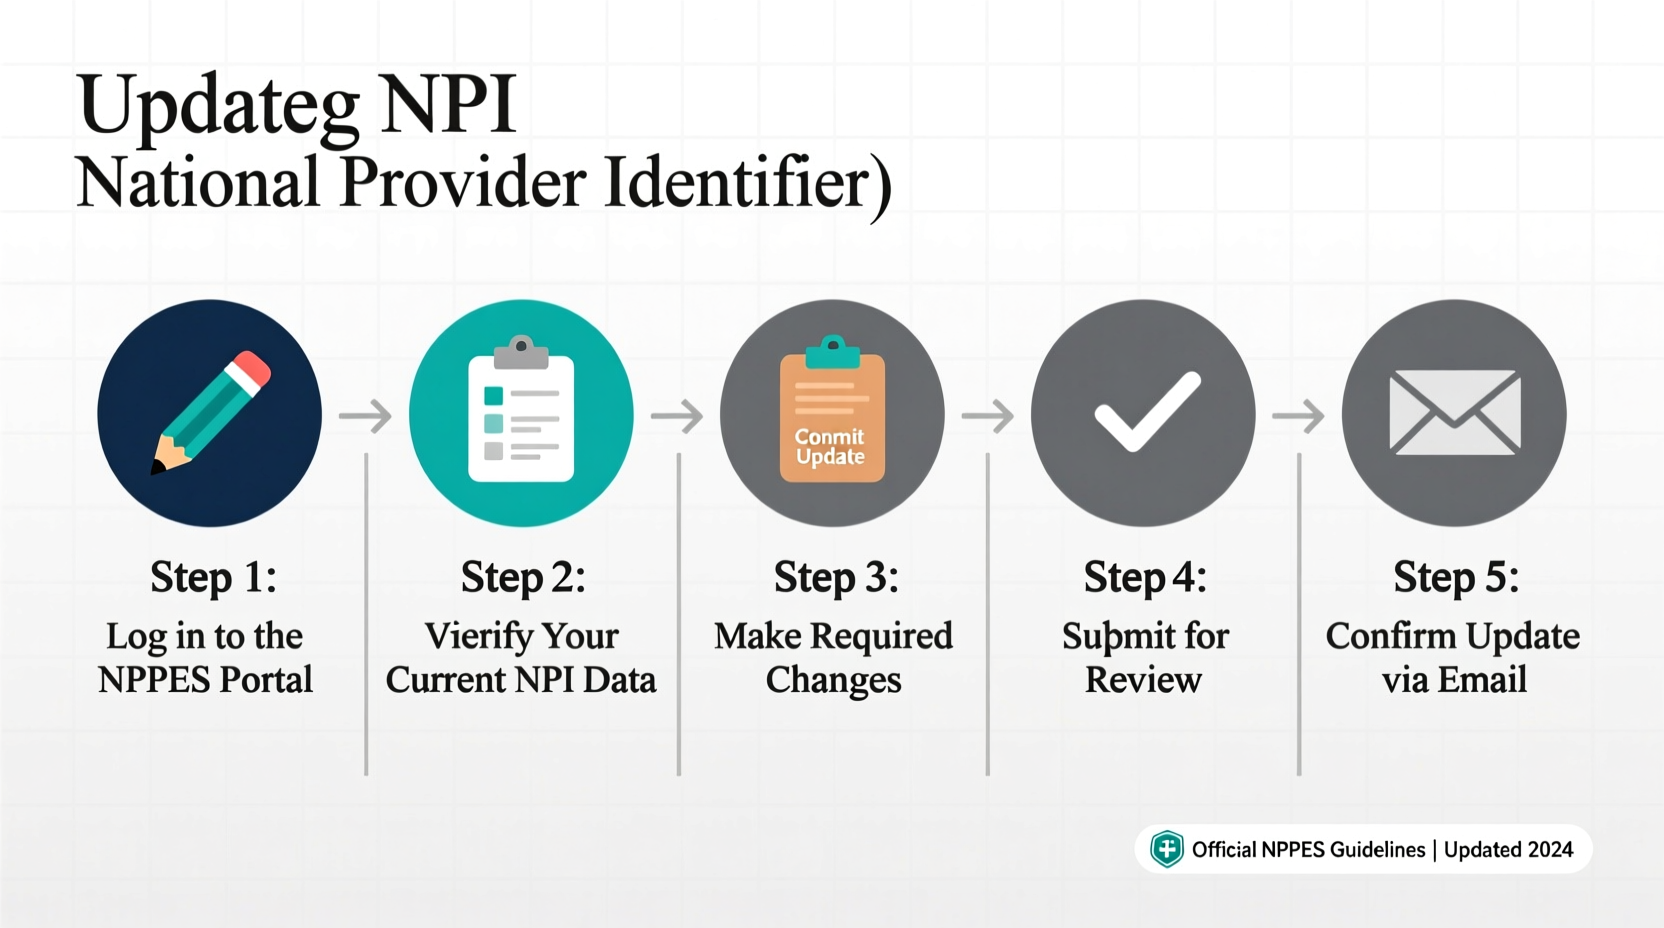
Step-by-Step Guide to Updating Your NPI Information
Follow these steps to ensure your NPI update is processed smoothly and without error.
- Determine What Needs Updating
Common changes include:- Practice address or mailing address
- Phone number or email
- Provider name (due to marriage, legal change, etc.)
- Taxonomy code or specialty classification
- Employment status (e.g., from employed to independent contractor)
- Deactivation/reactivation of NPI
- Gather Required Documentation
Prepare supporting documents such as:- Driver’s license or government ID (for name changes)
- Lease agreement or utility bill (for address verification)
- State license reflecting current specialty
- IRS W-9 form (if updating tax details)
- Log In to the NPPES Portal
Visit nppes.cms.hhs.gov. If you’re a sole proprietor or individual provider, use your existing user account. Organizations must designate an Authorized Official (AO) or Electronic Filing Individual (EFI) to make changes. - Navigate to Your NPI Record
Once logged in, select “Update an Existing NPI” from the dashboard. Search for your NPI using your identifier, last name, and first name. Confirm the correct record before proceeding. - Edit the Relevant Fields
Click on the section needing correction—such as “Practice Location Address” or “Provider Name.” Enter the updated information exactly as it appears on official documentation. Pay close attention to formatting: ZIP codes, phone numbers, and suffixes (e.g., Jr., III) must match precisely. - Upload Supporting Documents (If Required)
For certain changes—especially name or ownership changes—you’ll need to upload scanned copies of legal documents. Files should be clear, legible, and in PDF format. Maximum file size is 5MB. - Review and Submit
Before submission, use the built-in validation tool to check for missing or inconsistent data. After confirming accuracy, click “Submit.” You will receive a confirmation number and email receipt. - Monitor Processing Status
Most updates are processed within 1–5 business days. Check your NPPES dashboard regularly. If there’s an issue, CMS will send a notification explaining what needs correction.
Common Pitfalls and How to Avoid Them
Even experienced providers make mistakes when updating NPI records. Below are frequent errors and how to prevent them.
| Error | Consequence | How to Prevent |
|---|---|---|
| Inconsistent name formatting (e.g., “Bob” vs. “Robert”) | Claim denials due to identity mismatch | Use full legal name as on license and SSN card |
| Using P.O. Box for physical address | Non-compliance with CMS rules | Enter actual street address; P.O. Box only for mailing |
| Incorrect taxonomy code selection | Improper billing or credentialing issues | Verify code via CMS Taxonomy Code Lookup Tool |
| Submitting changes without logging in | Form treated as new application, not update | Always log into your NPPES account first |
Mini Case Study: A Smooth Transition After Relocation
Dr. Anita Patel, a family medicine physician in Austin, Texas, relocated her private practice 10 miles across town. She updated her NPI record two weeks before opening the new office. By logging into NPPES early, she changed her practice address, uploaded a copy of the lease agreement, and verified her taxonomy code remained accurate. Within three days, the update was confirmed. Her billing team tested a few claims immediately and found no disruptions. Because she also notified her major payers ahead of time, patient appointments continued seamlessly.
In contrast, a colleague who delayed the update faced a two-week backlog in claim processing due to address mismatches. Payers flagged submissions until the NPI data aligned with the provider file.
Checklist: Preparing and Submitting Your NPI Update
Use this checklist to ensure nothing is missed before submitting your NPI update:
- ✅ Identify which fields require changes
- ✅ Collect all supporting documents (ID, lease, license, etc.)
- ✅ Log into your NPPES account (not guest access)
- ✅ Locate your NPI record using search tools
- ✅ Edit only the necessary sections—do not re-enter everything
- ✅ Format all entries consistently (e.g., “St” vs “Street”)
- ✅ Upload required documents in PDF format (max 5MB)
- ✅ Review summary page for red flags or warnings
- ✅ Submit and save confirmation number
- ✅ Follow up in 3–5 business days to confirm processing
Frequently Asked Questions
Can I update my NPI information over the phone?
No. All NPI updates must be submitted electronically through the NPPES portal. CMS does not accept phone or paper-based modifications for security and audit trail purposes.
What happens if I miss the 30-day deadline to report a change?
Failure to update within 30 days violates 45 CFR §162.410. While CMS typically issues a warning for first-time offenses, repeated non-compliance can result in penalties or suspension from federal programs.
Do I need to update each NPI if I have more than one?
Yes. Each NPI is unique to a specific provider or organization. If you hold multiple NPIs (e.g., individual and group), each must be updated separately to reflect accurate information.
Final Steps and Ongoing Maintenance
Updating your NPI isn’t a one-time task—it’s part of ongoing professional responsibility. Set calendar reminders every 30 days to review your NPPES profile. Consider assigning this duty to an office manager or compliance officer if you're part of a larger practice.
Additionally, after updating your NPI, notify key stakeholders: insurance companies, EHR vendors, referral partners, and hospital affiliations. The NPI update doesn’t automatically sync across external systems.


 浙公网安备
33010002000092号
浙公网安备
33010002000092号 浙B2-20120091-4
Comments
No comments yet. Why don't you start the discussion?