
Translucent phone skins have surged in popularity among iPhone users who want to preserve their device’s original design while adding protection and a subtle personal touch. Unlike bulky cases, these ultra-thin vinyl wraps enhance grip and guard against scratches without hiding the sleek look of your iPhone. However, a poorly applied skin can quickly ruin the aesthetic with visible bubbles, misalignment, or stubborn wrinkles. The key to a professional-looking result lies not in luck—but in preparation, precision, and patience.
With the right approach, you can achieve a flawless installation at home. This guide walks you through every stage, from surface cleaning to final smoothing, using proven methods that minimize errors and maximize clarity.
Why Proper Installation Matters
A translucent skin is only as good as its application. Even minor imperfections like dust particles or uneven pressure can distort light transmission, making scratches or fingerprints more noticeable. Bubbles trapped beneath the surface not only look unprofessional but can grow over time due to heat expansion, eventually lifting the edges of the skin.
Unlike opaque skins, translucency magnifies every flaw. Light passes through the film, highlighting inconsistencies in adhesion and alignment. That’s why meticulous attention to detail during installation isn’t optional—it’s essential.
Essential Tools and Materials
Before starting, gather everything you’ll need. Rushing mid-process increases the risk of contamination or misalignment.
- Translucent phone skin (precisely cut for your iPhone model)
- Isopropyl alcohol (70% or higher) – for deep cleaning
- Microfiber cloth – lint-free and soft
- Squeegee tool or credit card wrapped in cloth – for smooth application
- Tape (low-adhesion painter’s tape) – for temporary holding and dust removal
- Lint roller – removes microscopic fibers
- Magnifying glass or bright lamp – helps spot dust before pressing down
Using a skin designed specifically for your iPhone model ensures precise cutouts for cameras, buttons, and ports. Third-party brands like dbrand, Slickwrap, and SkinIt offer high-quality options with accurate templating.
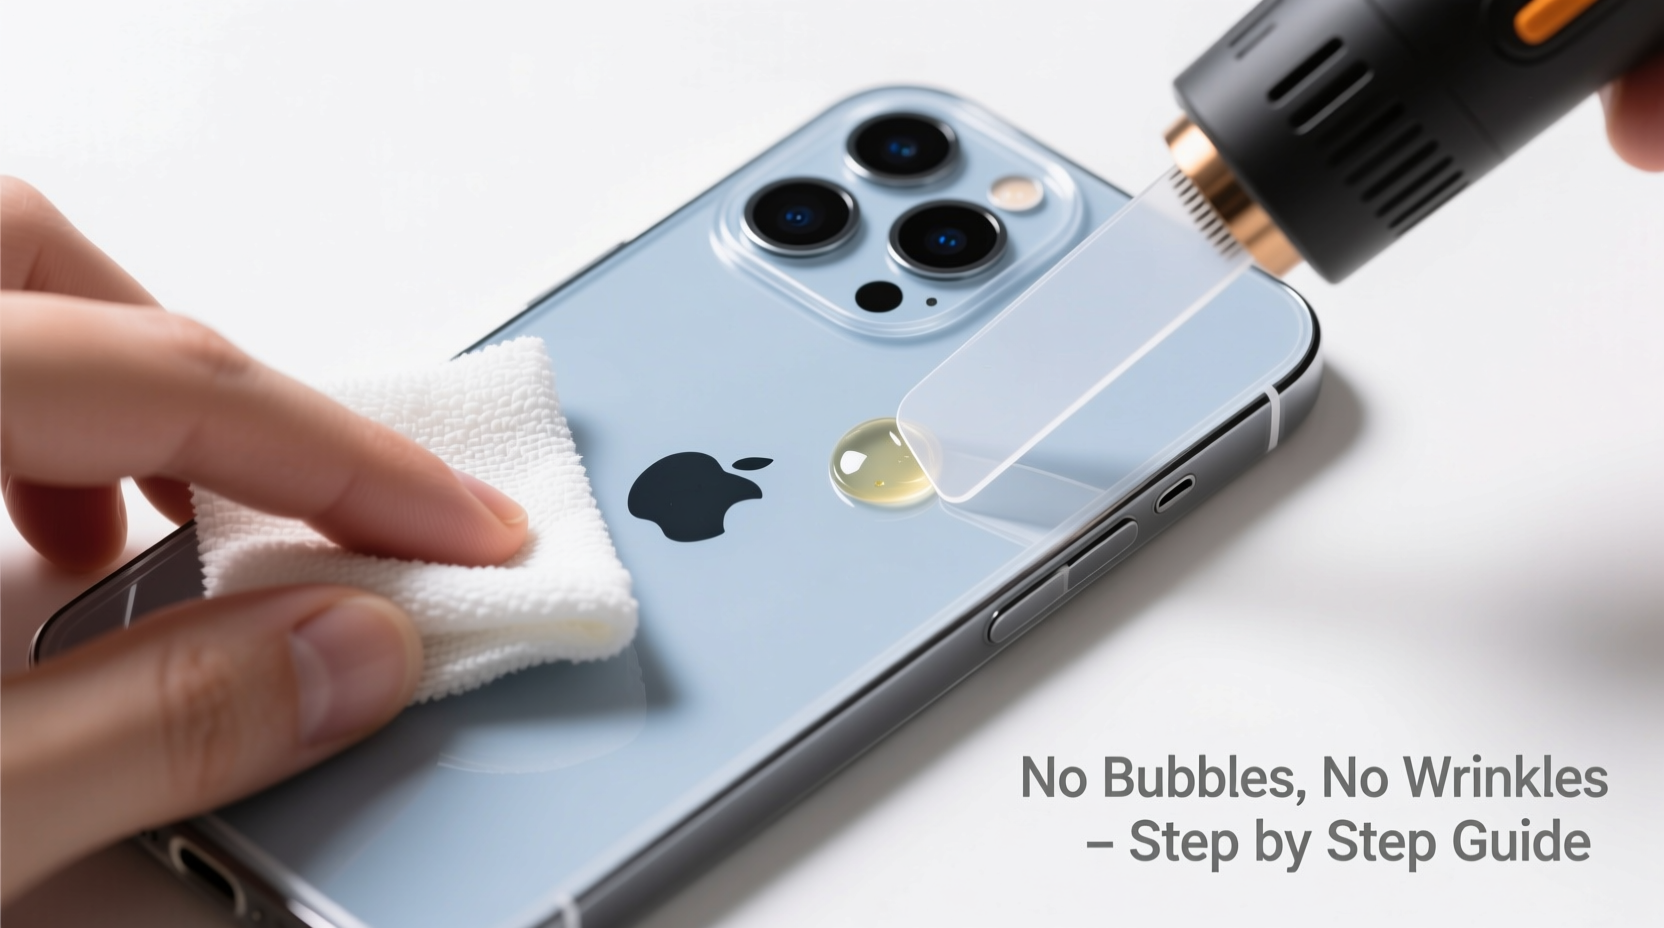
Step-by-Step Installation Guide
Follow this detailed sequence to apply your translucent skin with confidence and control.
- Power off your iPhone. This prevents accidental touches during installation and makes it easier to inspect screen edges if applicable (for full-body kits).
- Clean the surface thoroughly. Wipe the back and sides with a microfiber cloth, then dampen another section with isopropyl alcohol. Rub the entire surface in circular motions, focusing on edges and corners where oils accumulate.
- Dry completely. Let the phone air-dry for 30 seconds or gently buff with a dry microfiber cloth. No moisture should remain.
- Use a lint roller. Roll it over the phone’s surface several times. Even invisible fibers can cause bumps under transparent films.
- Peel the backing slowly. Hold the skin by the edges. Begin peeling the adhesive liner from one corner, keeping the rest of the liner flat to avoid premature sticking.
- Align carefully. Position the top edge first—most skins have a small tab or notch for camera alignment. Use both hands to hold it steady without touching the adhesive side.
- Apply from top to bottom. Once aligned, let the skin fall naturally onto the phone, starting at the top. Do not press yet—allow gravity to guide it into place.
- Smooth outwards. Using a soft-edged squeegee or cloth-wrapped credit card, start at the center and move outward in straight lines. Apply firm, even pressure to push air toward the edges.
- Check for bubbles. If small bubbles appear, lift the affected area slightly and re-smooth. For persistent ones, use a pinprick method: gently pierce the bubble with a needle, then press the air out.
- Final inspection. Hold the phone at an angle under bright light. Look for any lifted edges, residual dust, or tension lines near buttons.
Do’s and Don’ts During Application
| Do | Don't |
|---|---|
| Work on a clean, flat surface | Install near open windows or fans |
| Wash hands before handling | Touch the adhesive side with fingers |
| Take your time—rushing causes mistakes | Stretch or pull the skin into place |
| Use tape to hold edges temporarily | Press down fully until alignment is confirmed |
| Double-check camera and port cutouts | Ignore tiny specks of dust—they’ll show |
“Most failed installations come down to skipping prep. Cleaning isn’t just about grease—it’s about eliminating static and micro-debris that thrive under clear films.” — Jordan Lee, Mobile Accessory Technician with 8 years of customization experience
Real-World Example: A Close Call with Dust
Mark, an iPhone 14 owner in Portland, attempted his first skin install in his kitchen. He cleaned the phone with a tissue and applied the skin quickly, eager to see the result. At first glance, it looked fine—until he stepped into sunlight. A hairline wrinkle ran diagonally across the back, and two tiny bubbles clustered near the camera ring.
He removed the skin carefully (thankfully before full adhesion) and started over. This time, he used isopropyl alcohol, a lint roller, and worked inside his closed bathroom. The second attempt was flawless. “I underestimated how much lint floats in the air,” he said. “Now I treat it like a mini cleanroom procedure.”
Frequently Asked Questions
Can I reuse a translucent skin if I mess up the first time?
Some premium skins allow limited reapplication if removed gently within the first minute and kept free of dust. However, repeated peeling weakens the adhesive. It’s better to use a new skin for best results.
How long does it take for the skin to fully adhere?
Initial bonding happens within minutes, but full adhesion typically takes 12–24 hours. Avoid exposing the phone to moisture or extreme temperatures during this period.
Will the skin yellow over time?
High-quality TPU-based translucent skins resist yellowing for 1–2 years under normal conditions. Exposure to UV light, oils, and cigarette smoke accelerates degradation. Keep your phone away from direct sunlight when possible.
Pro Checklist for Flawless Results
- ✅ Verify iPhone model compatibility
- ✅ Wash and dry hands
- ✅ Power off device
- ✅ Clean surface with isopropyl alcohol
- ✅ Lint-roll the phone
- ✅ Inspect skin for defects before peeling
- ✅ Align top edge precisely
- ✅ Apply slowly, avoiding premature contact
- ✅ Smooth from center outward
- ✅ Inspect under angled light
Final Thoughts: Precision Pays Off
A perfectly installed translucent phone skin enhances your iPhone’s elegance while offering real protection. The process demands care, but it doesn’t require special skills—just discipline in execution. Every step, from cleaning to smoothing, contributes to the final clarity and longevity of the wrap.
Take your time. Treat the phone like a canvas. Respect the materials, and they’ll reward you with a seamless, invisible upgrade that lasts months without peeling or clouding.


 浙公网安备
33010002000092号
浙公网安备
33010002000092号 浙B2-20120091-4
Comments
No comments yet. Why don't you start the discussion?