
A well-fitted high waisted A-line skirt flatters nearly every body type, offering structure at the waist and ease through the hips and thighs. But achieving that ideal silhouette begins long before cutting fabric—it starts with precise measurements. Whether you're sewing from scratch, altering an existing pattern, or ordering custom-made clothing, accurate measurement is non-negotiable. This guide walks you through every step of the process, from selecting the right tools to interpreting your numbers in context with style and movement.
Why Accurate Measurement Matters
The high waisted A-line skirt combines two defining features: a waistline that sits above the natural waist (typically 2–4 inches higher) and a silhouette that gently flares from the waist down, skimming the hips without clinging. Because this design relies on clean lines and balanced proportions, even small measurement errors can result in gaping at the back, pinching at the sides, or an unflattering rise. Unlike stretchy garments that forgive minor discrepancies, structured skirts demand accuracy.
Fabric choice also plays a role. Stiffer materials like wool crepe or cotton twill offer less give, making precision even more critical. On the other hand, slight ease allowances become essential when working with minimal-stretch fabrics to allow for sitting, bending, and breathing.
“Fit begins with measurement, not pattern selection. The best pattern in the world won’t help if your starting numbers are off.” — Lena Torres, Professional Patternmaker & Fit Consultant
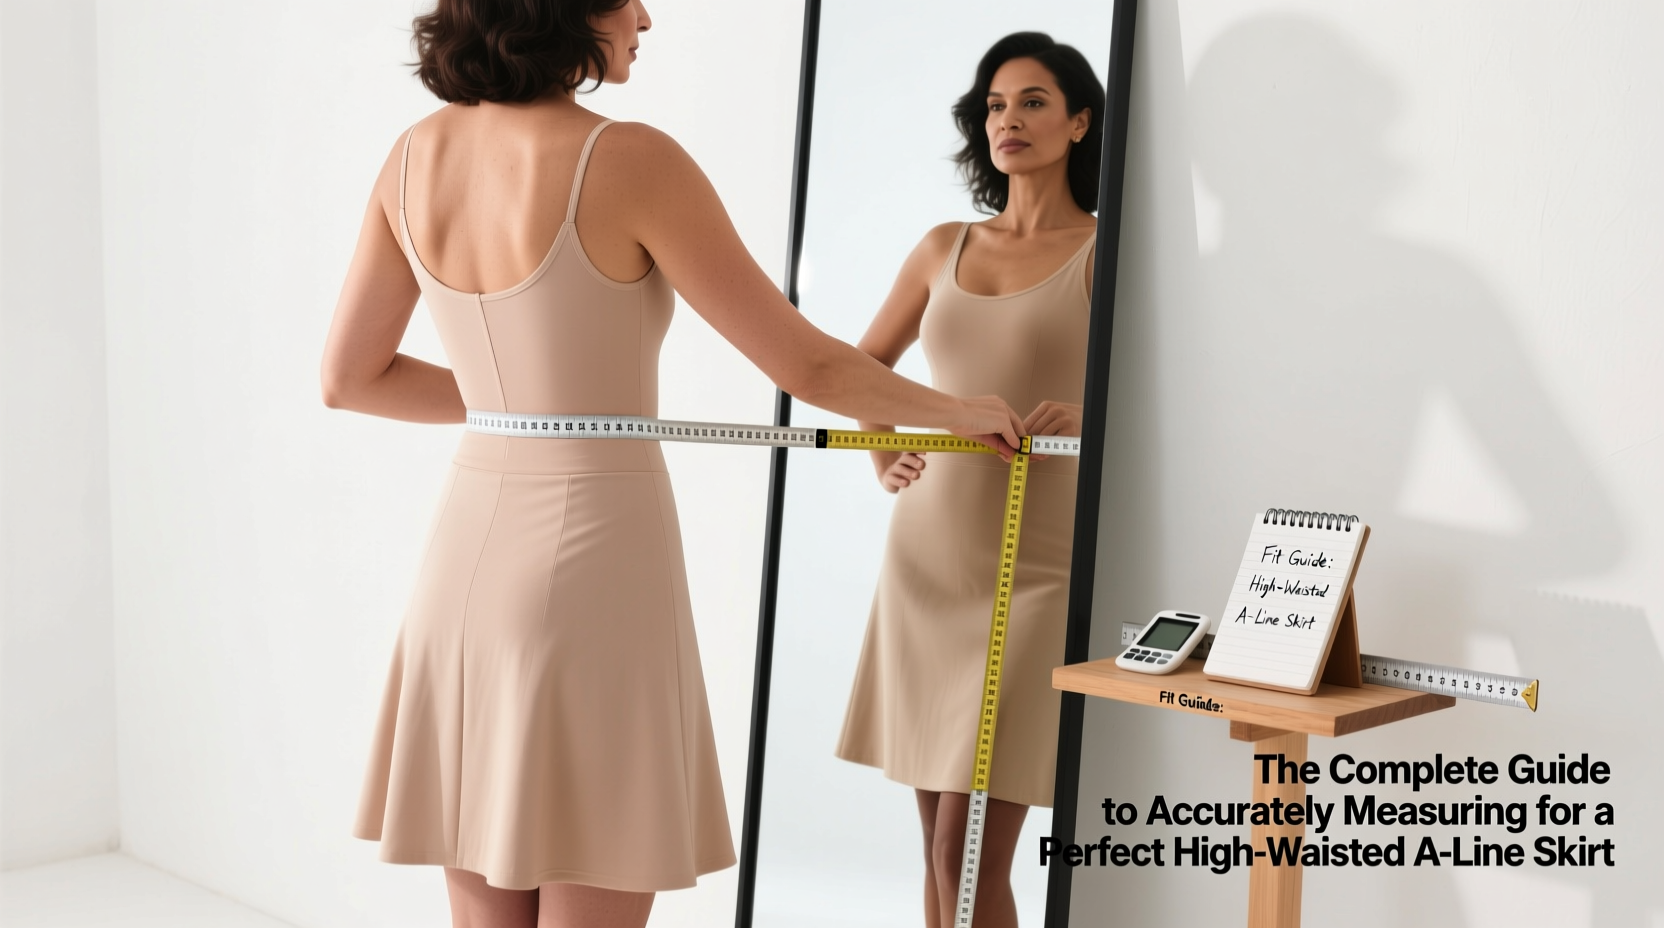
Essential Tools for Reliable Measurements
Before taking any measurements, ensure you have the correct tools. Using improper equipment leads to inconsistent results.
- Flexible tape measure: Must be non-stretch and clearly marked in both inches and centimeters.
- Measuring mirror: Helps maintain posture and alignment while measuring alone.
- Fitting band or elastic: A 1-inch wide strip worn at the intended waistline to mark where measurements should be taken.
- Pencil and notebook: Record each number immediately to avoid confusion.
- Full-length mirror: Allows visual confirmation of tape placement and body symmetry.
Step-by-Step Measurement Process
To achieve a perfect fit, follow this sequence precisely. Measure twice, record once.
- Mark the high waistline: Wrap a flexible tape or soft elastic around your torso 2–4 inches above your natural waist (narrowest part). This is your high waist. Ensure it’s level all the way around—check front, side, and back views in the mirror.
- High waist circumference: Measure around your body at the marked line. Keep the tape snug but not tight—allow room for a finger to slide underneath.
- Hip circumference: Measure around the fullest part of your hips, typically 7–9 inches below the high waist. Keep the tape parallel to the floor.
- Front and back rise: From the high waistband point, measure down over the curve of your hip to the top of your thigh. This helps determine crotch depth and prevents pulling across the seat.
- Skirt length: Decide where you want the skirt to fall (e.g., knee, mid-calf), then measure vertically from the high waistband down to that point, keeping the tape straight and perpendicular to the floor.
- Seat width (optional but recommended): For fuller hips or curvier figures, measure across the widest part of your seated hips to ensure adequate flare in the A-line shape.
Always take measurements in front of a mirror to verify the tape is horizontal and not twisted. Breathe normally—do not suck in your stomach—as real-world wear requires comfort.
Understanding Ease and Fit Preferences
Once you have your body measurements, apply appropriate ease—the extra space built into a garment for comfort and movement. There are two types:
- Wearing ease: Minimum space needed to move comfortably (typically 1–2 inches for woven fabrics).
- Design ease: Intentional added fullness for style (e.g., a dramatic A-line may include 4+ inches of additional hip room).
| Fabric Type | Recommended Waist Ease | Recommended Hip Ease | Notes |
|---|---|---|---|
| Cotton Twill (no stretch) | 1–1.5\" | 2–3\" | Add more hip ease for seated comfort |
| Wool Crepe | 1\" | 2\" | Structured drape benefits from moderate ease |
| Stretch Cotton (2% spandex) | 0.5–1\" | 1–2\" | Less ease required due to recovery |
| Linen Blend | 1.5\" | 3\" | Linen wrinkles easily; extra room reduces strain |
Real-World Example: Fitting for Curves
Sophia, a size 14 with a defined waist and full hips, struggled with RTW high waisted skirts gapping at the back and binding across her thighs. She took her own measurements using the method above and discovered her high waist was 34\", but her full hip was 46\"—a difference many standard patterns don’t accommodate. Using a commercial pattern graded for her waist, she compared it to her hip measurement and realized the hip was only cut for 42\". By blending sizes—from a 12 at the waist to a 16 at the hip—and adding 2\" of design ease in the lower panel, she created a skirt that followed her natural shape without strain. The result? A smooth, elegant A-line that moved with her throughout the day.
Checklist: Pre-Measurement Preparation
- ✓ Wear form-fitting clothing or undergarments
- ✓ Use a non-stretch measuring tape
- ✓ Mark high waist position with elastic or string
- ✓ Stand on a hard, level surface
- ✓ Check tape alignment in mirror (front, side, back)
- ✓ Breathe normally during measurement
- ✓ Record all numbers immediately
- ✓ Double-check key measurements (waist, hips, rise)
Common Mistakes to Avoid
- Measuring over bulky clothing: Adds false inches and distorts proportions.
- Tightening the tape too much: Results in undersized garments that bind.
- Ignoring posture: Slouching or arching alters waist and hip placement.
- Using outdated measurements: Bodies change; re-measure every few months or after weight shifts.
- Assuming one size fits all: Different brands and patterns grade differently—always refer to specific size charts.
FAQ
How high is “high waisted”?
A high waisted skirt typically sits 2 to 4 inches above the natural waist, usually near the narrowest part of the torso just below the ribcage. For some, this aligns with the belly button; for others, slightly above it.
Should I add extra length if I plan to sit often?
No—length doesn’t affect sitting comfort. Instead, ensure adequate hip and rise measurements. A too-short rise will pull the skirt down when seated, exposing the waistband or causing tension at the back.
Can I use a friend to help measure?
Yes, and it’s often more accurate. Have them keep the tape parallel to the floor and avoid pulling too tightly. Communication is key—tell them if the tape feels restrictive.
Final Steps: Translating Measurements to Pattern
With accurate numbers in hand, select a sewing pattern with a size chart that matches your high waist and hip measurements. If you fall between sizes, consider a blend. Many modern indie patterns (such as those from Tilly and the Buttons or Colette) offer detailed fit guides and adjustment tutorials. Always make a muslin (test version) in inexpensive fabric before cutting your final material. This allows you to assess fit, check for drag lines, and adjust seam allowances as needed.
For custom orders or tailoring, provide your measurements in writing along with preferred ease and fabric type. Clear communication prevents misunderstandings and ensures a professional result.
Conclusion
Perfecting the fit of a high waisted A-line skirt isn’t about guesswork—it’s about precision, understanding your body, and respecting the relationship between measurement and design. With the right tools, technique, and attention to detail, you can create or choose a skirt that enhances your shape, moves with you, and looks tailor-made. Don’t rush the measuring process; it’s the foundation of everything that follows. Take the time now, and enjoy a wardrobe staple that fits flawlessly for years to come.


 浙公网安备
33010002000092号
浙公网安备
33010002000092号 浙B2-20120091-4
Comments
No comments yet. Why don't you start the discussion?