
Raising sheep for meat is increasingly common among homesteaders, small farmers, and sustainability-minded individuals. But after months of care, the next step—processing the animal—can feel daunting, especially for first-timers. Butchering a sheep at home doesn’t have to be intimidating. With proper preparation, respect for the animal, and attention to hygiene and technique, you can produce high-quality meat while minimizing waste and maximizing yield.
This guide walks through every stage of the process—from pre-slaughter considerations to final cuts—with practical advice, safety protocols, and insights from experienced livestock processors. Whether you're processing one lamb for your family or building skills for future self-reliance, this comprehensive resource equips you with everything needed to succeed.
Understanding the Process: From Field to Freezer
Home butchering begins long before the knife touches hide. The quality of your final meat depends on how the animal was raised, handled before slaughter, and processed afterward. Stress, poor hygiene, or rushed techniques can ruin even the healthiest animal’s meat.
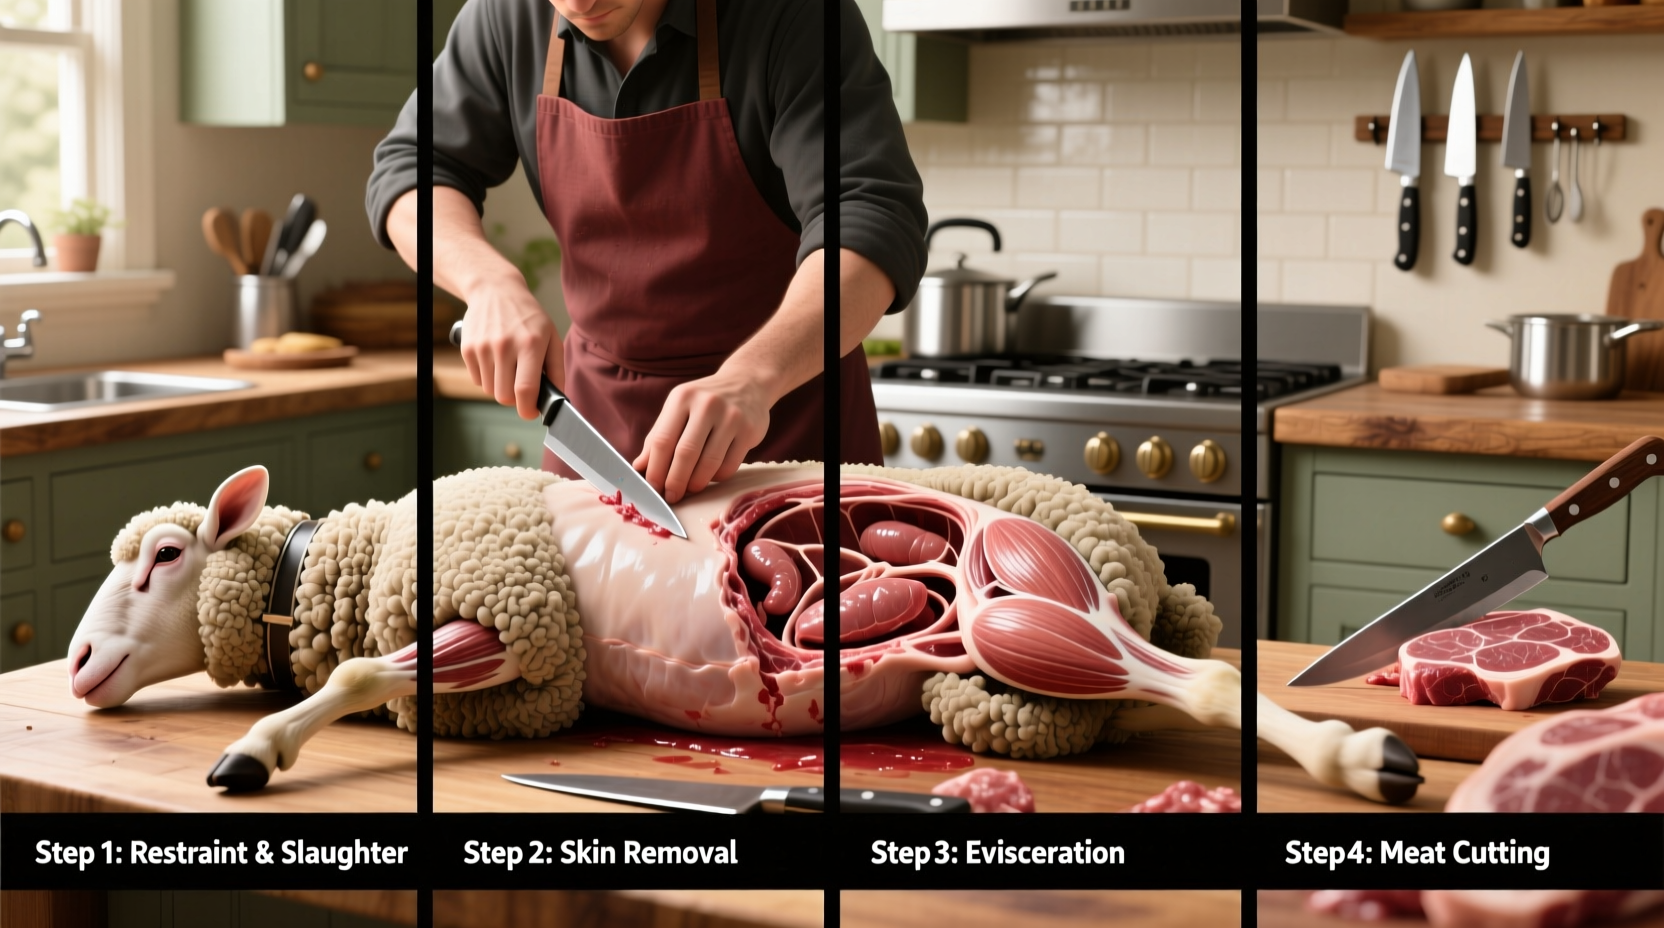
The full process includes five major phases:
- Preparation and animal selection
- Humane stunning and slaughter
- Field dressing and evisceration
- Carcass breakdown (butchering)
- Meat aging, packaging, and storage
Each phase requires specific tools, knowledge, and emotional readiness. Rushing any step compromises both food safety and meat quality.
Essential Tools and Equipment Checklist
Having the right tools ensures efficiency, safety, and precision. Invest in quality equipment—it pays off in cleaner cuts and reduced physical strain.
- Sharp, boning, and skinning knives (keep backups)
- Heavy-duty gambrel and hoist system (or sturdy beam)
- Large plastic tubs or stainless steel tables
- Food-grade gloves and apron
- Bleeding knife or bolt gun (for humane kill)
- Chainsaw or bone saw (optional, for splitting)
- Plenty of clean towels and disinfectant
- Vacuum sealer and freezer-safe bags
- Scale for tracking yields
Sanitation is non-negotiable. All tools must be cleaned with hot, soapy water and sanitized with a diluted bleach solution (1 tablespoon per gallon) between uses. Cross-contamination leads to spoilage and illness.
Step-by-Step: Breaking Down the Carcass Safely
After bleeding, skinning, and eviscerating the sheep (a process best learned hands-on or via video demonstration), you’ll hang the carcass by the hind legs to cool slightly and begin breaking it down.
- Split the carcass (optional): Use a saw or heavy knife to split down the spine if preferred for easier handling.
- Remove the front legs (forequarters): Cut through the shoulder joint just above the ribs.
- Separate the hind legs (haunches): Cut along the natural seam between leg and loin, then detach at the hip joint.
- Cut the loin and rack: Remove the rib and loin section using a sharp knife along the ribs’ curve.
- Break down into retail cuts: Divide shoulders into roasts, debone legs for roasting or grinding, slice loin into chops.
Work slowly. Let the anatomy guide your knife—muscle groups separate cleanly when cut along natural seams. Forcing the blade increases waste and injury risk.
| Cut of Meat | Best Uses | Average Yield (per 120 lb lamb) |
|---|---|---|
| Hind Leg | Roasts, steaks, ground meat | 14–16 lbs |
| Shoulder (Foreleg) | Stews, slow roasts, sausages | 8–10 lbs |
| Loin Chops | Pan-searing, grilling | 3–4 lbs |
| Rib Rack | Rib roast, grilled chops | 2–3 lbs |
| Neck & Flank | Stews, soups, dog food | 5–7 lbs |
Expert Insight: Respecting the Animal and the Craft
Butchering is more than mechanics—it's an act of responsibility. Those who do it well understand that honoring the animal means doing it right.
“Every cut should reflect gratitude and competence. A sloppy job disrespects the life given. Take your time, stay focused, and treat each animal with dignity—from field to freezer.” — Daniel Hartman, Small-Scale Livestock Processor & Educator
Hartman emphasizes that training matters. “Most beginners fail not from lack of courage, but from skipping practice. Sharpen your knife skills on pork shoulders or goat carcasses first. Muscle memory saves time and reduces errors when it counts.”
Avoiding Common Mistakes: Do’s and Don’ts
Mistakes are inevitable when learning, but some can ruin meat or create hazards. Avoid these frequent errors:
| Do’s | Don’ts |
|---|---|
| Chill the carcass within 2 hours of slaughter | Leave the carcass in direct sun or heat |
| Use sharp knives—dull blades tear meat | Force cuts; let anatomy guide the knife |
| Wear gloves and sanitize surfaces frequently | Touch face, hair, or non-food items during processing |
| Label all packages with date and cut type | Store meat loosely in the freezer without wrapping |
| Aging lamb 3–5 days at 34–38°F for tenderness | Freeze immediately—misses flavor development |
Real Example: First-Time Butcher Success Story
Sarah Miller, a homesteader in Vermont, processed her first lamb at age 32 after raising it from birth. She admits she was nervous: “I’d watched videos, read books, but nothing prepared me for the weight of the animal or the silence after the kill.”
She followed a strict protocol: stunned humanely with a captive bolt, bled quickly, cooled the carcass in a shaded garage with fans. With her husband assisting, they used labeled bins for organs, trimmings, and cuts. After butchering, they vacuum-sealed portions and aged the loin for four days in a dedicated cooler.
“The leg roast we made two weeks later melted in our mouths. Knowing exactly where it came from—and that we did it right—made the meal sacred,” she says. Her advice? “Have a checklist. And don’t try to do it alone the first time.”
Frequently Asked Questions
Is it legal to butcher a sheep at home?
In most rural areas of the U.S., Canada, UK, and Australia, it is legal to slaughter your own animals for personal consumption under “custom exempt” or small-farm regulations. However, selling the meat typically requires USDA-inspected facilities. Always check local laws before proceeding.
How long does it take to butcher a sheep?
From slaughter to packaged cuts, expect 4–6 hours for a beginner working with one helper. Skilled teams can finish in 2–3 hours. Breaks, cooling time, and cleanup add additional time.
Can I use kitchen knives for butchering?
While possible, kitchen knives aren’t designed for prolonged use on hide, sinew, or bone. Dedicated skinning and boning knives with curved blades and secure grips reduce fatigue and improve control. Reserve your kitchen cutlery for cooking.
Final Thoughts: Confidence Through Preparation
Butchering a sheep at home is a profound skill—one that reconnects people with their food and fosters self-reliance. It demands respect, patience, and precision, but the rewards are deep: nutrient-dense meat, zero-waste utilization, and the quiet pride of knowing exactly what’s on your plate.
Start small. Practice with smaller animals like rabbits or chickens if needed. Seek mentorship from experienced farmers. Document your process, learn from mistakes, and refine your technique. Each animal teaches something new.


 浙公网安备
33010002000092号
浙公网安备
33010002000092号 浙B2-20120091-4
Comments
No comments yet. Why don't you start the discussion?