
Swapping out your Apple Watch band is one of the simplest ways to refresh your wearable’s look, enhance comfort, or adapt it for different activities. Whether you’re switching from a sport band for the gym to a sleek leather strap for the office, knowing how to install a new band properly ensures both safety and longevity for your device. While the process may seem straightforward, incorrect installation can lead to accidental drops, misalignment, or even damage to the watch casing. This comprehensive guide walks you through every detail—from identifying compatible bands to securing them correctly—so you can change your band with confidence and precision.
Understanding Apple Watch Band Compatibility
Not all Apple Watch bands fit every model. Before purchasing or installing a new band, confirm compatibility based on your watch size and series. Apple designs bands to fit specific case diameters: 38mm/40mm/41mm and 42mm/44mm/45mm/49mm. Using an incompatible band may result in a loose fit or excessive strain on the connectors.
Beyond size, consider the type of connection system. Most modern Apple Watch bands use a spring-loaded bar mechanism that slides into slots on either side of the watch case. Older bands may differ slightly in design, but since Series 1 onward, Apple has maintained consistent attachment standards across models.
“Ensuring band compatibility isn’t just about aesthetics—it’s critical for maintaining structural integrity and preventing unintended detachment.” — Jordan Lee, Wearable Tech Specialist
Tools You’ll Need (And What You Don’t)
The good news: installing a new Apple Watch band requires no tools. The mechanism is entirely user-operated and designed for tool-free changes. However, having a clean, flat surface and good lighting makes the process easier and reduces the risk of dropping your watch during transition.
If you frequently swap bands, consider using a soft microfiber cloth underneath the watch to prevent scratches. Some users also opt for plastic pry tools marketed for band removal, but these are optional and not recommended by Apple. Fingertips are sufficient when used carefully.
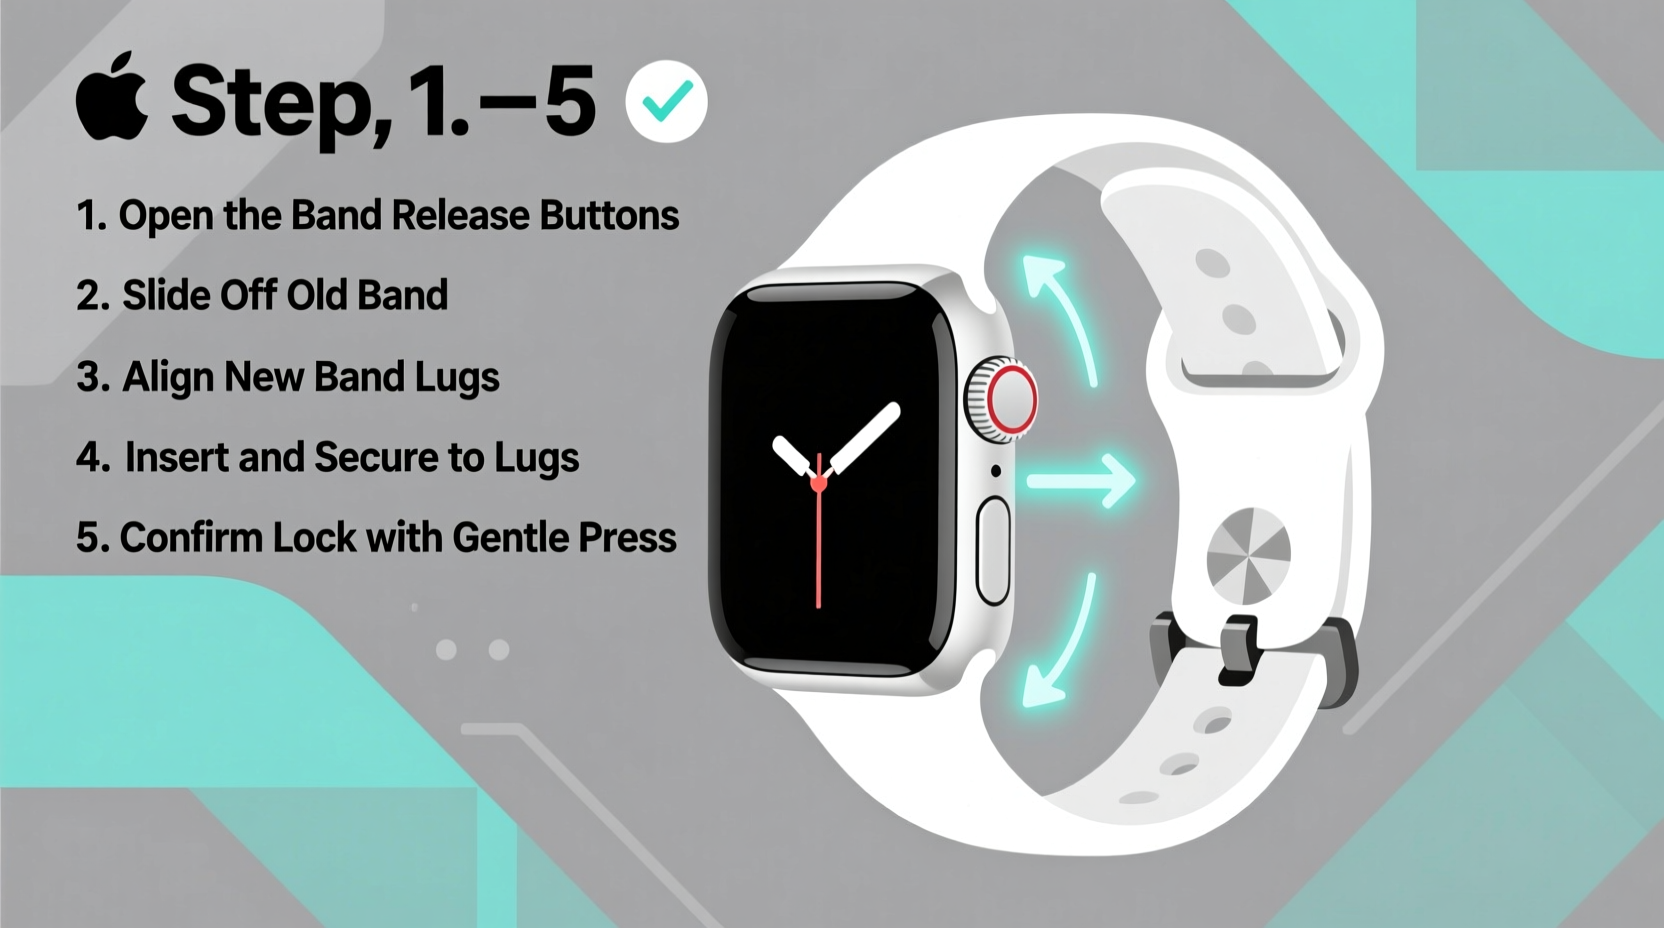
Step-by-Step Guide to Removing the Old Band
- Power down if desired: While not required, turning off your Apple Watch eliminates accidental screen activation during handling.
- Position the watch face-up: Place it on a soft, clean surface with the display facing you.
- Locate the release button: On the left side of the watch case (when viewing the screen), you’ll see a small oval-shaped button near the top band connector.
- Press and hold the release: Use your fingertip to press firmly on the release button. You should feel slight resistance followed by a smooth inward slide as the pin retracts.
- Slide the band outward: While holding the release, gently pull the band away from the case until the metal pin clears the slot.
- Repeat on the bottom: Perform the same action on the lower connector to fully detach the band.
- Set aside safely: Store the removed band in a protected area to avoid loss or damage.
Installing Your New Band Securely
Once the old band is removed, installing the new one follows a reverse but equally precise process.
- Align the new band: Hold the replacement band so its connector bar lines up with the slot on one side of the watch case.
- Insert the first end: Gently push the metal bar into the slot until it clicks into place. You should hear a soft snap indicating full engagement.
- Angle the second end: With one side secured, tilt the free end of the band upward slightly to align it with the opposite slot.
- Slide in and lock: Press the second connector straight into the case until it clicks. Do not wiggle or apply sideways pressure.
- Test the connection: Lightly tug on both ends of the band to ensure neither side moves or feels loose.
- Repeat for the other band half: If replacing both top and bottom straps (e.g., two-part bands like Milanese or Link), repeat steps for the second piece.
When properly installed, there should be no visible gaps between the band and the case, and the watch should sit flush against your wrist without wobbling.
Band Type Comparison: Features and Installation Notes
| Band Type | Installation Difficulty | Best For | Special Notes |
|---|---|---|---|
| Sport Band | Easy | Daily wear, workouts | Flexible silicone; quick snap-in mechanism |
| Milanese Loop | Moderate | Formal settings, magnetic closure | Thin wire mesh; handle gently to avoid bending |
| Leather Loop | Easy | Office, casual elegance | Natural material; may stretch slightly over time |
| Link Bracelet | Moderate to Hard | Professional events, adjustable links | May require link adjustments; heavier than others |
| Nylon Braided Solo Loop | Easy | All-day comfort, eco-friendly | Stretchable; fits snugly without buckles |
Avoiding Common Mistakes
- Skipping the release button: Attempting to yank the band out without depressing the release damages the internal spring.
- Forcing misaligned connectors: If the pin doesn’t slide smoothly, double-check orientation before applying more pressure.
- Using damaged bands: Cracked or bent connectors compromise security and increase the chance of sudden disconnection.
- Ignoring dust in the slot: Debris can block proper insertion. Blow lightly or use a dry brush to clean the port if needed.
Real Example: Sarah’s Gym-to-Work Transition
Sarah, a marketing executive and fitness enthusiast, uses her Apple Watch throughout the day. In the morning, she wears a Sport Band for her workout—sweat-resistant and secure during high-intensity intervals. After showering, she swaps to a Leather Loop for a polished office appearance. Initially, she struggled with alignment and once dropped her watch while rushing. After following proper release techniques and taking 60 seconds to focus on each change, she now transitions seamlessly. “Taking a moment to do it right saved me from a cracked screen,” she says. “Now I keep my watch on a coaster during swaps.”
Frequently Asked Questions
Can I use third-party bands on my Apple Watch?
Yes, many third-party manufacturers produce high-quality, compatible bands. Just verify they explicitly state compatibility with your Apple Watch size and generation. Reputable brands often meet or exceed Apple’s durability standards.
How tight should the band feel after installation?
The band should hold the watch firmly against your wrist without sliding around, but not so tight that it causes discomfort or restricts circulation. You should be able to fit one finger comfortably between the band and your skin.
Is it safe to change bands frequently?
Absolutely. Apple designed the band system for regular changes. As long as you follow correct procedures and avoid aggressive handling, frequent swaps won’t harm your device.
Final Checklist Before Every Band Change
- ✅ Confirm band compatibility with your Apple Watch size
- Check packaging or manufacturer specs.
- ✅ Work on a clean, soft surface
- Prevents scratches and accidental drops.
- ✅ Press the release button fully before removing
- Never force the band out.
- ✅ Align connectors straight before inserting
- Misalignment can damage the pin or housing.
- ✅ Test stability after installation
- Gently tug both ends to confirm secure attachment.
Conclusion
Changing your Apple Watch band is more than a style choice—it’s a functional upgrade that adapts your device to your lifestyle. With the right knowledge, the process becomes quick, safe, and repeatable. Whether you're switching to a rugged option for hiking or slipping on a refined metal bracelet for dinner, doing it correctly protects your investment and enhances daily usability. Now that you know exactly how to install a new band easily and securely, take a moment to evaluate your current collection and make the switch with confidence.


 浙公网安备
33010002000092号
浙公网安备
33010002000092号 浙B2-20120091-4
Comments
No comments yet. Why don't you start the discussion?