
Upgrading your laptop’s RAM is one of the most cost-effective ways to breathe new life into an aging machine. Whether you're struggling with slow multitasking, frequent application crashes, or sluggish web browsing, adding more memory can deliver a noticeable improvement. Unlike complex hardware overhauls, RAM installation is straightforward when approached methodically. With the right tools, compatible parts, and careful execution, you can complete the upgrade in under 30 minutes.
Understanding RAM and Why It Matters
Random Access Memory (RAM) acts as your laptop’s short-term memory. It stores active data that your operating system, applications, and browser tabs use for quick access. The more RAM you have, the more tasks your system can handle simultaneously without relying on slower storage drives.
When RAM is insufficient, your laptop starts using virtual memory—a portion of your SSD or HDD—which dramatically slows performance. This bottleneck becomes evident when switching between programs, editing large files, or running memory-intensive software like video editors or virtual machines.
“Doubling your RAM can reduce app load times by up to 40% in systems previously constrained by memory.” — Dr. Alan Zhou, Hardware Performance Analyst at TechBenchmark Labs
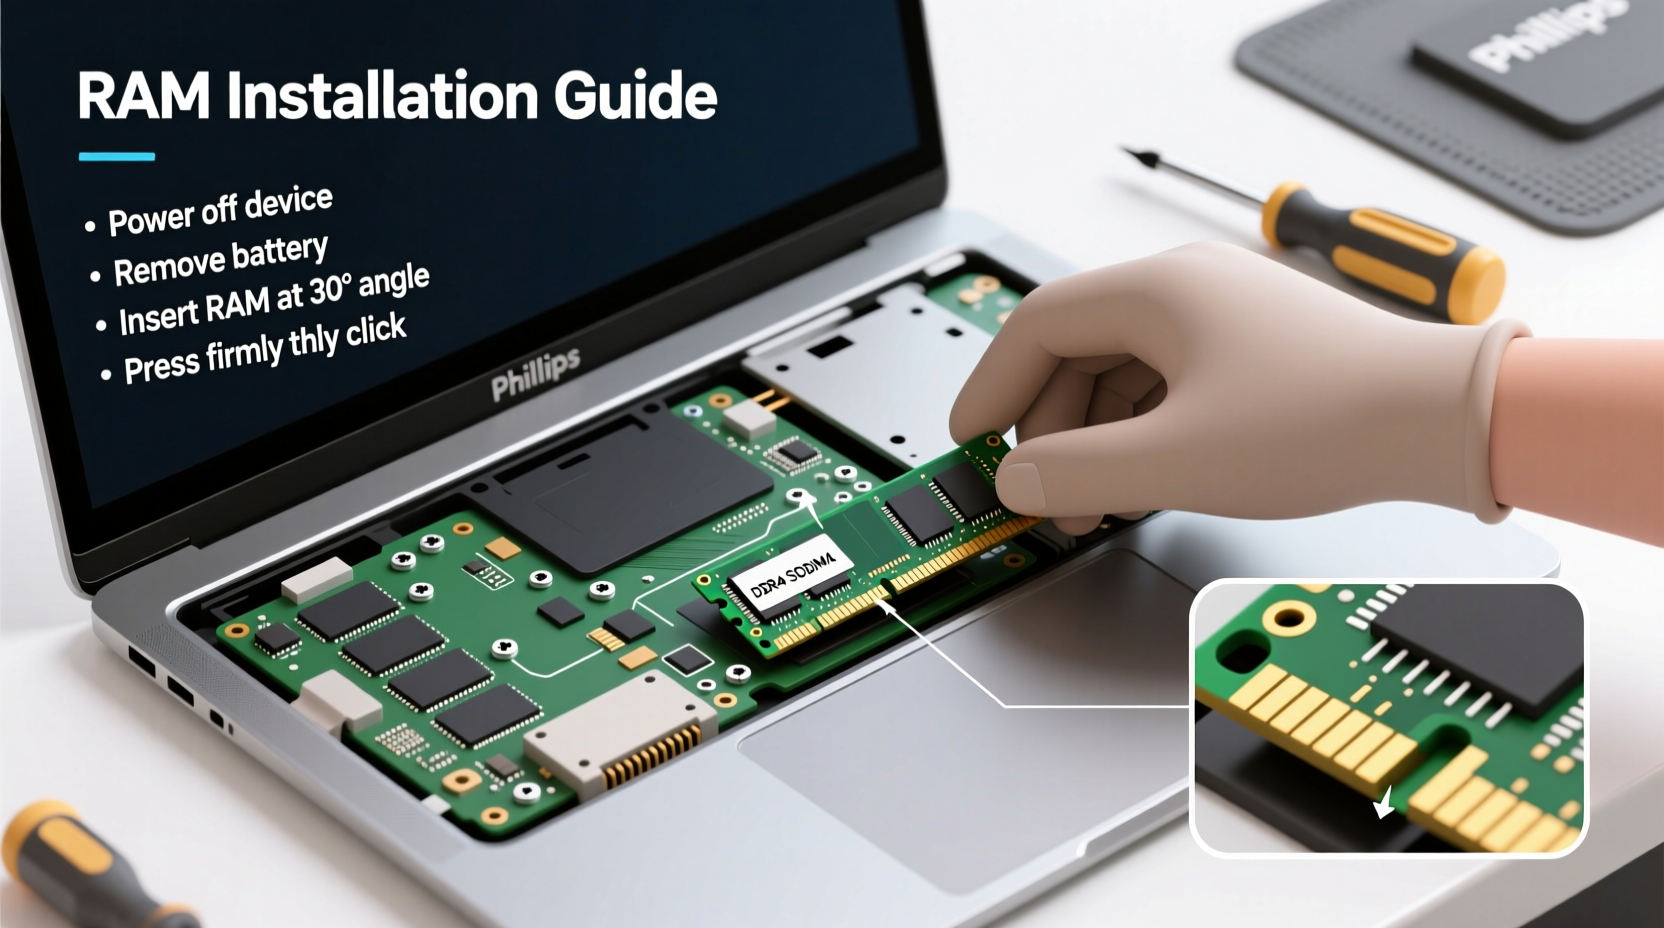
Step-by-Step: Installing RAM in Your Laptop
Before touching any hardware, follow this structured process to ensure a safe and successful upgrade.
- Determine compatibility: Check your laptop model’s maximum supported RAM and type (DDR3, DDR4, DDR5).
- Purchase the correct module: Match speed, voltage, and form factor (SODIMM for laptops).
- Power down and prepare your workspace: Shut down the laptop and disconnect all cables.
- Ground yourself: Prevent static damage by using an anti-static wrist strap or frequently touching metal surfaces.
- Open the RAM compartment: Locate the panel on the underside (often marked with a RAM icon).
- Remove existing module (if replacing): Gently push the retaining clips outward to release the stick.
- Insert the new RAM: Align the notch and press firmly at a 45-degree angle, then lift to lock into place.
- Secure and test: Replace the panel, power on, and verify detection in BIOS or system settings.
Compatibility Checklist Before You Buy
Not all RAM works with every laptop. Use this checklist to avoid costly mistakes:
- Confirm your laptop model supports the RAM capacity (e.g., 8GB, 16GB, 32GB).
- Identify the generation: DDR3, DDR4, or DDR5 (they are not interchangeable).
- Check if your system uses single-channel or dual-channel configuration for optimal performance.
- Ensure the voltage matches (commonly 1.2V for DDR4, 1.1V for DDR5).
- Verify physical space—some ultrabooks only support one SODIMM slot.
Do’s and Don’ts of Laptop RAM Installation
| Do’s | Don’ts |
|---|---|
| Use compressed air to clean dust from the RAM bay before installation. | Don’t force the RAM stick into the slot—if it doesn’t align easily, recheck orientation. |
| Boot into BIOS to confirm the system recognizes the new RAM immediately. | Don’t skip grounding procedures—static discharge can permanently damage components. |
| Install matching pairs for dual-channel mode (same size, speed, brand if possible). | Don’t mix DDR types—even if they fit physically, they won’t function. |
| Update your BIOS before upgrading if recommended by the manufacturer. | Don’t assume maximum listed RAM is always achievable with consumer configurations. |
Real Example: Boosting Productivity with a Simple Upgrade
Sophie, a freelance graphic designer using a 2018 Dell XPS 13, found her workflow increasingly interrupted by lag when running Adobe Photoshop and Illustrator simultaneously. Her system had 8GB of soldered RAM with no second slot—an intentional limitation. After researching, she discovered that while she couldn't upgrade beyond 8GB, newer models offered 16GB+ options. She opted to transfer her projects to a used 2020 model with upgradeable RAM, installed a 16GB kit herself, and reported a 60% reduction in program freeze incidents. For her, the lesson was clear: knowing hardware limits before purchase saves time and frustration later.
Frequently Asked Questions
Can I mix different sizes of RAM in my laptop?
Yes, but not optimally. A mismatched pair (e.g., 8GB + 16GB) will run in \"asymmetric dual-channel\" mode, which still improves performance over single-channel. However, both sticks will operate at the speed of the slower module, potentially limiting gains. For best results, use identical modules.
Why isn’t my laptop detecting the new RAM?
First, power off and reseat the module—ensure it’s fully locked in place. If undetected, try booting with only the new stick installed. Clean the contacts gently with a dry eraser if oxidation is suspected. Also, check BIOS settings: some systems disable memory above certain thresholds unless manually enabled.
Is there a difference between OEM and third-party RAM?
Functionally, no—most RAM is manufactured by a few major producers (Samsung, SK Hynix, Micron). Reputable third-party brands like Crucial, Kingston, and Corsair rigorously test their modules and often offer better pricing and warranties than OEM upgrades. Always buy from authorized sellers to avoid counterfeit products.
Optimizing Performance After Installation
Once your new RAM is installed and recognized, take these steps to maximize its impact:
- Adjust virtual memory settings: In Windows, set a custom size (initial and maximum) slightly above your physical RAM to prevent unnecessary disk swapping.
- Enable XMP/DOCP profiles: If using high-speed RAM, enter BIOS to activate preset performance profiles for full speed utilization.
- Close background apps: Use Task Manager to identify memory-hogging processes and disable non-essential startup programs.
- Monitor usage: Tools like HWiNFO or Resource Monitor show real-time RAM consumption, helping you fine-tune workflows.
“Many users overlook firmware updates before hardware changes. An outdated BIOS can misreport RAM specs or fail to initialize higher capacities.” — Lin Mei, Senior Support Engineer at Notebook Insight Group
Final Thoughts and Action Plan
Installing RAM is a simple yet transformative upgrade. With minimal investment and effort, you can extend your laptop’s usable lifespan by years, delay costly replacements, and enjoy smoother daily computing. The key lies in preparation: verifying compatibility, handling components safely, and validating results post-installation.
If you’ve been putting up with slow performance, now is the time to act. Identify your current RAM setup, research compatible upgrades, and schedule a quiet 30-minute window to perform the swap. Most users report immediate improvements in responsiveness and multitasking capability.


 浙公网安备
33010002000092号
浙公网安备
33010002000092号 浙B2-20120091-4
Comments
No comments yet. Why don't you start the discussion?