
Google Photos has become a default storage solution for millions of users worldwide, offering seamless backup and intelligent organization. However, as your photo library grows, you may want to remove certain images—whether for privacy, space management, or digital decluttering. Simply deleting a photo doesn’t always mean it’s gone for good. Understanding the full lifecycle of deletion in Google Photos is essential to ensure permanent removal without compromising data security.
This guide walks through every stage of permanently clearing photos from Google Photos, covering hidden pitfalls, recovery windows, device synchronization, and best practices for maintaining digital hygiene—all while keeping your remaining media safe and intact.
Understanding How Google Photos Handles Deletion
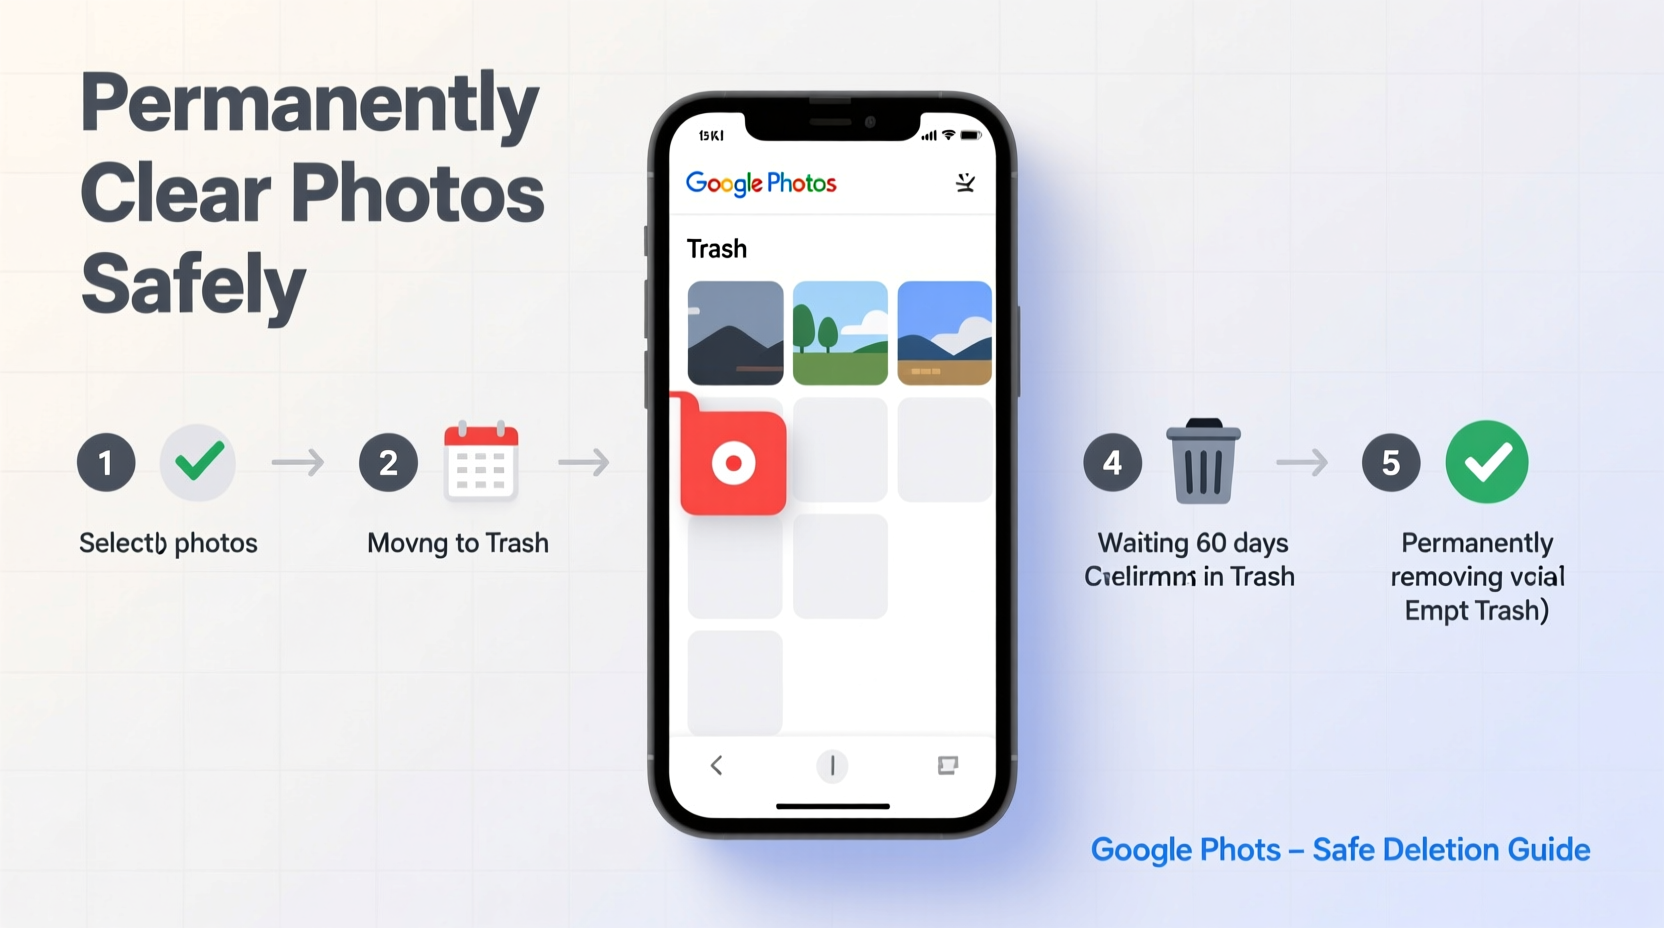
When you delete a photo from Google Photos, it doesn't vanish immediately. Instead, it moves to the \"Trash\" (also labeled \"Bin\") where it remains recoverable for 60 days. During this period, the file still occupies storage space and can be restored by accident or accessed if your account is compromised.
After 60 days, Google automatically deletes the contents of the Trash—but only if you haven’t manually emptied it sooner. This grace period is designed to protect users from accidental loss, but it also means that true permanence requires intentional action beyond a simple delete.
“Many users assume deletion equals immediate erasure, but cloud services like Google Photos operate on delayed deletion cycles. True data removal involves multiple steps.” — Dr. Lena Torres, Digital Privacy Researcher at the Center for Secure Computing
Step-by-Step: Permanently Remove Photos from Google Photos
To ensure your photos are truly gone, follow this structured process:
- Select the photos you wish to delete using the app or web interface. You can choose individual files or entire albums.
- Delete them permanently by tapping the trash icon. They will move to the Trash folder.
- Navigate to Trash in the menu (left sidebar on desktop, bottom menu on mobile).
- Select all items in Trash or specific ones you want to erase now.
- Tap “Delete forever” (web) or “Empty Trash” (mobile). Confirm the action when prompted.
- Verify device sync: If you have Google Photos backed up on Android or iOS devices, ensure deleted photos no longer appear locally.
Checklist: Ensuring Permanent Photo Removal
- ✅ Back up any photos you want to keep elsewhere before deletion
- ✅ Delete unwanted photos from your main library
- ✅ Access the Trash section in Google Photos
- ✅ Manually empty the Trash or delete individual entries permanently
- ✅ Check linked devices (phones, tablets) for cached copies
- ✅ Disable auto-backup temporarily during cleanup to avoid re-uploading
- ✅ Wait 24–48 hours and verify photos don’t reappear due to sync delays
Data Safety and Device Considerations
Even after emptying the Trash, remnants of photos may persist on your devices. For example, if you use “Back up & Sync,” deleting a photo on one device removes it across all synced devices—but only after synchronization occurs. There can be a lag, especially with poor connectivity.
Additionally, some smartphones retain local copies in their gallery apps even after cloud deletion. To fully eliminate traces:
- On Android: Open the Gallery app, go to Settings > Backup > Manage Storage, and clear cached media.
- On iPhone: Go to Settings > General > iPhone Storage > Google Photos, and offload unused data.
- For computers: If you’ve used the Google Photos desktop uploader, check the original folders and delete local files manually.
| Action | Where It Applies | Effect on Data |
|---|---|---|
| Delete from Library | Cloud, Devices | Moves to Trash; not permanent |
| Empty Trash | Cloud Only | Permanent cloud deletion after confirmation |
| Delete Local Copy | Phone, Computer | Removes offline access but not cloud version |
| Turn Off Auto-Backup | All Devices | Prevents re-upload of deleted media |
Real Example: Recovering Control After a Data Breach Scare
Sarah, a freelance photographer, discovered an old smartphone had been sold without wiping her Google account. Fearing private client images might still be accessible via Google Photos, she took immediate action. First, she signed into her Google account on a secure device and reviewed recent activity. She found several unfamiliar logins and promptly changed her password and enabled two-factor authentication.
Next, she went to Google Photos and deleted all sensitive project folders from her library. She then navigated to Trash and selected “Empty Trash” to prevent recovery. Finally, she disabled auto-backup on her old device model through her Google Account settings under Security > Your Devices. Within 48 hours, she confirmed no new uploads occurred. Her proactive approach ensured that even if someone accessed the old phone, no new data could sync—and previously uploaded work was permanently erased.
Frequently Asked Questions
Does emptying the Trash in Google Photos delete photos from all my devices?
Yes—once you empty the Trash, the deletion syncs across all connected devices within a few hours. However, local copies stored outside Google Photos (e.g., in your phone’s internal storage) must be deleted separately.
Can Google recover photos after I’ve emptied the Trash?
No. Once you manually empty the Trash or wait for the 60-day auto-delete cycle, Google cannot restore those files. Recovery is only possible during the 60-day retention window.
What happens to shared albums when I delete photos?
If you delete a photo from a shared album, it only removes your copy unless you're the album owner. Other members retain their versions. As the owner, deleting a photo removes it for everyone.
Best Practices for Ongoing Photo Management
Permanently removing photos shouldn’t be a one-time emergency fix. Incorporate these habits into your digital routine:
- Review regularly: Schedule quarterly cleanups to evaluate which photos you no longer need.
- Use archives: Before deleting, archive sentimental photos to external drives or encrypted cloud storage.
- Limit auto-backup: Exclude screenshots and duplicate downloads from syncing to reduce clutter.
- Enable location-based controls: On mobile, restrict Google Photos’ background data usage in public Wi-Fi zones.
“Digital minimalism isn’t just about saving space—it’s about reducing exposure. Every photo you keep is a potential data point.” — Marcus Reed, Cybersecurity Consultant
Conclusion: Take Control of Your Digital Footprint
Your photo library reflects your life, but not every moment needs to be preserved indefinitely. By understanding how Google Photos manages deletion, actively managing your Trash, and synchronizing device-level cleanup, you gain real control over your digital footprint. Permanently clearing photos isn’t just about freeing up storage—it’s a critical step in protecting your privacy and maintaining peace of mind.


 浙公网安备
33010002000092号
浙公网安备
33010002000092号 浙B2-20120091-4
Comments
No comments yet. Why don't you start the discussion?