
Installing a punching bag at home transforms any space into a personal training zone, offering convenience, privacy, and consistent access to fitness. However, improper installation can lead to structural damage, injury, or equipment failure. Whether you're setting up in a garage, basement, or spare room, safety and stability must come first. This guide walks through every critical step—from choosing the right location to securing the mount—with expert-backed methods that ensure durability and performance.
Selecting the Right Location
The success of your home boxing setup begins with location. An ideal spot provides enough clearance, structural integrity, and minimal disruption to household activities.
- Ceiling height: At least 9 feet is recommended to allow full swing without hitting the floor or ceiling.
- Clearance: Maintain at least 3–4 feet of open space on all sides to avoid collisions during movement.
- Flooring: Hard surfaces like concrete or rubber mats are best; carpet may compress over time and affect stability.
- Noise consideration: Basements or detached garages reduce sound transmission to living areas.
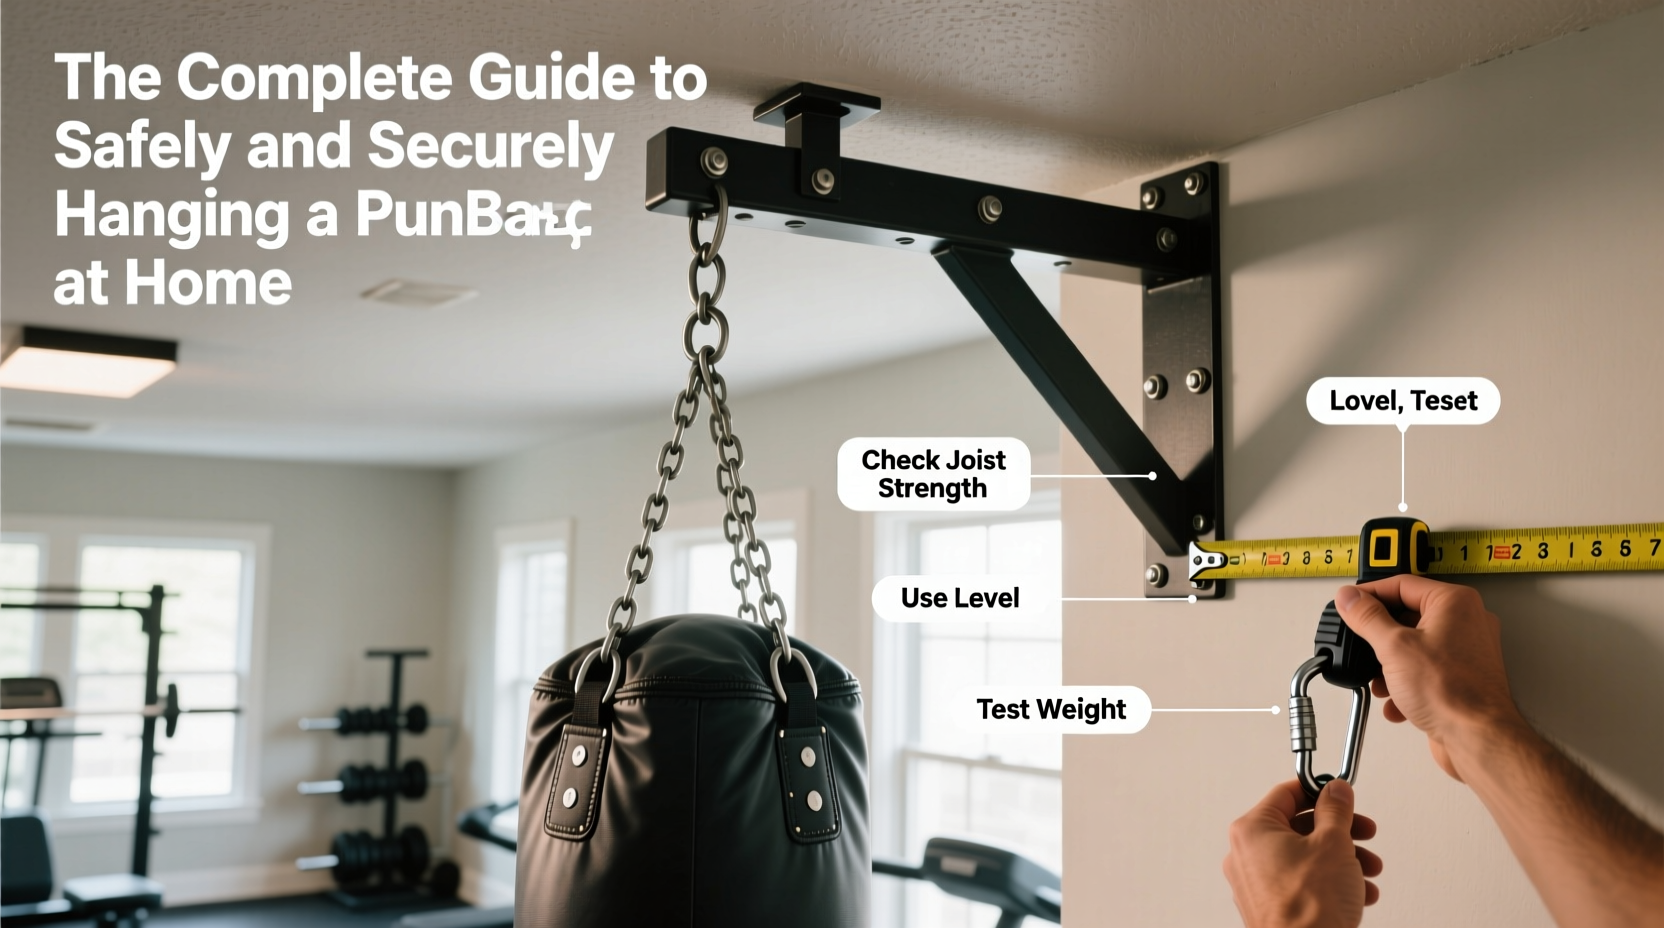
Assessing Structural Integrity
A punching bag exerts dynamic force—especially during heavy strikes. The mounting point must support not only the static weight (typically 70–100 lbs) but also repeated impact loads that can exceed several hundred pounds.
Always anchor into solid structural elements:
- Joists or beams: These are load-bearing components above ceilings. Use a stud finder to locate them before drilling.
- Avoid drywall anchors: Toggle bolts or plastic anchors are insufficient for long-term use and may fail under stress.
- Concrete ceilings: In basements or garages, use wedge anchors or sleeve anchors rated for vibration resistance.
“Never underestimate the cumulative force of repeated punches. A poorly mounted bag isn’t just ineffective—it’s dangerous.” — James Reed, Certified Strength and Conditioning Specialist (CSCS)
Choosing the Right Mounting Hardware
The hardware determines how well your setup withstands daily use. Off-the-shelf kits vary in quality; investing in commercial-grade components ensures longevity.
| Component | Recommended Spec | Avoid |
|---|---|---|
| Eye Bolt | At least 3/8” diameter, forged steel, minimum 5,000 lb tensile strength | Thin-threaded bolts or zinc-plated hardware |
| Mounting Plate | Steel plate (¼” thick) with multiple bolt points for joist attachment | Single-point mounts or flimsy brackets |
| Chain or S-Hook | Grade 70 transport chain with welded links | Bright finish chains or loose hooks |
| Swivel | Heavy-duty 360° rotating swivel (rated for 1,000+ lbs) | Plastic or low-tension swivels |
For added safety, install a secondary backup strap or safety cable between the mount and ceiling beam. This redundancy prevents catastrophic drop if one component fails.
Step-by-Step Installation Guide
Follow this sequence to install your punching bag securely and efficiently.
- Locate ceiling joists: Use a stud finder to identify two adjacent joists spaced to match your mounting plate width. Mark center points.
- Drill pilot holes: Pre-drill through the ceiling at marked locations using a bit slightly smaller than your lag bolts.
- Attach mounting plate: Align the plate over the holes and secure it with 3-inch lag bolts and washers. Tighten firmly but avoid stripping threads.
- Screw in eye bolt: Insert the eye bolt through the center hole of the plate. Wrap threads with Teflon tape to prevent creaking, then tighten fully. Add a lock nut beneath for extra security.
- Install swivel and chain: Attach the swivel to the eye bolt using an S-hook. Connect the chain to the swivel, adjusting length so the bag hangs 1–2 inches off the ground when weighted.
- Hang the bag: Hook the bag’s top ring to the chain. Ensure all connections are tight and rotate freely.
- Test stability: Apply firm downward pressure (simulate double body weight) and check for movement, bending, or noise.
Alternative Mounting Options
If overhead installation isn't feasible due to ceiling type or rental restrictions, consider these alternatives:
- Floor-to-ceiling stand: Freestanding frames offer portability and require no permanent modification. Look for models with sand-fillable bases for stability.
- Wall-mounted swing arm: Some systems extend from a wall brace, allowing retraction when not in use. Must be anchored into wall studs or masonry.
- Portable rig: Ideal for renters, these consist of adjustable poles braced between floor and ceiling with padding. Confirm weight rating exceeds your bag’s loaded weight.
Note: While convenient, portable options generally absorb more shock than fixed mounts, which may affect striking feedback and long-term durability.
Real Example: Installing in a Finished Home Gym
Mark, a software engineer in Denver, converted his attic into a compact workout space. With 9-foot ceilings and exposed wooden beams, he had strong structural potential. He used a stud finder to verify joist positions, selected a 24” steel mounting plate with dual lag bolts per side, and paired it with a 3/8” hot-dipped galvanized eye bolt. After installation, he hung a 80-lb synthetic leather bag and tested it with aggressive combinations. Over six months of daily use, the setup remained silent and stable—no loosening or sagging occurred. His attention to material specs and proper torque made the difference.
Safety and Maintenance Checklist
Use this checklist monthly to ensure continued safety and performance:
- ✅ Inspect eye bolt and swivel for signs of wear, bending, or corrosion
- ✅ Check all lag bolts for tightness; re-torque if necessary
- ✅ Examine chain links for stretching or cracking
- ✅ Confirm swivel rotates smoothly without grinding
- ✅ Clean bag surface to prevent buildup and mildew
- ✅ Listen for unusual noises during use (creaking, popping)
- ✅ Verify clearance remains unobstructed
Frequently Asked Questions
Can I hang a punching bag from a wooden beam in my garage?
Yes, provided the beam is structurally sound and you use appropriate lag bolts (minimum 3” x 3/8”) anchored directly into the wood. Avoid attaching to thin plywood or fascia boards.
Is it safe to hang a punching bag in an apartment?
It depends on construction. In older buildings with timber joists, consult a professional before drilling. Many apartment dwellers opt for freestanding rigs instead. Always check lease agreements for modifications.
How high should the punching bag hang?
The bottom should be 1–2 inches above the floor when weighted. This allows full range of motion without dragging, reducing strain on the mount and preventing premature wear on the base.
Final Recommendations
A properly installed punching bag enhances fitness, focus, and resilience. But its value hinges on safety. Never rush the installation process or cut corners on materials. Take time to assess your space, choose durable hardware, and follow best practices for anchoring. Regular inspections will catch issues early, protecting both your investment and your well-being.


 浙公网安备
33010002000092号
浙公网安备
33010002000092号 浙B2-20120091-4
Comments
No comments yet. Why don't you start the discussion?