
Many new garments, especially children’s clothing, come equipped with small plastic or metal safety buttons—often near the collar or shoulder—as a tamper-resistant feature. These are not decorative; they serve as anti-theft devices used in retail settings. While intended for store use, they sometimes remain on clothes after purchase. Removing them incorrectly can tear delicate fabric, leave sharp remnants, or ruin the garment's appearance. This guide provides detailed, safe methods to remove these buttons without causing damage, backed by textile care experts and real-world experience.
Understanding the Safety Button: Purpose and Design
Safety buttons, also known as security tags or EAS (Electronic Article Surveillance) tags, are typically made of hard plastic or metal and locked into place using a spring-loaded pin or magnetic clamp. Unlike regular buttons, they cannot be simply snipped off or pulled apart. The fastening mechanism is designed to resist casual removal, which is why improper techniques often lead to torn collars, snagged threads, or broken needles in sewing machines if left unattended.
These tags are most commonly found on infant onesies, toddler shirts, pajamas, and high-end baby apparel. They contain a small radio-frequency component that triggers alarms if passed through detection systems at store exits. Once deactivated at checkout, they still need physical removal—but doing so requires precision.
“Removing a safety button improperly is one of the top causes of preventable garment damage in children’s wear.” — Dr. Lena Torres, Textile Preservation Specialist, National Apparel Care Institute
Essential Tools for Safe Removal
Before attempting removal, gather the right tools. Using inappropriate objects like scissors, knives, or pliers increases the risk of cutting the fabric. Instead, use specialized or household items designed for controlled force and leverage.
- Needle-nose pliers – For gripping and manipulating the pin mechanism.
- Flathead screwdriver (small) – Useful for prying open certain tag types.
- Rubber gloves – Improve grip and protect fingers from sharp edges.
- Magnifying glass (optional) – Helps identify the locking mechanism in low light.
- Cutting mat or soft surface – Place the garment on a non-slip, cushioned base to avoid stretching.
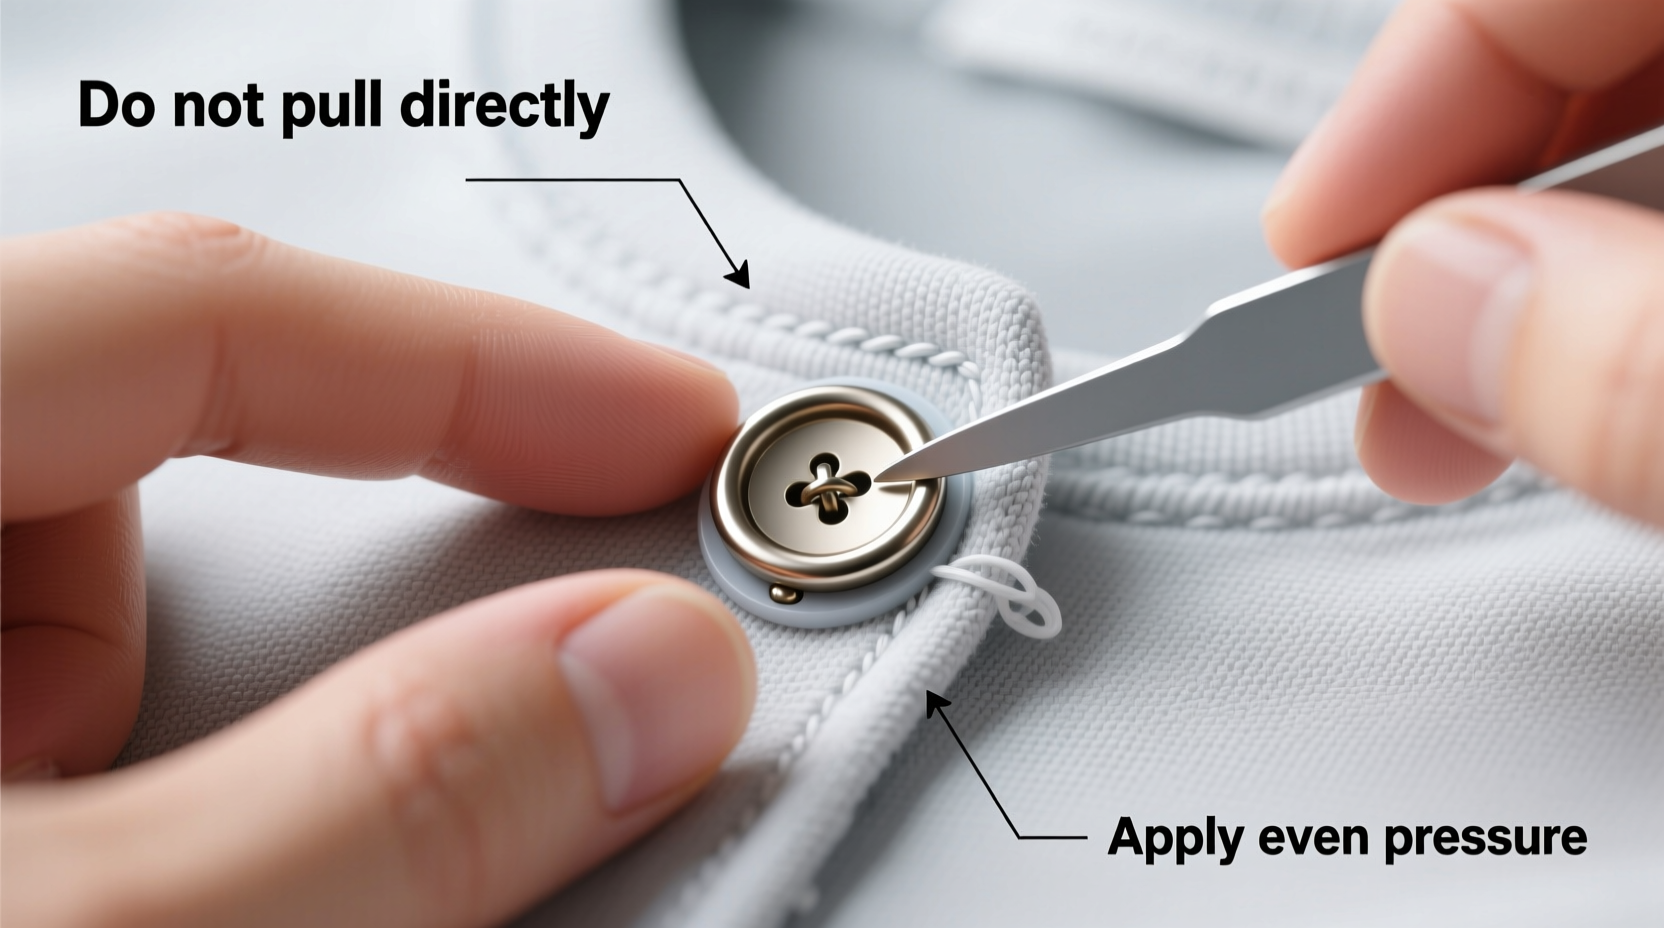
Step-by-Step Guide to Removing the Safety Button
Follow this proven sequence to remove the safety button efficiently and safely. This process works for both plastic dome-style tags and metal-clasp variants.
- Inspect the tag closely. Determine whether it has a visible pin, a twist-lock mechanism, or a spring release. Most have a central pin surrounded by a plastic housing.
- Position the garment securely. Lay it flat on a soft surface with the tag accessible and well-lit.
- Grip the outer casing with one hand. Use your thumb and forefinger or wear rubber gloves for better traction.
- Insert the flathead screwdriver beneath the pin head. Gently apply upward pressure to lift the pin just enough to expose the locking ridge.
- Use needle-nose pliers to grasp the exposed pin shaft. Pull straight out with steady, even pressure. Do not wiggle side-to-side, as this can widen the hole.
- Check the underside of the fabric. Ensure no sharp ends or fragments remain embedded in the material.
- Smooth the surrounding area. If fibers are raised, gently press them down with a clean fingertip or soft cloth.
For twist-type tags (less common), rotate the outer shell counterclockwise until it disengages. Some require a quarter-turn; others need more. Always test minimal movement first.
Do’s and Don’ts: Best Practices Summary
| Do’s | Don’ts |
|---|---|
| ✔ Use proper tools like pliers and screwdrivers | ✖ Cut around the tag with scissors |
| ✔ Work under bright lighting | ✖ Pull the tag forcefully |
| ✔ Remove the pin straight out, not at an angle | ✖ Leave the pin partially embedded |
| ✔ Inspect both sides of the fabric post-removal | ✖ Attempt removal while the garment is being worn |
| ✔ Store removed pins safely away from children | ✖ Reuse the tag on other garments |
Real-World Example: A Parent’s Experience
Sarah M., a mother of two from Portland, Oregon, purchased a premium organic cotton onesie for her newborn. After washing it, she noticed the safety button had left a faint scorch mark during drying—likely due to friction against the drum. “I tried pulling it off with my fingers,” she recalls. “It didn’t budge. Then I grabbed kitchen scissors and nicked the shoulder seam. That ruined the stretch, and the snaps wouldn’t align anymore.”
After contacting customer service, she was advised to use needle-nose pliers. Following the correct procedure, she successfully removed the remaining tags from three other outfits without further incident. “It took less than two minutes once I had the right tool,” she says. “Now I check every new item before washing.”
Frequently Asked Questions
Can I cut the safety button off instead of removing the pin?
No. Cutting risks slicing through the fabric, especially on thin knits common in baby clothes. The plastic housing may also shatter unpredictably, sending sharp fragments into the material. Always remove the pin mechanism intact.
Is there a universal tool for removing all types of safety buttons?
While no single tool fits every design, a combination of small needle-nose pliers and a precision flathead screwdriver handles over 90% of retail security tags. Specialty detachers exist but are typically used by retailers, not consumers.
What should I do if the pin breaks inside the fabric?
If the shaft snaps during removal, stop immediately. Use tweezers to carefully extract the remaining piece. If it’s deeply lodged, consider taking the garment to a tailor. Attempting to sew over it can damage needles and create lumps in the seam.
Preventative Measures and Long-Term Care
Once the safety button is removed, take a moment to assess the integrity of the surrounding fabric. On stretchy materials like interlock cotton or jersey knit, the puncture site may appear slightly stretched. In most cases, this is cosmetic and won’t affect durability. However, avoid placing heavy stress on that area during wear or washing.
To minimize future issues:
- Examine all new clothing tags before laundering.
- Keep a dedicated toolkit (pliers, screwdriver) in your laundry room or changing station.
- Teach older children not to play with or pull on these tags, as they can break loose and become choking hazards.
“Garment longevity starts with smart handling at the point of purchase. Removing security features properly preserves both function and comfort.” — Marcus Lin, Senior Product Developer, EcoBaby Wear Co.
Final Checklist: Safe Removal in Five Steps
- Identify the type of safety button and its locking mechanism.
- Gather appropriate tools: pliers, screwdriver, rubber gloves.
- Lay the garment flat on a protected surface.
- Expose and extract the central pin using steady, straight-line pressure.
- Inspect both sides of the fabric and dispose of the tag safely.
Conclusion
Removing a safety button doesn’t have to be a stressful or destructive task. With the right knowledge and tools, it becomes a quick, routine step in preparing new clothes for use. Whether you're outfitting a nursery or organizing seasonal wardrobes, mastering this skill protects delicate fabrics and ensures garments last longer. Take a few moments to inspect each new piece, handle the removal with care, and enjoy the peace of mind that comes with knowing your clothing is both safe and undamaged.


 浙公网安备
33010002000092号
浙公网安备
33010002000092号 浙B2-20120091-4
Comments
No comments yet. Why don't you start the discussion?