
Harvesting rainwater is one of the most practical steps homeowners can take toward sustainable living. A properly installed rain barrel captures runoff from rooftops, reducing stormwater runoff, lowering municipal water use, and providing free, chemical-free water for gardens and outdoor cleaning. When set up correctly, a rain barrel system can collect hundreds of gallons annually—enough to irrigate flower beds, fill birdbaths, or wash tools without drawing from treated supplies. This guide walks through every step of selecting, installing, maintaining, and optimizing a rain barrel system for long-term efficiency.
Why Collect Rainwater?
Rainwater is naturally soft and free of chlorine, fluoride, and other additives found in tap water, making it ideal for plants. In urban and suburban areas, rooftop runoff contributes significantly to stormwater overflows, which can carry pollutants into rivers and streams. By intercepting this flow, rain barrels help mitigate erosion, reduce strain on drainage systems, and lower household water bills.
A typical 1,000-square-foot roof can yield about 600 gallons of water from just one inch of rainfall. Over a single growing season, that adds up to thousands of gallons saved. As climate variability increases and droughts become more frequent, rainwater harvesting offers resilience and self-reliance.
Selecting the Right Rain Barrel
Not all rain barrels are created equal. Materials, capacity, design, and features vary widely. Choosing the right model depends on your climate, roof size, intended use, and aesthetic preferences.
| Feature | Recommended Option | Why It Matters |
|---|---|---|
| Material | UV-resistant polyethylene or recycled plastic | Resists cracking, fading, and algae growth |
| Capacity | 50–80 gallons | Balances storage with space and weight (full barrel weighs ~600 lbs) |
| Inlet Design | Mesh screen + overflow adapter | Keeps debris and insects out while allowing excess water to exit |
| Spigot Height | At least 6 inches from base | Allows room for buckets or hoses underneath |
| Connection Ports | Multiples for linking barrels | Enables expansion for greater storage |
Barrels made from repurposed food-grade drums are cost-effective but require thorough cleaning and sealing. Commercial models often include built-in filters, child-safe lids, and brass spigots that resist corrosion. Dark-colored barrels minimize sunlight penetration, discouraging algae formation.
“Rain barrels are a simple yet powerful tool in decentralized water management. They empower individuals to contribute meaningfully to watershed health.” — Dr. Lena Torres, Urban Hydrology Researcher, University of Vermont
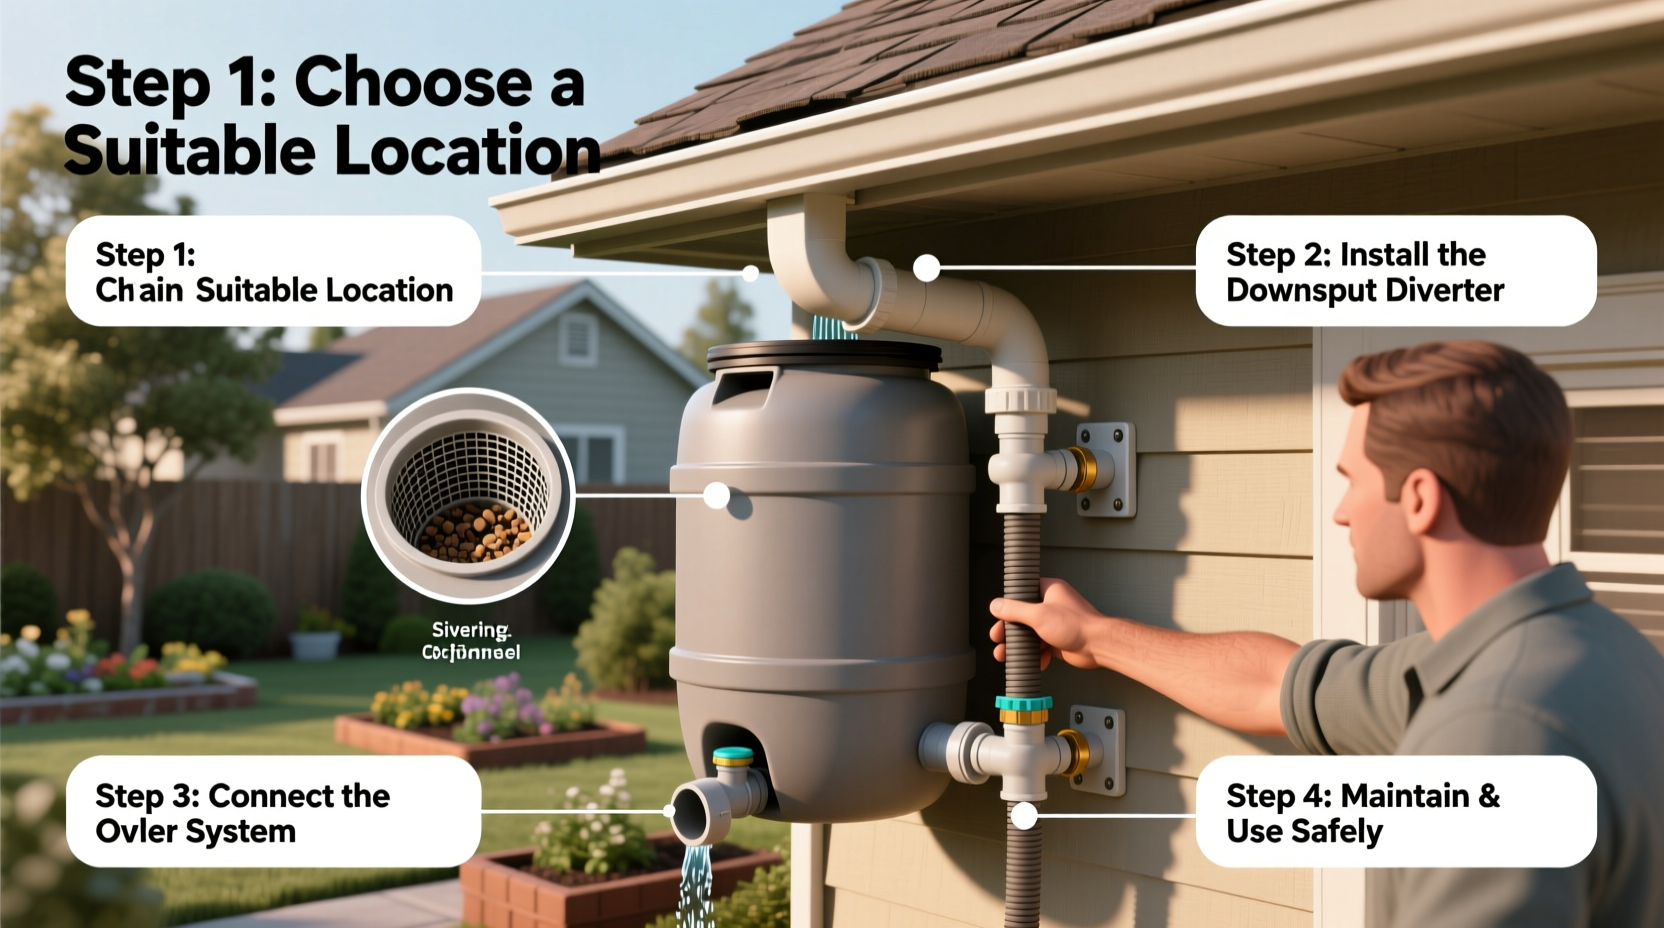
Step-by-Step Installation Guide
Setting up a rain barrel takes only a few hours with basic tools. Follow these steps for a secure, functional installation:
- Choose the location: Identify a downspout near garden access. Ensure the ground is level and stable.
- Elevate the barrel: Place it on a sturdy platform made of concrete pavers or cinder blocks. Elevation improves gravity-fed flow and access to the spigot.
- Cut the downspout: Use tin snips or a hacksaw to shorten the vertical pipe so it aligns with the barrel’s inlet.
- Install a diverter or elbow connector: Attach a downspout diverter or 90-degree bend to direct water into the barrel efficiently.
- Seal the lid: Ensure the top is tightly closed to prevent mosquito breeding and contamination.
- Connect overflow hose: Route the overflow to a safe discharge point, such as a rain garden, dry well, or adjacent barrel.
- Test the system: Wait for a light rain or pour water into the gutter to check for leaks, proper flow, and overflow direction.
Maintenance and Seasonal Care
A rain barrel requires minimal upkeep, but regular attention ensures longevity and water quality. Inspect the system monthly during the rainy season.
- Clean gutters and screens every spring and fall to prevent clogs.
- Flush the barrel annually using a mixture of white vinegar and water to remove sediment and biofilm.
- Check for cracks, leaks, or warping—especially after extreme temperatures.
- Remove standing water if freezing is expected; drain and disconnect before winter in cold climates.
- Replace worn seals or spigots promptly to avoid slow drips that attract pests.
In regions with hard freezes, store barrels upside down or indoors during winter. Leaving water inside can cause expansion and rupture. If connected to multiple barrels, disconnect and cap all ports.
Mini Case Study: The Green Family’s Backyard Upgrade
The Greens, a family of four in Portland, Oregon, installed two 60-gallon rain barrels on their south-facing downspouts in early spring. Their goal was to eliminate tap water use in their vegetable garden. After elevating the barrels on a stone platform and connecting them with a bypass hose, they collected over 1,800 gallons during the rainy season. Using a simple timer drip system, they irrigated tomatoes, kale, and herbs entirely with harvested water. By midsummer, their outdoor water bill dropped by 37%, and plant vitality improved due to the absence of chlorine. “We didn’t realize how much difference untreated water would make,” said homeowner Maria Green. “Our cucumbers grew twice as fast.”
Maximizing Efficiency and Safety
To get the most from your rain barrel, consider these optimization strategies:
- Link multiple barrels: Daisychaining increases total storage without requiring larger footprints.
- Add a first-flush diverter: This device discards the initial runoff, which carries roof contaminants like bird droppings and dust.
- Use a pump: For larger gardens or elevated beds, a small solar-powered pump enhances delivery pressure.
- Paint or disguise the barrel: Use non-toxic exterior paint or lattice covers to blend it into your landscape.
Safety is critical. Never drink rainwater unless it has been filtered and disinfected. Label the barrel clearly: “Non-potable Water – Do Not Drink.” Keep it covered and sealed to comply with local health codes and prevent mosquito breeding. In some municipalities, uncovered barrels may violate ordinances.
FAQ
Can I use rain barrel water on edible plants?
Yes, but avoid spraying it directly on fruits or leafy greens. Use drip irrigation or water at the soil level to minimize contamination risk. Always wash produce before eating.
How often should I empty the barrel?
During active growing seasons, aim to use stored water weekly to prevent stagnation. If unused for more than 10 days, flush and refill to maintain freshness.
Are rain barrels legal everywhere?
Most U.S. states encourage rainwater harvesting, but regulations vary. Colorado, for example, has specific limits on storage volume. Check with your local water authority before installing.
Final Checklist Before Launch
- Barrel is on stable, elevated platform
- Downspout is cut and fitted with diverter/elbow
- Lid is securely fastened
- Overflow hose is routed away from foundation
- Spigot operates smoothly and doesn’t leak
- Screen is in place to block leaves and insects
- System has been tested with water flow
- Barrel is labeled as non-potable
Start Harvesting Today
Setting up a rain barrel is a small investment with lasting environmental and economic returns. Whether you're nurturing a container garden or maintaining a lawn, every drop captured reduces demand on stressed water systems. With thoughtful placement, routine care, and smart usage, your rain barrel can become a cornerstone of a sustainable home. Take the next step: measure your roof, choose your barrel, and begin turning rainfall into a resource. The earth—and your water bill—will thank you.


 浙公网安备
33010002000092号
浙公网安备
33010002000092号 浙B2-20120091-4
Comments
No comments yet. Why don't you start the discussion?