
Growing ginger root at home is a rewarding experience that blends practical gardening with culinary benefit. Known for its spicy, aromatic rhizomes, ginger (Zingiber officinale) thrives in warm, humid environments but can be cultivated indoors or in temperate climates with the right approach. Whether you're an urban gardener with a windowsill or a backyard grower with partial shade, this comprehensive guide provides everything you need to grow healthy, flavorful ginger from start to harvest.
Choosing the Right Ginger Root for Planting
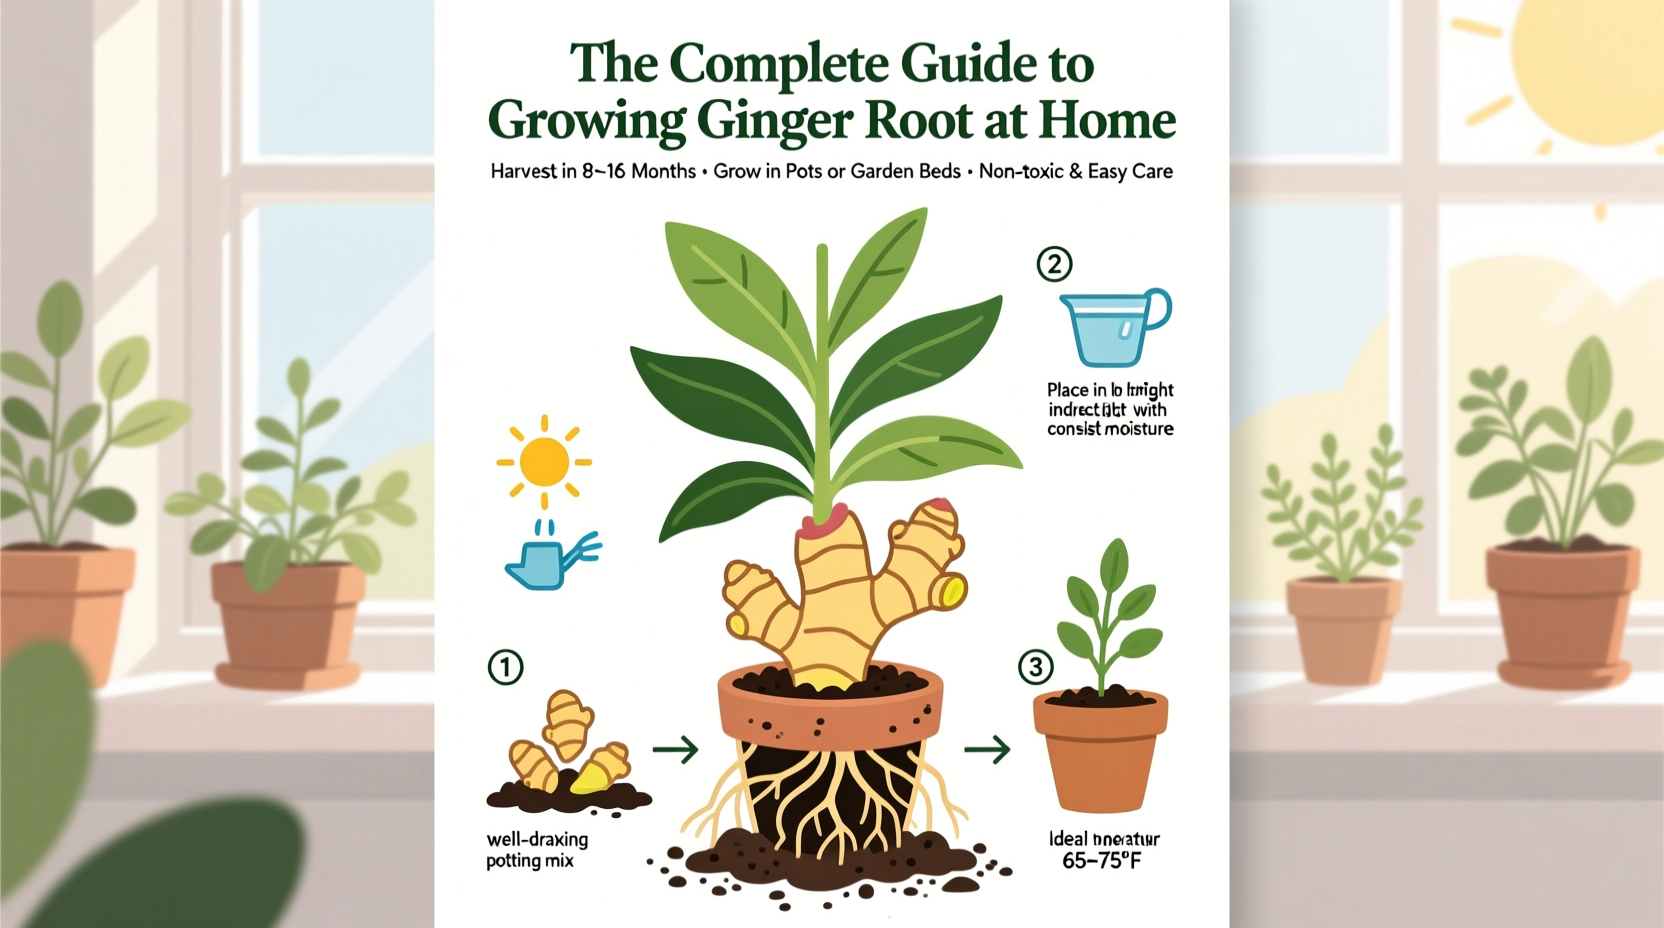
The foundation of successful ginger cultivation begins with selecting a viable planting piece. Unlike seeds, ginger is grown from live rhizomes—thick, knobby roots purchased from the grocery store or nursery. Not all store-bought ginger is suitable for propagation; some are treated with growth inhibitors to prevent sprouting.
Look for plump, firm rhizomes with multiple eye buds (small, pointed bumps where new shoots emerge). Avoid shriveled or moldy pieces. A single segment about 2–3 inches long with at least one visible bud is sufficient to start a plant.
“Fresh, organic ginger with active buds behaves like a perennial when given warmth and moisture—it doesn’t just grow, it multiplies.” — Dr. Lila Nguyen, Horticulturist & Tropical Plant Specialist
Step-by-Step Guide to Planting Ginger
Ginger grows slowly and requires patience, but the process is straightforward if followed correctly. Here’s a detailed timeline for planting and early development:
- Soak the rhizome: Submerge the ginger piece in warm water for 12–24 hours. This rehydrates dried roots and encourages bud activation.
- Prepare the container: Use a wide, shallow pot (at least 12 inches deep) with drainage holes. Fill with loose, well-draining soil rich in organic matter—compost mixed with coconut coir or peat works well.
- Plant the rhizome: Place the ginger horizontally in the soil with the buds facing up. Cover with 1–2 inches of soil. Do not bury deeply.
- Water gently: Moisten the soil thoroughly but avoid saturation. Keep consistently damp, never soggy.
- Provide warmth and indirect light: Place the pot in a warm area (75–85°F / 24–29°C) with bright, indirect sunlight. A bathroom or kitchen near a window often works well.
- Wait for sprouts: Germination takes 2–4 weeks. During this time, maintain humidity by covering the pot with plastic wrap (ventilated daily).
Essential Care Requirements for Healthy Growth
Once sprouted, ginger enters a slow-growing vegetative phase lasting several months. Proper care during this period determines yield and flavor quality.
Light and Temperature
Ginger prefers dappled sunlight or partial shade. Outdoors, plant under trees or on the east side of a structure. Indoors, use a north- or east-facing window. Temperatures below 60°F (15°C) will stunt growth; frost kills the plant.
Watering and Humidity
Keep soil evenly moist but not waterlogged. Water when the top inch feels dry. Mist foliage regularly to increase humidity, especially in dry indoor environments.
Fertilizing Schedule
Feed every 4–6 weeks with a balanced, organic liquid fertilizer (e.g., fish emulsion or compost tea). Reduce feeding in fall as growth slows.
| Care Factor | Ideal Condition | Avoid |
|---|---|---|
| Soil Type | Loamy, well-draining, high in organic matter | Heavy clay or sandy soils |
| pH Level | 6.0–6.8 | Below 5.5 or above 7.5 |
| Watering | Consistently moist, not soggy | Dry spells or standing water |
| Light | Indirect bright light or partial shade | Direct midday sun or full darkness |
Harvesting and Storing Homegrown Ginger
You can begin harvesting ginger 8–10 months after planting, though some gardeners prefer waiting 10–12 months for larger, more pungent roots. There are two methods:
- Partial harvest: Gently dig around the edge of the clump and remove a few outer rhizomes, allowing the plant to continue growing.
- Full harvest: Cut back foliage and lift the entire root mass when leaves yellow and die back. This typically happens in late fall or early winter.
After harvesting, clean the rhizomes gently with a soft brush and allow them to air-dry for 1–2 days. Store in a cool, dark place or refrigerate in a paper bag for up to three weeks. For long-term storage, freeze peeled ginger or preserve in vinegar.
Mini Case Study: Urban Ginger Success in Seattle
Marina Chen, a home gardener in Seattle, WA, began growing ginger in her apartment using a south-facing kitchen window and a self-watering planter. Despite the region’s cool climate, she maintained consistent warmth with a small heat mat and boosted humidity using a pebble tray. After nine months, she harvested over half a pound of fresh ginger from a single rhizome. “I used it in teas, stir-fries, and even made candied ginger,” she shared. “Knowing it was chemical-free and homegrown made it taste better.” Her success proves that location isn’t a barrier—with attention to microclimate, ginger thrives even in non-tropical zones.
Troubleshooting Common Growing Problems
Ginger is relatively pest-resistant but can face challenges if environmental conditions aren't ideal.
Root Rot
Caused by overwatering or poor drainage. Symptoms include mushy stems and foul-smelling soil. Prevent by using pots with drainage and watering only when needed.
Yellowing Leaves
May indicate nutrient deficiency (especially nitrogen), underwatering, or cold stress. Adjust feeding and check temperature consistency.
Pests
Rare, but spider mites or mealybugs may appear indoors. Wipe leaves with soapy water or apply neem oil weekly until resolved.
No Sprouting?
If your ginger hasn’t sprouted after six weeks, it may have been too old, stored improperly, or planted upside down. Try again with a fresher, organic piece and ensure warmth and moisture.
FAQ
Can I grow ginger from grocery store roots?
Yes, but only if they are organic and show healthy buds. Conventional ginger is often irradiated or treated to prevent sprouting, reducing success rates.
How long does it take for ginger to grow?
From planting to full harvest, expect 8–12 months. The plant grows slowly, especially in cooler climates or low-light conditions.
Can I grow ginger year-round indoors?
Absolutely. With consistent warmth (above 70°F), indirect light, and proper watering, ginger can grow continuously indoors. It may go dormant in winter but will regrow in spring if kept slightly dry and warm.
Checklist: How to Successfully Grow Ginger at Home
- ✅ Source an organic ginger rhizome with visible buds
- ✅ Soak the root for 12–24 hours before planting
- ✅ Use a wide, shallow pot with drainage and rich, loose soil
- ✅ Plant rhizome horizontally, buds facing up, 1–2 inches deep
- ✅ Keep soil moist and provide warmth (75–85°F)
- ✅ Place in bright, indirect light
- ✅ Fertilize monthly with organic liquid feed
- ✅ Wait 8–12 months before harvesting
- ✅ Save part of your harvest to replant
Conclusion
Growing ginger at home connects you directly to your food in a meaningful way. Beyond the satisfaction of nurturing a tropical plant in your own space, you gain access to fresher, more potent ginger than what’s available in stores. With minimal equipment and consistent care, anyone can cultivate this versatile root—whether on a sunny windowsill or in a shaded garden bed. Start small, learn from each growth cycle, and soon you’ll enjoy a continuous supply of homegrown ginger for cooking, wellness, and sharing.


 浙公网安备
33010002000092号
浙公网安备
33010002000092号 浙B2-20120091-4
Comments
No comments yet. Why don't you start the discussion?