
Rosemary is more than just a fragrant herb for seasoning roasted potatoes or grilled meats—it’s a resilient, aromatic perennial that thrives with minimal care once established. Propagating rosemary at home allows gardeners to expand their herb collection without relying on store-bought plants, which may carry pests or struggle to adapt. Unlike many herbs grown from seed, rosemary has low germination rates and slow early growth. The most effective method? Propagation from cuttings. This guide walks you through every step—from selecting the right stem to transplanting your rooted cutting—with practical advice, expert insights, and real-world techniques that ensure success.
Why Propagate Rosemary from Cuttings?
While rosemary can be grown from seed, it's often impractical for home gardeners. Seeds have a germination rate of only 30–40%, and seedlings grow slowly, taking months to reach usable size. In contrast, stem cuttings taken from a mature, healthy plant are genetically identical clones, ensuring the same flavor, aroma, and growth habits as the parent. Rooting cuttings also shortens the timeline to harvest by several weeks.
Cuttings root reliably in water or soil under the right conditions. This method is cost-effective, sustainable, and deeply satisfying—watching roots emerge from a simple snip of green stem feels like a quiet miracle of nature.
Step-by-Step Guide to Propagating Rosemary
Follow this detailed sequence to propagate rosemary with confidence. With patience and attention to detail, you’ll develop multiple new plants from a single healthy parent.
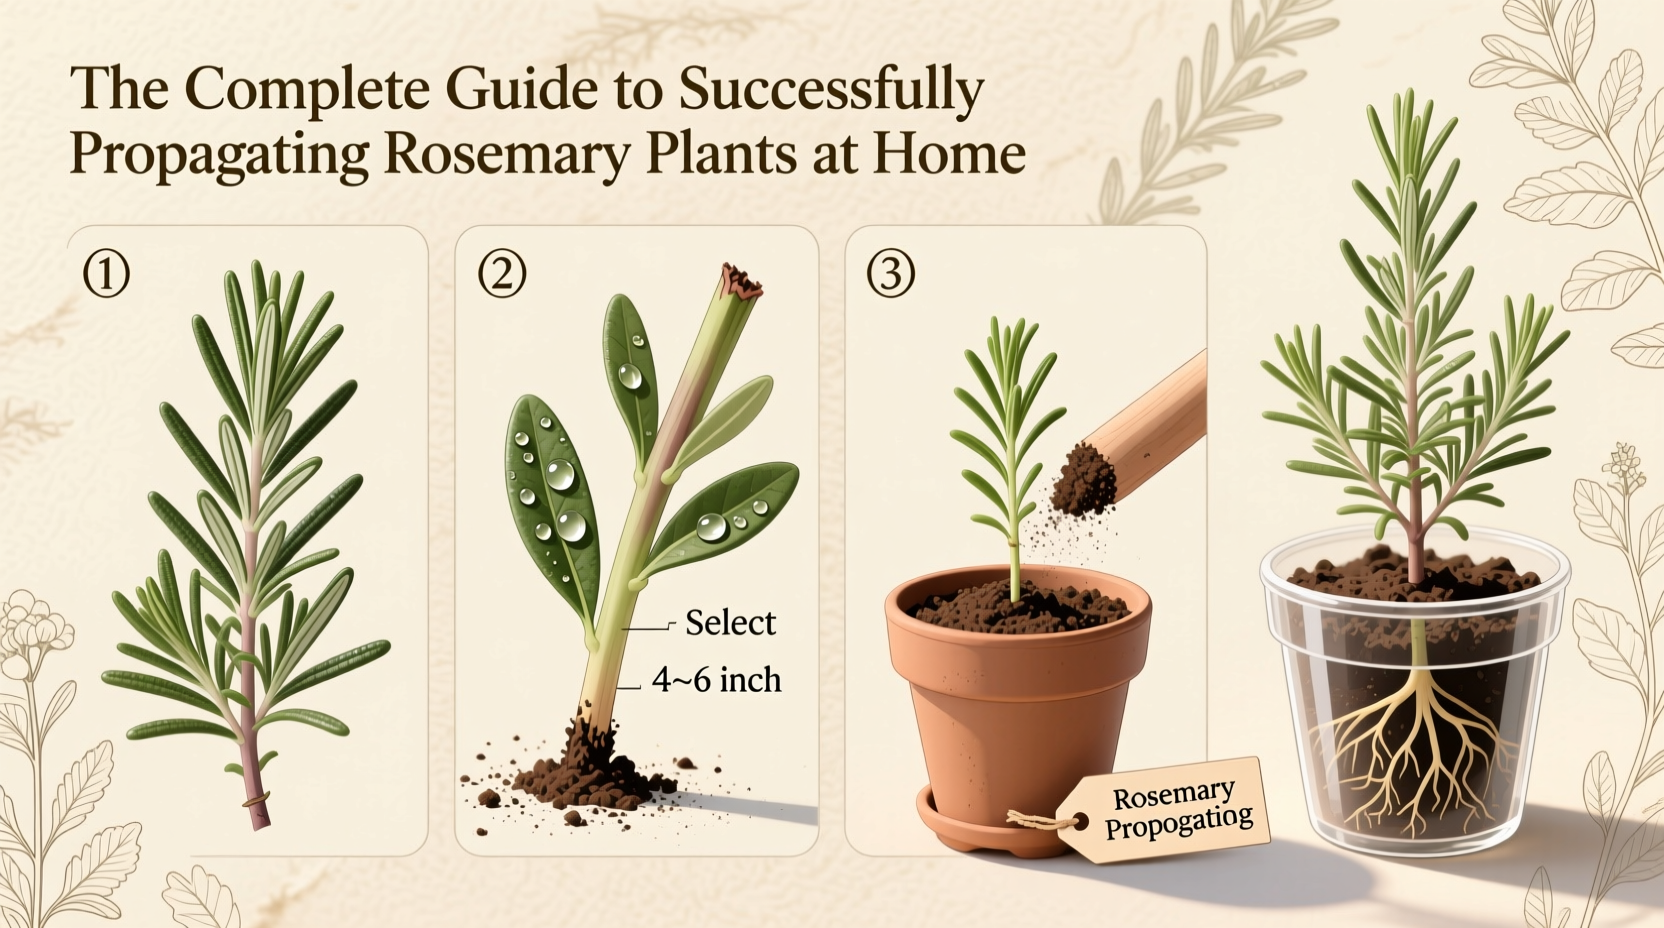
- Select a Healthy Parent Plant: Choose a rosemary bush that is free from pests, disease, and stress. Look for vibrant green stems with no yellowing or wilting.
- Choose the Right Stem: Pick non-flowering shoots that are semi-hardwood—neither too soft nor fully woody. Ideal cuttings are 4–6 inches long with several sets of leaves.
- Make a Clean Cut: Using sterilized pruning shears or scissors, cut just below a leaf node (the bump where leaves emerge). A clean cut reduces infection risk and encourages root development.
- Remove Lower Leaves: Strip off the leaves from the bottom half of the cutting. Exposed nodes are where roots will form.
- Optional: Apply Rooting Hormone: While not required, dipping the cut end in rooting hormone powder or gel can speed up root formation and improve success rates.
- Plant or Place in Water:
- Soil Method: Insert the cutting into a small pot filled with well-draining mix (perlite and peat or cactus soil). Gently firm the soil around the base.
- Water Method: Place the cutting in a glass of clean water, ensuring no leaves are submerged. Change the water every 2–3 days.
- Provide Optimal Conditions: Place the cutting in bright, indirect light. Avoid direct sun, which can overheat and dry out young tissue. Keep soil lightly moist (not soggy) or water clean and oxygenated.
- Wait Patiently: Roots typically appear in 2–6 weeks. Soil-rooted cuttings may take longer but tend to transition better to outdoor conditions.
- Pot Up When Ready: Once roots are 1–2 inches long, transfer the cutting to a larger container with quality potting mix or directly into the garden if climate permits.
Soil vs. Water Propagation: What Works Best?
Gardeners often debate whether water or soil is superior for rooting rosemary. Each method has pros and cons depending on environment and experience level.
| Method | Advantages | Disadvantages | Best For |
|---|---|---|---|
| Water | Roots visible; easy monitoring; no soil mess | Roots may be weaker; transplant shock common; algae buildup possible | Beginners, indoor propagation, visual learners |
| Soil | Stronger root system; less transplant stress; natural environment | Harder to monitor progress; overwatering risk | Experienced growers, outdoor planting goals |
“Rosemary cuttings rooted directly in soil often establish faster in the garden because they adapt immediately to a terrestrial environment.” — Dr. Lena Torres, Horticulturist & Sustainable Gardening Researcher
Common Mistakes and How to Avoid Them
Even experienced gardeners encounter setbacks when propagating rosemary. These pitfalls are avoidable with awareness and proper technique.
- Using old or woody stems: These lack the vitality needed for rapid root initiation. Stick to fresh, green-growth tips.
- Overwatering: Soggy soil leads to rot. Always use pots with drainage holes and a gritty mix.
- Placing in direct sunlight: Intense light dries out cuttings before roots form. Bright, filtered light is ideal.
- Waiting too long to transplant: Once roots exceed 2 inches, delay increases stress. Move promptly to prevent overcrowding.
- Skipping sanitation: Dirty tools or containers introduce pathogens. Sterilize shears with rubbing alcohol before use.
Real Example: From Kitchen Snip to Thriving Garden Plant
Sarah, a home gardener in Portland, Oregon, decided to try propagating rosemary after using a sprig from her grocery-store bouquet in a stew. Instead of discarding the remaining stem, she placed it in a small jar of water on her sunny kitchen windowsill. Within three weeks, fine white roots emerged. She transplanted it into a terracotta pot with cactus mix, keeping it indoors during winter. By the following spring, the plant had doubled in size and survived its first outdoor season with no issues. Today, she regularly takes cuttings from her original plant to gift to friends—proof that even accidental propagation attempts can lead to lasting results.
Essential Care After Rooting
Once your rosemary cutting has developed a solid root system, ongoing care ensures strong development. Transition gradually to full sun over 7–10 days to avoid leaf scorch. Use a pot with excellent drainage and a lean, sandy soil mix—rosemary hates wet feet.
Water only when the top inch of soil feels dry. Over time, feed sparingly with a balanced liquid fertilizer diluted to half strength, no more than once every six weeks during growing season. Prune lightly to encourage bushiness and prevent legginess.
Propagation Checklist
Use this checklist to stay organized and increase your chances of success:
- ☐ Select a healthy, pest-free parent plant
- ☐ Use sterilized pruning shears
- ☐ Cut 4–6 inch semi-hardwood stems below a leaf node
- ☐ Remove lower leaves completely
- ☐ Dip in rooting hormone (optional)
- ☐ Place in water or well-draining soil
- ☐ Position in bright, indirect light
- ☐ Maintain consistent moisture (not wetness)
- ☐ Wait 3–6 weeks for root development
- ☐ Transplant into permanent pot or garden bed
Frequently Asked Questions
Can I propagate rosemary in winter?
Yes, but success rates drop due to slower growth and reduced light. If propagating indoors, supplement with a grow light and maintain temperatures above 60°F (15°C).
How long does it take for rosemary cuttings to root?
Most cuttings show roots in 3–5 weeks, though cooler temperatures or suboptimal conditions may extend this to 6–8 weeks. Patience is key—avoid disturbing the cutting to check.
Why did my rosemary cutting turn brown?
Browning usually indicates rot from overwatering, poor air circulation, or bacterial infection. Ensure containers drain well, change water frequently if using the water method, and avoid crowding cuttings.
Final Thoughts and Call to Action
Propagating rosemary at home is a rewarding skill that connects you more deeply with your garden and kitchen. Whether you're expanding your herb collection, sharing plants with neighbors, or simply enjoying the quiet process of nurturing life from a simple stem, the practice fosters mindfulness and self-reliance. With the right techniques and a little consistency, anyone can succeed—even beginners.


 浙公网安备
33010002000092号
浙公网安备
33010002000092号 浙B2-20120091-4
Comments
No comments yet. Why don't you start the discussion?